Special Occasion Recipes: Celebrate with Delicious Indian Vegetarian Dishes
In Indian culture, food is an integral part of every celebration, festival, and special occasion. Whether it’s a grand wedding, a religious festival, or a simple family get-together, the menu is always elaborate, reflecting the richness of the Indian culinary heritage. Special occasions call for special dishes, and when it comes to Indian cuisine, the options are endless. From mouth-watering appetizers to sumptuous main courses and decadent desserts, Indian vegetarian recipes can make any celebration truly unforgettable.
The Importance of Food in Indian Celebrations
Food plays a central role in Indian celebrations, symbolizing prosperity, happiness, and togetherness. Each dish is thoughtfully prepared, using ingredients that are in harmony with the occasion’s significance. Traditional recipes passed down through generations often take center stage, with a focus on flavors, textures, and presentation.
Indian vegetarian cuisine, in particular, offers a wide range of options that cater to various dietary preferences and religious practices. These recipes are not only delicious but are also steeped in cultural and regional significance, making them ideal for special occasions.
Must-Try Indian Vegetarian Recipes for Special Occasions
Paneer Lababdar
Paneer Lababdar is a rich and creamy dish made with paneer (Indian cottage cheese) cooked in a tomato-based gravy. The addition of cream and butter gives it a luxurious texture, making it perfect for a festive meal. Serve it with naan or pulao for a complete experience.
Dum Aloo
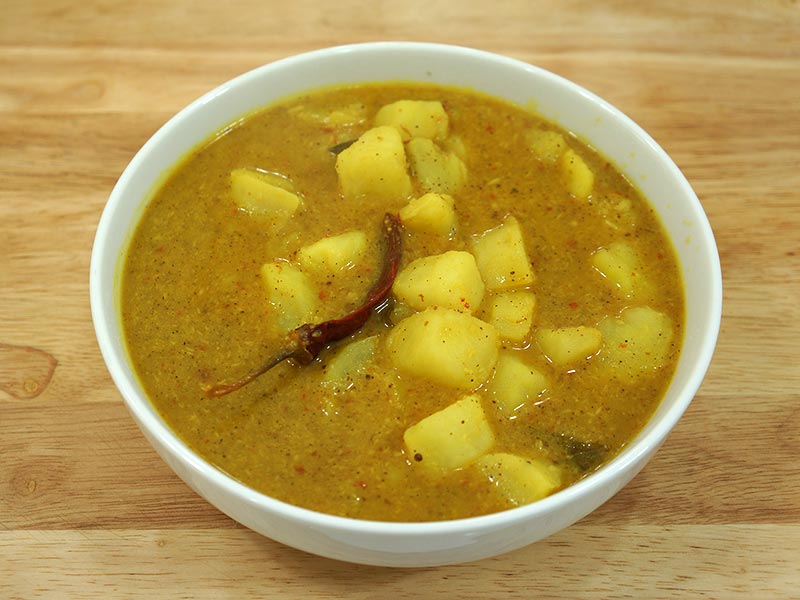
Dum Aloo is a popular dish from North India, where baby potatoes are cooked slowly in a spicy yogurt-based gravy. The slow cooking process, known as “dum,” ensures that the flavors are deeply infused into the potatoes, making it a favorite for special occasions.
Malai Kofta
Malai Kofta is a classic dish that features soft, melt-in-the-mouth koftas (dumplings) made from paneer, potatoes, and nuts, simmered in a creamy tomato gravy. It’s a dish that’s sure to impress your guests and is often served at weddings and celebrations.
Pulao with Nuts and Raisins
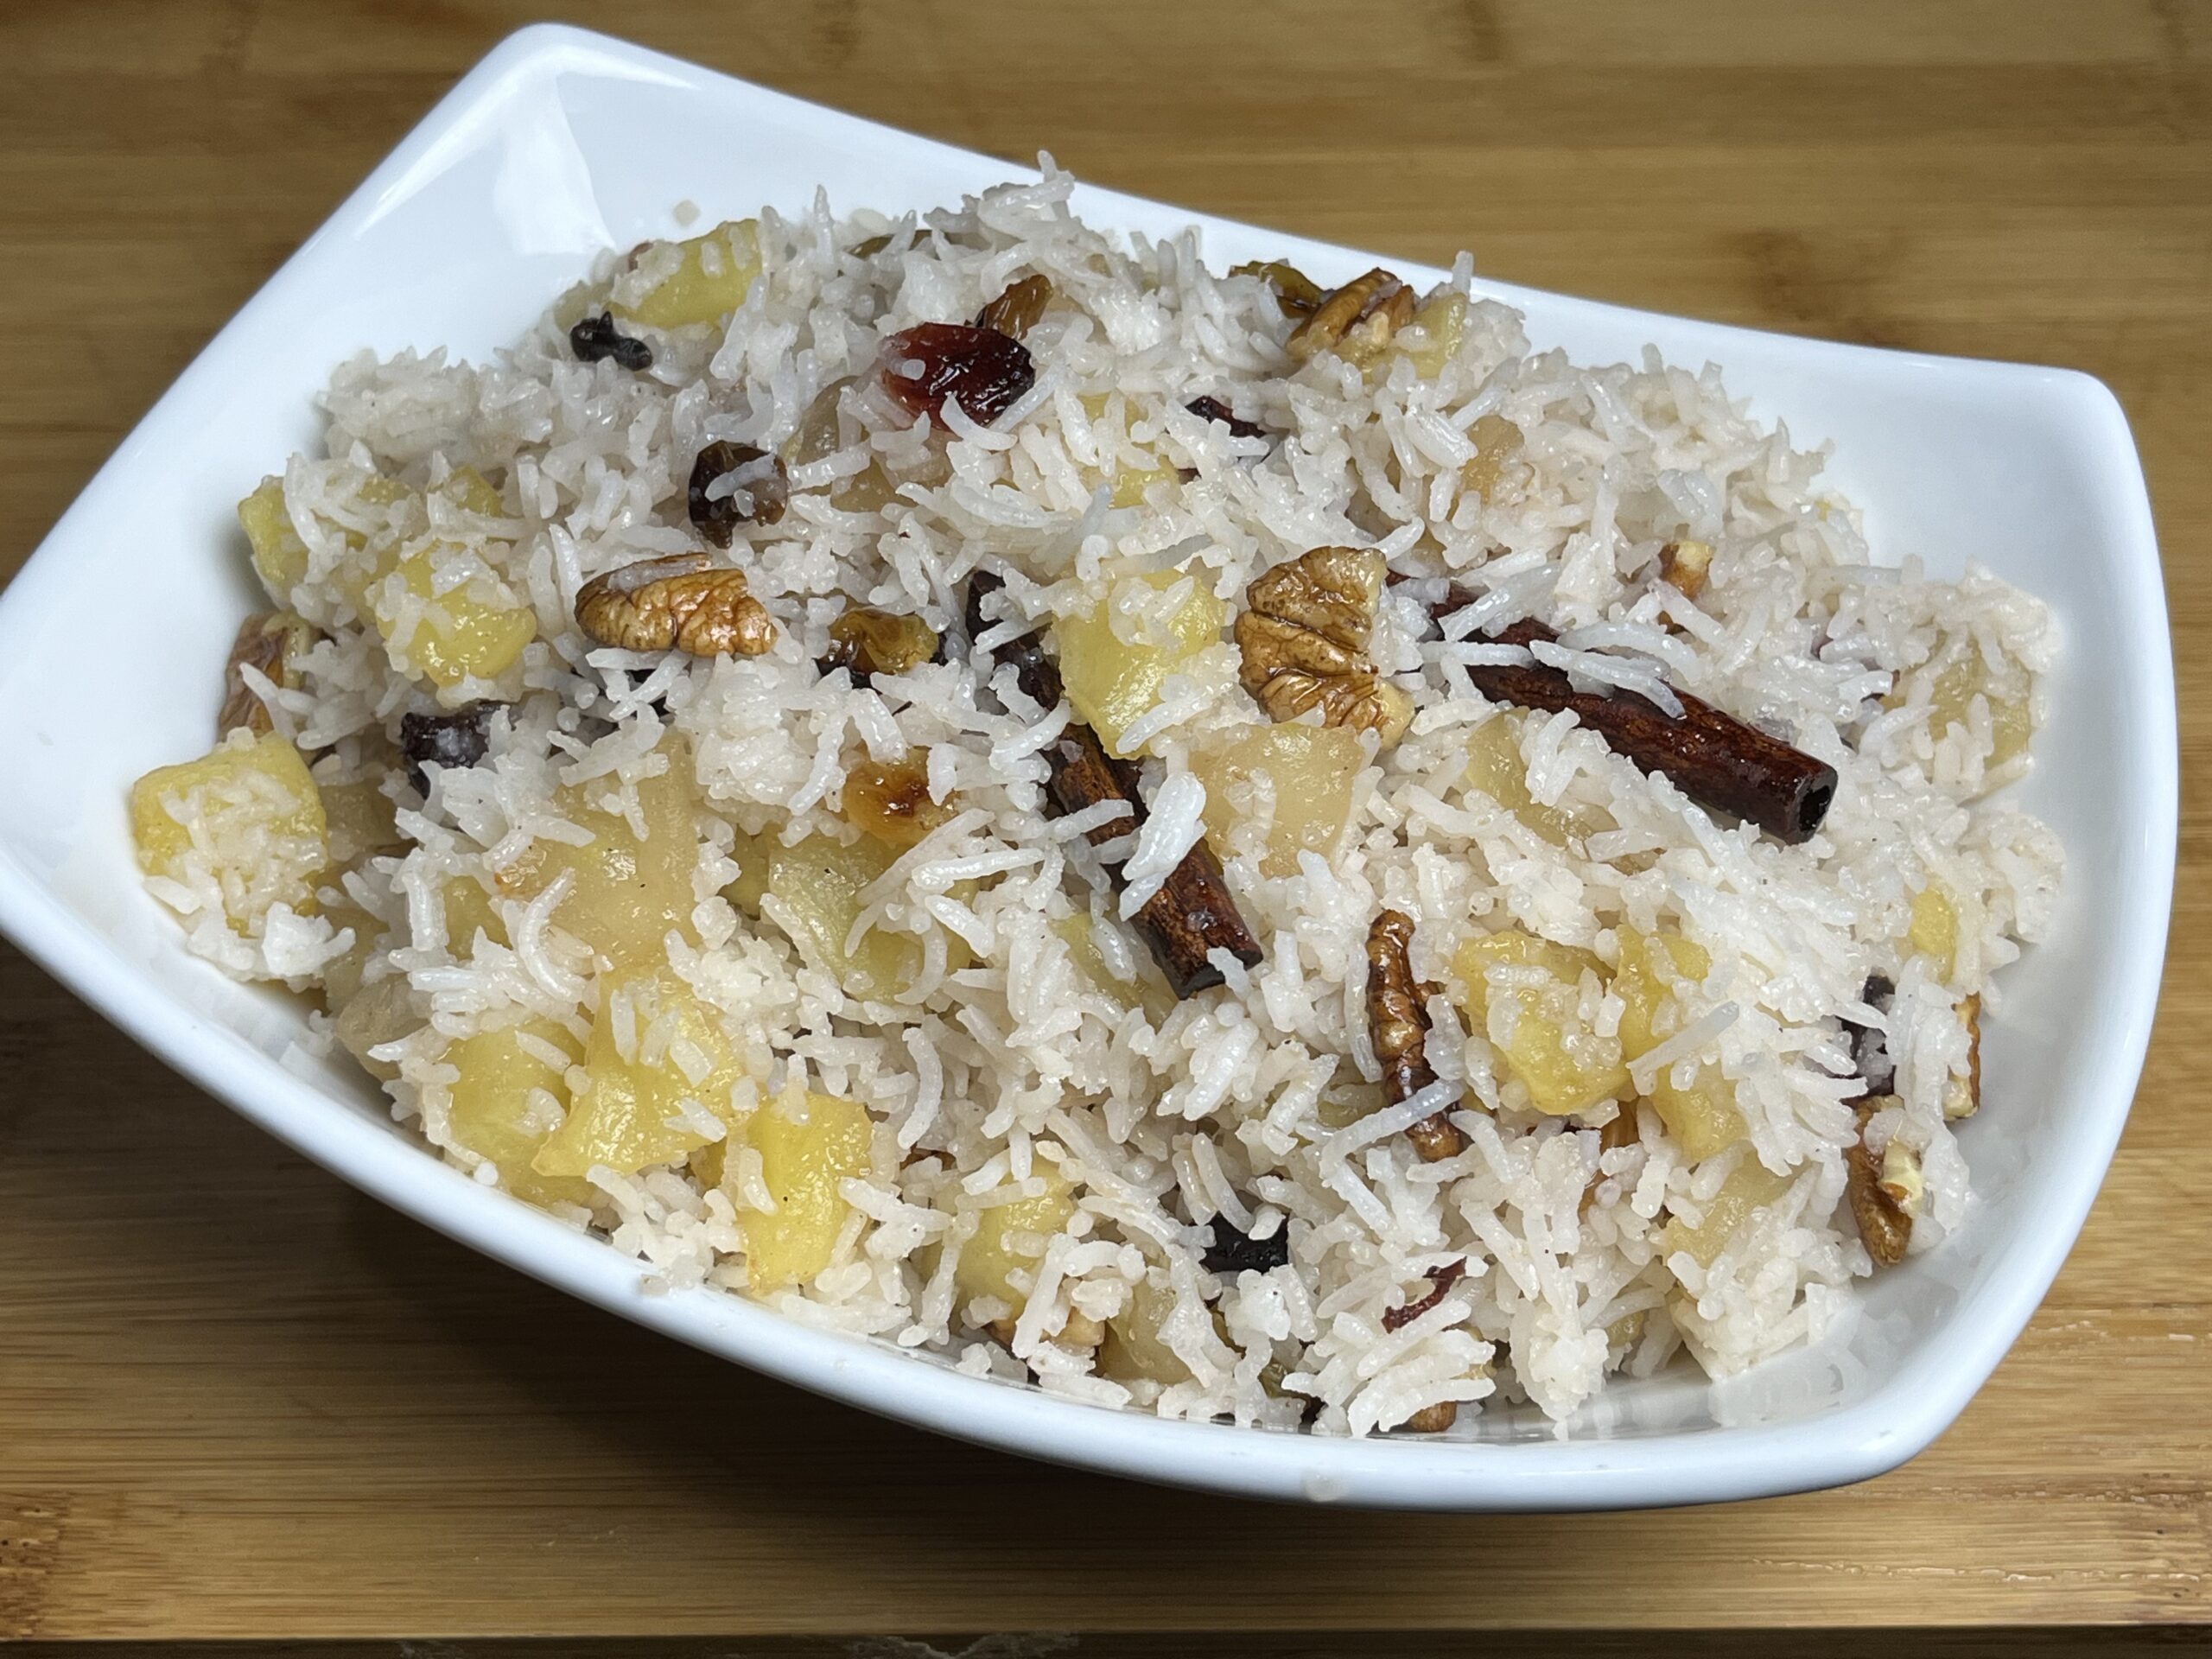
A fragrant and flavorful rice dish, pulao is often prepared with a variety of spices, nuts, and raisins. This dish is a staple at Indian weddings and festivals, offering a delightful combination of sweet and savory flavors.
Gajar Ka Halwa
No Indian celebration is complete without dessert, and Gajar Ka Halwa (carrot pudding) is a must-have. Made with grated carrots, milk, sugar, and ghee, this dessert is garnished with nuts and is often served during Diwali and other festive occasions.
Puran Poli
Puran Poli is a traditional Maharashtrian sweet flatbread stuffed with a filling made from chana dal (split chickpeas) and jaggery. This delicacy is commonly prepared during festivals like Holi and Ganesh Chaturthi and is enjoyed by people of all ages.
Kofta Biryani
Biryani is synonymous with celebration, and Kofta Biryani adds a vegetarian twist to this classic dish. Made with spiced koftas, basmati rice, and aromatic spices, this dish is layered and slow-cooked to perfection, making it ideal for festive gatherings.
Dahi Bhalla
Dahi Bhalla is a popular North Indian snack made from deep-fried lentil balls soaked in yogurt and topped with chutneys and spices. This dish is a favorite during festivals like Holi and Diwali and is loved for its tangy and sweet flavors.
Shahi Paneer
Shahi Paneer is a royal dish that lives up to its name. “Shahi” means royal, and this dish is made with paneer cooked in a rich and creamy gravy of cashews, almonds, and cream. It’s a dish that is often reserved for the most special occasions.
Kheer
Kheer, a rice pudding, is one of the most beloved Indian desserts, often prepared for festivals and celebrations. Made with rice, milk, sugar, and flavored with cardamom and saffron, kheer is garnished with nuts and dried fruits, making it a fitting end to a celebratory meal.
Tips for Planning a Special Occasion Menu
Balance the Menu: Ensure that your menu has a good mix of appetizers, main courses, and desserts. Include a variety of flavors and textures to keep your guests engaged.
Consider Dietary Preferences: Indian cuisine offers a range of vegetarian options, but it’s also important to consider other dietary needs, such as vegan or gluten-free preferences.
Plan Ahead: Special occasion meals often require elaborate preparation. Plan your menu in advance and do as much prep work as possible the day before the event.
Presentation Matters: The way you present your food can enhance the dining experience. Use garnishes, elegant serving dishes, and thoughtful plating to make your dishes visually appealing.
Conclusion
Indian vegetarian cuisine offers a rich tapestry of flavors and dishes that are perfect for any special occasion. Whether you’re celebrating a wedding, a festival, or just gathering with loved ones, these recipes will add a touch of festivity and joy to your table. From creamy paneer dishes to decadent desserts, each dish is crafted to make your celebration memorable.
For more special occasion recipes, visitManjula’s Kitchen – Special Occasion Recipes. Explore a world of flavors and find the perfect dishes to make your celebration truly special.
Mango pineapple cobbler is a wonderful choice for a sweet and homemade dessert. The combination of mango and pineapple brings a tropical twist to the classic cobbler, creating a flavorful and refreshing snack.
The recipe is very simple. We need a baking dish; I am using an 8-inch x 6-inch Pyrex dish.
In a baking dish, combine the mangoes, crushed pineapple, sugar, lemon juice, and cornstarch. Mix well.
Sprinkle the cake mix evenly over the fruits.
Spread the sliced butter evenly over the cake mix.
Bake until the topping is lightly brown and looks crispy, and the filling is bubbly for about 35-40 minutes.
For the best taste, serve warm. If desired, serve with a scoop of ice cream, or whipping cream.
To Make Ahead: Mango pineapple cobbler is best served immediately, but it can be kept covered in the fridge for up to 5-6 days. Before serving, heat the cobbler in the microwave.
Notes
If you like the recipe share my video recipe with your friends. Enjoy!
Mango pineapple cobbler presents itself as a delightful choice for those seeking a homemade dessert infused with tropical flavors.
The marriage of mango and pineapple in this classic cobbler recipe introduces a refreshing twist, offering a burst of flavor that tantalizes the taste buds.
Perfect for moments when the craving for something sweet beckons as this dessert embodies simplicity, deliciousness, and a touch of indulgence.
Crafting this sweet and tender cake requires just a handful of ingredients, making it an accessible option for any home cook.
With a yield serving of 4, you can share the joy of this delightful treat with loved ones or savor it all for yourself.
Other Variatiants of Cakes:
Eggless Pineapple Cake: Eggless Pineapple Cake is an easy and delicious eggless cake recipe and this can be served any time of the day, and for any occasion.
Milk Cake: Milk Cake is a delicious, mouthwatering dessert. This is a unique “cake” made with just a few ingredients, primarily milk and sugar and has a touch of sourness to it.
Eggless Chocolate Cake: Chocolate lovers can indulge in the rich and decadent flavors of Chocolate Eggless Cake. Add cocoa powder to the cake batter and chocolate shavings to the whipped cream for a delightful chocolate twist on this classic dessert.
Mango Cheese Cake: Fresh ripe mangoes are used to make this light and refreshing cheesecake. It makes for an amazing presentation and tastes just as exotic as it looks. The egg-less recipe is delightfully delicious and can be enjoyed by just about everyone.
FAQs: Frequently Asked Questions
What is Mango Pineapple Cobbler?
Mango Pineapple Cobbler is a delicious dessert featuring a juicy filling of mangoes and pineapples topped with a buttery biscuit or cake-like topping. It’s a perfect way to enjoy the sweet and tropical flavors of these fruits.
How can I tell if my mangoes are ripe?
A ripe mango will have a slight give when pressed gently near the stem. The skin color can vary depending on the variety, but it should not be completely green. You should also be able to smell a sweet mango fragrance.
Q: Can I use fresh mangoes instead of frozen?
A: Yes, fresh mangoes can be used in this recipe. Simply peel and cube the mangoes before proceeding with the recipe.
Q: Can I use canned mangoes instead of frozen?
A: While fresh or frozen mangoes are preferred for optimal flavor, canned mangoes can be used as a substitute if fresh or frozen mangoes are not available. Just be sure to drain any excess liquid before using.
Q: Can I use a different type of cake mix?
A: Yes, you can experiment with different flavors of cake mix to customize the cobbler to your taste preferences. For example, you could try using a lemon cake mix for a tangy twist or a coconut cake mix for added tropical flavor.
Chola Chaat, a popular street food, makes for a spicy and tasty afternoon snack. It can be served in various ways. This time, I decided to serve Chola Chaat with toasted bread and crisp potato wedges, adding an unexpected flavor to the chaat. I enjoy serving snacks and desserts to leave a good impression on my friends and family, relishing the opportunity to add little twists to my dishes. While these touches work well with small get-togethers, they also convey the impression that I have put in extra effort. This is an easy recipe, providing you with the chance to try your ideas and creativity. Additionally, the recipe is vegan and gluten-free.
Chola Chaat, a beloved street food, is a spicy and flavorful chickpea snack enjoyed by many. This healthy chaat recipe is not only delicious but also vegan and gluten-free, making it suitable for a wide range of dietary preferences. With its combination of aromatic spices, tangy tamarind chutney, and crisp potato wedges, Chola Chaat is sure to tantalize your taste buds and leave you craving for more.
Exploring the Spicy Chickpea Snack: Chola Chaat Recipe
Chola Chaat, a cherished street food delicacy, entices taste buds with its spicy and vibrant flavors. This delightful snack, enjoyed by many, combines the wholesomeness of chickpeas with an array of aromatic spices, tangy tamarind chutney, and crisp potato wedges.
Chola Chaat is a treat for the senses, it’s also a healthy option, being both vegan and gluten-free. In this recipe, we’ll delve into the process of crafting this beloved snack at home, exploring its benefits, variations, and answering common questions.
Benefits of Chola Chaat:
High in Protein:
Chickpeas or Punjabi Chole the star ingredient of Chola Chaat, are renowned for their high protein content. This plant-based protein is essential for muscle repair, growth, and overall health, making Chola Chaat not just delicious but also nutritious.
Rich in Fiber
Chickpeas are also abundant in dietary fiber, aiding digestion, promoting satiety, and fostering a healthy gut microbiome. The inclusion of fiber-rich ingredients enhances the nutritional value of Chola Chaat, making it a wholesome snack option.
Vegan and Gluten-Free
With its plant-based ingredients and absence of gluten-containing components, Chola Chaat caters to individuals with diverse dietary preferences and restrictions. Whether you follow a vegan lifestyle or adhere to a gluten-free diet, this recipe offers a flavorful and satisfying snack solution.
Loaded with Vitamins and Minerals
The spices utilized in Chola Chaat, including ginger, green chili, and lemon juice, contribute essential vitamins and minerals that bolster immune function and overall well-being. By incorporating these flavorful seasonings, Chola Chaat not only tantalizes the taste buds but also nourishes the body. Its a great alternative to Crispy Aloo Tikki (Potato Patty).
Low in Calories
Despite its rich flavor profile, Chola Chaat remains relatively low in calories, making it an ideal guilt-free indulgence. Whether enjoyed as a midday snack or an evening treat, Chola Chaat satisfies cravings without compromising on nutritional value.
Variations to Enhance Chola Chaat
Chaat Masala: For an authentic touch, sprinkle chaat masala over the Chola Chaat, imparting an additional burst of flavor and elevating its culinary appeal. This simple addition enhances the authenticity of the dish, delighting the palate with its complex blend of spices.
Healthy Chaat Recipe
Transform Chola Chaat into an even healthier option by incorporating additional vegetables such as bell peppers, or shredded carrots. These nutrient-rich additions not only enhance the visual appeal of the dish but also contribute to its overall nutritional value.
Chickpea Chaat with Yogurt
For a creamy twist, serve the spicy chickpea snack with a dollop of yogurt or vegan yogurt. The creamy texture of the yogurt complements the bold flavors of the chaat, offering a delightful contrast and adding a touch of tanginess to each bite.
Frequently Asked Questions (FAQs) About Chola Chaat
Q: Can I use canned chickpeas instead of dried ones?
A: Yes, canned chickpeas can be substituted for dried ones, offering a quicker and more convenient preparation method. Simply rinse and drain the canned chickpeas before incorporating them into the recipe to ensure optimal flavor and texture.
Q: Can I adjust the spice level of the chaat to my preference?
A: Absolutely! Feel free to customize the spice level of the chaat according to your taste preferences. Adjust the amount of green chili or omit it altogether for a milder flavor. Similarly, you can increase or decrease the quantity of black pepper and other spices to suit your palate.
Q: Can I make the tamarind chutney at home?
A: Yes, homemade tamarind chutney can be prepared using tamarind pulp, sugar, salt, and spices such as cumin powder and chili powder. Numerous recipes are available online for crafting homemade tamarind chutney, allowing you to tailor the flavour profile to your liking.
Chola Chaat stands as a testament to the vibrant flavors and culinary creativity of street food culture such as Chaat Bites. By recreating this beloved snack at home, you can enjoy its spicy chickpeas, tangy tamarind chutney, and crispy potato wedges with friends and family.
How did I come up with this unique Banana Rice Bowl combination? At lunchtime, I craved something spicy yet easy. I decided to make banana chat, but it didn't seem filling enough. I remembered I had some cooked rice in the fridge. While taking it out, I noticed moong sprouts, and grilled tofu so I decided to add those as well. However, it looked very bland. I decided to add cucumber and tomatoes. Now it looked colorful, tempting, and healthy. To my surprise, the combination turned out delicious. It was a delightful and tasty meal.My son, who is a picky eater, tried and enjoyed it, also added crushed pecans to give a crunch and suggested that this should be your new recipe.Banana Rice Bowl is also gluten free and vegan.This recipe also gives you the choice to add or take out some ingredients, some suggestions replace tofu with paneer or bell pepper, apple.
Craving a satisfying yet easy meal that packs a punch of flavor? Look no further than this unique banana rice recipe! Inspired by a desire for something spicy and filling, this Banana with Rice Bowl combines the sweetness of bananas with the savory goodness of rice and a variety of vegetables and spices. Whether you’re vegan, gluten-free, or simply looking for a delicious and nutritious dish, this banana rice recipe is sure to become a favorite in your kitchen.
Assembling the Ingredients
To begin preparing the Banana Rice Bowl, gather all the necessary ingredients listed in the banana rice recipe. You’ll need bananas, cooked rice, moong dal sprouts, cucumber, tomatoes, grilled tofu, salt, roasted cumin seed powder, sugar, cilantro, green chilies, lemon juice, and pecans. Having everything ready and prepped will make the cooking process smooth and efficient.
Creating the Flavorful Layers
In a wide serving bowl, start assembling the Banana Rice Bowl by adding each ingredient one at a time. Begin with a generous layer of cooked rice as the base, followed by slices of ripe banana for a touch of sweetness. Next, add the grilled tofu, moong dal sprouts, chopped cucumber, and tomatoes. This layering technique ensures that every bite is bursting with a variety of textures and flavors, from creamy to crunchy.
Seasoning for Depth of Flavor
Once all the ingredients are layered in the bowl, it’s time to season them with a combination of spices and herbs. Sprinkle salt, roasted cumin seed powder, and sugar over the top of the bowl to enhance the flavors and balance the sweetness of the bananas. Add finely chopped cilantro and green chilies for a pop of freshness and a hint of heat. Drizzle freshly squeezed lemon juice over the top to brighten up the dish with a tangy citrus flavor.
Adding a Crunchy Finishing Touch
To elevate the texture of the Banana with Rice Bowl, top it off with broken pecans. The pecans not only add a satisfying crunch but also contribute a rich, nutty flavor that complements the other ingredients beautifully. Feel free to adjust the amount of pecans according to your preference, or substitute them with your favorite nuts or seeds for variety.
Tips
Choose ripe but firm bananas for this banana rice recipe to ensure they hold their shape when mixed with the other ingredients.
Experiment with different vegetables and proteins to customize the Banana Rice Bowl to your liking. Try substituting tofu with paneer or adding bell peppers or apples for added crunch and sweetness.
For a burst of freshness, garnish the finished dish with a sprinkle of freshly chopped herbs like mint or parsley.
Variations
Get creative with your choice of grains by substituting rice with quinoa, couscous, or bulgur for a different texture and flavor profile.
For a spicy kick, add a dash of your favorite hot sauce or chili flakes to the Banana Rice Bowl before serving.
Benefits
Bananas are a good source of potassium, fiber, and vitamins, making them a nutritious addition to any meal.
Rice provides carbohydrates for energy and is a staple food in many cuisines around the world.
The variety of vegetables and sprouts in this banana rice recipe add vitamins, minerals, and antioxidants to support overall health.
FAQs
Can I prepare the Banana with Rice Bowl in advance?
Yes, you can pre-cook the rice and prep the other ingredients in advance, then assemble the bowl just before serving for maximum freshness and flavor.
Are there any substitutions I can make for the ingredients listed in the recipe?
Absolutely! Feel free to customize the Banana Rice Bowl with your favorite ingredients and flavors. You can swap out the tofu for your protein of choice or adjust the seasoning to suit your taste preferences.
Is this recipe suitable for meal prep?
Yes, you can prepare a batch of Banana Rice Bowls ahead of time and store them in individual containers in the refrigerator for quick and easy meals throughout the week. Just be sure to store the pecans separately to maintain their crunchiness.
Other Recipes If you enjoyed this banana rice recipe, you might also like to try these other recipes from Manjula’s Kitchen:
What's more satisfying and comforting than a hot bowl of soup? This is quick and easy recipe and simply delicious. Tomato Soup is always good as a starter or light meal with salad and crusty bread.
Tomato soup, a savory delight perfect for winter cravings, boasts a plethora of health benefits tailored to specific dietary needs. For those managing diabetes, its low glycemic index ensures stable blood sugar levels. Being gluten-free, it caters to gluten-sensitive individuals. With its high protein content, it aids in muscle repair and satiety, ideal for a satisfying lunch box addition.
Additionally, this soup is low in cholesterol, making it heart-friendly. Its low-fat profile further enhances its appeal for those watching their fat intake. Bursting with flavor and nutrients, it’s a stellar choice for soups and salads enthusiasts seeking a wholesome winter recipe.Whether served as a starter, a light meal, or alongside a grilled cheese sandwich, tomato soup never fails to warm the soul and satisfy the taste buds.
Benefits of Tomato Soup:
Rich in Nutrients: Tomato soup is rich in essential nutrients such as vitamins A, C, and K, as well as antioxidants like lycopene. These nutrients are known for their various health benefits, including supporting immune function, promoting healthy skin, and reducing the risk of chronic diseases.
Low in Calories: Tomato soup is naturally low in calories, making it a great option for those looking to maintain or lose weight. By using minimal added fats and sugars in the preparation, tomato soup offers a satisfying and nutritious meal without the guilt.
Hydrating: Since tomato soup is primarily made from tomatoes, which have a high water content, it can help keep you hydrated and replenish fluids in your body. Enjoying a bowl of tomato soup is a tasty way to stay hydrated, especially during colder months when drinking plain water may be less appealing.
Versatile: Tomato soup is incredibly versatile and can be customized to suit your taste preferences and dietary restrictions. Whether you prefer a smooth and creamy texture or a chunky and rustic style, there’s a tomato soup variation to please every palate.
Other Soup Variations:
Corn Vegetable Soup: Corn Vegetable Soup is a creamy corn soup with vegetables that is a great starter for a summer lunch. This delicious soup can be served hot or cold.
Lentil Vegetable Soup: Roast the tomatoes, before blending them into a soup for a deeper and more complex flavor. Roasted tomato soup has a slightly caramelized taste and a smoky aroma that adds depth to the dish.
Moong Dal Soup: Add chilli flakes, cayenne pepper, or hot sauce to the soup for a spicy kick. Spicy tomato soup is perfect for warming you up on chilly days and adding a bit of excitement to your meal.
Green Pea Soup: This is a healthy and delicious vibrant green colour soup. Green pea soup can be served with a slice of bread or with rice.
Tips for How To Make Tomato Soup:
Use Ripe Tomatoes: Use ripe, juicy tomatoes for the best flavor and color in your tomato soup. If fresh tomatoes are not available, you can use canned tomatoes as a convenient alternative.
Blend Smoothly: For a smooth and velvety texture, blend the soup until completely smooth using an immersion blender or countertop blender. If you prefer a chunky soup, blend only a portion of the soup and leave some chunks of tomatoes and vegetables intact.
Adjust Seasoning: Taste the soup and adjust the seasoning as needed before serving. Add salt, pepper, and any additional herbs or spices to suit your taste preferences and enhance the flavor of the soup.
FAQs about Tomato Soup:
Can I freeze tomato soup?
Yes, tomato soup can be frozen for future use. Allow the soup to cool completely before transferring it to airtight containers or freezer bags. Frozen tomato soup can be stored in the freezer for up to 3 months. Thaw the soup in the refrigerator overnight before reheating on the stovetop or in the microwave.
Is tomato soup vegan-friendly?
Yes, tomato soup is naturally vegan-friendly as it does not contain any animal products. However, be sure to check the ingredients of store-bought tomato soup as some brands may include dairy or meat-based ingredients
Can I add other vegetables to tomato soup?
Absolutely! Feel free to add other vegetables such as carrots, celery, bell peppers, or spinach to your tomato soup for added flavor and nutrition. Simply chop the vegetables and sauté them before adding the tomatoes.
What can I serve with tomato soup?
Tomato soup pairs well with a variety of accompaniments, including grilled cheese sandwiches, crusty bread, or a simple green salad. Serve the soup as a starter or as a light meal for a satisfying and comforting dining experience.
Paneer Kheer with Strawberry is a delightful dessert. This Paneer and strawberry dessert is a sure winner especially when you want to serve a unique paneer delicacy.
In a small bowl mix the corn starch with 1/4 cup of milk and set aside.
In a heavy bottom pan boil 2 cups of milk over medium high heat. Wet inside of the pan with water and put about 2 tablespoons of water before pouring the milk in a pan this prevents the burning of the milk in bottom of the pan. Stir the milk occasionally.
After milk comes to boil reduce the heat to medium and let it boil for about 10-12 minutes.
Add the corn starch and mix it well, there should no lumps, after milk comes to boil let it boil for additional 2-3 minutes
Add the sugar and shredded paneer stir and let it boil for 4-5 minutes, stir occasionally.
Paneer Kheer should have consistency of a thick batter. This should be chilled before serving.
Notes
Strawberry Topping for Garnishing
1 cup chopped strawberry
2 tablespoons sugar
1 teaspoon corn starch (arrowroot)
Few drops of lemon juice
Strawberry Topping
In a small bowl mix corn starch with about 1 tablespoons of water and set aside.
In a small pan cook strawberry and sugar together mix it and let it come to boil. Add corn starch; mix it well after it comes to boil turn off the heat. Strawberry topping is ready. This also should be chilled before using.
For ServingIn an individual serving bowl put about ¼ cup Paneer Kheer and top it with strawberry.SuggestionsYou can serve this just as Paneer Kheer, while cooking don’t use corn starch and don’t garnish with strawberries. To flavor the Kheer add 1/8 teaspoon of cardamom powder and few sliced of almonds and or pistachios. Serve chilled.
Paneer kheer with strawberry is a delightful fusion dessert that combines the rich, creamy texture of paneer kheer with the fresh, tangy sweetness of strawberries. This unique dessert offers a refreshing twist on traditional Indian sweets, making it perfect for special occasions and festive celebrations be it Holi, Diwali or even for party occasions. In this article, we will delve into the various aspects of paneer kheer strawberry, its benefits, and how it stands out as a dessert choice.
What is Paneer Kheer with Strawberry?
Paneer kheer with strawberry is a variation of the classic Indian dessert, paneer kheer, which is made from paneer (Indian cottage cheese) cooked in sweetened milk. Adding strawberries to the mix enhances the flavor and adds a burst of freshness to the dessert.
Health Benefits of Paneer Kheer Strawberry
Paneer is a rich source of protein and calcium, while strawberries are packed with vitamins, antioxidants, and fiber. Combining these two ingredients in paneer kheer strawberry offers a nutritious treat that is both delicious and beneficial for health.
The Popularity of Strawberry Paneer Kheer
Strawberry paneer kheer has gained popularity due to its unique flavor profile and appealing presentation. The combination of creamy paneer and vibrant strawberries makes it a favorite among dessert lovers.
Making Paneer Kheer Strawberry for Festive Occasions
Strawberry with paneer kheer is an excellent choice for festive occasions and celebrations. Its unique taste and attractive appearance make it a standout dessert that can impress guests and add a special touch to any event.
Easy Preparation of Paneer Kheer with Strawberry
Despite its sophisticated flavor, paneer kheer strawberry is relatively easy to prepare. With a few simple ingredients and straightforward steps, you can create this delightful dessert at home.
Serving Suggestions for Paneer Kheer Strawberry
Paneer kheer strawberry can be served in various ways to enhance its appeal. You can garnish it with chopped nuts, saffron strands, or a drizzle of strawberry syrup to make it even more enticing.
Storing and Reheating Paneer Kheer with Strawberry
Strawberry paneer kheer can be stored in the refrigerator for a couple of days. When ready to serve, it can be gently reheated or enjoyed chilled, depending on your preference.
Similar Dessert Recipes from Manjula’s Kitchen
Ras Malai: Rasmalai is a delightful Bengali dessert featuring soft paneer balls immersed in chilled, creamy milk. Similar to Rasgullas, Rasmalai is made from homemade cheese, known as “paneer” or “chana.”
Gulab Jamun: Gulab Jamun is a delicious Indian version of donuts immersed in warm sweet syrup. As India’s most popular dessert, Gulab jamun is a staple in most parts of the country. Gulab jamuns are served for almost every celebrations.
Paneer Burfi: Paneer Burfi is a delectable Indian sweet made from fresh paneer, sugar, and a hint of cardamom. This rich and creamy dessert is perfect for festive occasions and special celebrations. The process involves cooking paneer with sugar until it thickens and forms a fudgy consistency, then adding aromatic cardamom for flavor.
Mawa Paneer Thandai Balls: Mawa Paneer Thandai Balls are a unique and delectable Indian dessert, combining the richness of mawa (khoya) and paneer with the exotic flavors of thandai. This delightful treat is perfect for festive occasions and special celebrations.
Coconut Burfi: Coconut Burfi is a traditional Indian sweet made from fresh coconut, sugar, and a touch of cardamom. This delicious and aromatic dessert is popular during festivals and special occasions.
The Perfect Dessert for All Ages
The creamy texture of paneer kheer combined with the fruity freshness of strawberries makes paneer kheer with strawberry a dessert that appeals to all age groups, from kids to adults.
Tips for Making the Best Paneer Kheer Strawberry
To make the best paneer kheer strawberry, ensure the paneer is fresh and the strawberries are ripe. Using high-quality milk and a touch of cardamom can also enhance the flavor of the dessert.
Incorporating Paneer Kheer Strawberry into Your Diet
Strawberry with paneer kheer can be a delightful addition to your diet as an occasional treat. It provides essential nutrients and a satisfying taste that can be enjoyed as a part of a balanced diet.
FAQs Frequently Asked Questions
Can paneer kheer strawberry be made vegan?
Yes, you can use plant-based milk and tofu instead of paneer to make a vegan version of paneer kheer strawberry.
What can I use as a sweetener in paneer kheer with strawberry?
You can use sugar, honey, or natural sweeteners like stevia to sweeten paneer kheer strawberry.
How long does it take to prepare paneer kheer strawberry?
Preparing paneer kheer with strawberry typically takes around 30-45 minutes, depending on the recipe.
Can I use frozen strawberries for paneer kheer strawberry?
Yes, frozen strawberries can be used, but fresh strawberries are recommended for the best flavor and texture in strawberry paneer kheer.
What is the best way to serve paneer kheer strawberry?
Paneer kheer with strawberry can be served chilled or at room temperature, garnished with fresh strawberries and nuts.
Is paneer kheer with strawberry gluten-free?
Yes, paneer kheer strawberry is naturally gluten-free, making it a great dessert option for those with gluten intolerance.
Paneer kheer with strawberry is a delicious and nutritious dessert that offers a unique twist on traditional Indian sweets. Its combination of creamy paneer and fresh strawberries creates a delightful flavor that can be enjoyed on any special occasion. By following simple preparation steps and using quality ingredients, you can create this dessert at home and enjoy its rich, satisfying taste.
Chai is black tea brewed beverage with spices and milk. A cup of chai gives a wonderful sense of warmth and has a soothing effect. The mere aroma of chai makes you to want one; it is hard to resist. There are endless recipes, and every household has its favorite spice mix and its a drink which goes with many snack be it mathri to namak para.
2tsptea leaves (I prefer Brooke Bond Red Label or Lipton Yellow Label)
2tspsugar
1/2tspchai spice mix
Instructions
Mix all the spices and grind to a powder. I prefer to use a coffee grinder, the one I keep just for spices. Store the chai spice mix in airtight container.
Boil the water and milk with 1/4 teaspoon spice mix. When the water boils, reduce the heat to low and add the tea leaves and sugar. Cover the pan and let it simmer two to three minutes.
Strain the mixture and serve hot. Adjust the sugar to your taste.
Notes
NotesI use 10 oz tea cups or mugs.Use 1/8 teaspoon of spice mix for 1 cup of tea.You will also enjoy Chai Latte
Chai masala tea is a quintessential Indian beverage known for its rich flavors and aromatic spices. This traditional drink combines black tea with a blend of spices, creating a soothing and invigorating experience. In this article, we’ll explore the origins, health benefits, and preparation techniques for the perfect cup of chai masala tea.
What is Chai Masala Tea?
Chai masala tea, often simply called masala chai, is a spiced tea made by brewing black tea with a mixture of aromatic spices and herbs. Common spices include cardamom, cinnamon, cloves, and ginger, each contributing to the tea’s distinctive taste.
The Origins of Chai Masala Tea
The history of chai masala tea dates back thousands of years in India. Initially used for medicinal purposes, it evolved into a popular daily beverage enjoyed across the country and beyond.
Health Benefits of Chai Masala Tea
Boosts Immunity: The spices in chai masala tea, such as ginger and cloves, are known for their immune-boosting properties.
Aids Digestion: Spices like cardamom and ginger can help with digestion and soothe the stomach.
Reduces Inflammation: Ingredients like ginger and cinnamon have anti-inflammatory properties that can help reduce inflammation in the body.
Improves Heart Health: Black tea, a key component of chai masala tea, has been linked to improved heart health due to its antioxidants.
Preparing the Perfect Chai Masala Tea
To make chai masala tea, you will need black tea, a blend of spices, milk, and sweetener. Here’s a simple method:
Boil Water and Spices: Start by boiling water with your preferred spices (e.g., cardamom, cloves, cinnamon, and ginger).
Add Tea Leaves: Add black tea leaves to the boiling water and let it simmer.
Add Milk and Sweetener: Pour in milk and sweetener (sugar or honey) and bring the mixture to a boil again.
Strain and Serve: Strain the tea into cups and enjoy hot.
Customizing Your Chai Masala Tea
One of the beauties of chai masala tea is its versatility. You can adjust the spice levels to your taste or add other flavors like vanilla or star anise to create your unique blend.
Chai Masala Tea in Modern Culture
While chai masala tea remains a staple in Indian households, it has also gained popularity worldwide. Cafés and tea shops around the globe offer their versions of this delightful drink, introducing it to new audiences.
Serving Suggestions for Chai Masala Tea
Chai masala tea is often enjoyed with snacks such as biscuits, pakoras, or samosas. It’s perfect for a cozy afternoon tea or as a comforting beverage on a chilly day.
Tips for Making the Best Chai Masala Tea
Use fresh, high-quality spices for the best flavor.
Adjust the sweetness to suit your preference.
Experiment with different milk options, like almond or oat milk, for a unique twist.
Incorporating Chai Masala Tea into Your Routine
Including chai masala tea in your daily routine can offer not only a delicious drink but also numerous health benefits. Enjoy it as a morning energizer or an afternoon pick-me-up.
FAQs
What is the best type of tea for chai masala tea? Use robust black tea such as Assam or Darjeeling for a strong, flavorful base.
Can I make chai masala tea without milk? Yes, you can make it without milk for a lighter version, known as “black chai.”
How can I store chai masala spice mix? Store the spice mix in an airtight container in a cool, dry place for up to six months.
Is chai masala tea caffeinated? Yes, chai masala tea contains caffeine from the black tea leaves.
Can I add other spices to my chai masala tea? Absolutely! Feel free to experiment with spices like nutmeg or star anise to create your blend.
What is the best sweetener for chai masala tea? Common sweeteners include sugar, honey, and jaggery. Choose according to your taste preference.
Conclusion
Chai masala tea is more than just a beverage; it’s a comforting ritual that offers a myriad of flavors and health benefits. Whether you’re a seasoned tea enthusiast or new to this aromatic drink, making chai masala tea at home can be a delightful and rewarding experience.
Potato Sandwiches give a different dimension to grilled cheese sandwich. They are delicious and add an Indian taste to standard grilled cheese. Potato& cheese sandwiches are excellent choice for a hearty and satisfying lunch.
4sliceswhite firm bread I am using buttermilk bread
3medium sizepotatoes boiled peeled and mashed, about 1-1/2 cups of mashed potatoes
2tbspchopped cilantro (hara dhania)
1tbspchopped ginger (adrak)
1tbspchopped green chili (hari mirch)
½ tbspcumin seeds (jeera)
½ tbspsalt
½tbspmango power (amchoor)
2tbspmelted butter
2 slices cheddar cheese
8slicedtomato thinly
Instructions
In a bowl mix potatoes, cilantro, ginger, green chili, salt, cumin seeds, and mango powder well.
Lightly butter the bread slices from one side and other side spread layer of thin potato mixture evenly, and brush the butter over the mixture.
Heat the skillet over medium heat and put the bread slices over the skillet putting the potato mixture side down.
Let it cook for about 2-3 minutes or till it is golden brown from bottom. Note: if you turn too quickly the spread will start coming out. Turn it over; put one slice of cheese and tomato slices covering the bread slice.
Now put the other slice of bread potato side down over tomatoes and grilled both sides until sandwich is golden brown and cheese has melted.
Potato Sandwich is ready, slice them diagonally. Serve the sandwich with Hari Cilantro Chutney and side of Carrot Pickle.
Notes
Suggestions
Slice them in small squares and serve them as snack.
You may use leftover dry vegetables like Aloo Gobi (potatoes with cauliflower) or Aloo jeera, mash the left over vegetables and follow the same steps.
You can also use a multigrain or whole wheat bread of your choice.
A grilled potato sandwich is a delightful and versatile dish, perfect for any meal. Combining the comforting taste of potatoes with the crispiness of grilled bread, this sandwich is both satisfying and easy to make. In this guide, we will explore various aspects of the grilled potato sandwich, including its variations like the potato grilled cheese sandwich and potato cheese grilled sandwich.
What is a Grilled Potato Sandwich?
A grilled potato sandwich features seasoned mashed or sliced potatoes layered between slices of bread, then grilled to perfection. This sandwich can be enhanced with various ingredients to create delicious variations.
Variations of Grilled Potato Sandwich
Potato Grilled Cheese Sandwich: This version adds melted cheese to the mix, creating a gooey, satisfying bite. It’s perfect for those who love the combination of potatoes and cheese.
Potato Cheese Grilled Sandwich: Similar to the grilled cheese variant, this sandwich includes additional cheese varieties and perhaps even some extra vegetables or spices for a richer flavor profile.
Potato Grilled Sandwich: This simple version focuses on the basic elements of potatoes and grilled bread, allowing the flavors of the seasoned potatoes to shine.
Health Benefits of Grilled Potato Sandwich
While the grilled potato sandwich is indulgent, it can also be nutritious when made with whole grain bread and fresh ingredients. Potatoes are a good source of vitamins and minerals, including vitamin C, potassium, and fiber.
Making the Perfect Grilled Potato Sandwich
Ingredients:
Bread (whole grain or your choice)
Potatoes (boiled and mashed or thinly sliced)
Cheese (optional, for cheese variants)
Butter or oil (for grilling)
Spices (salt, pepper, and optional herbs like cilantro or parsley)
Method:
Prepare the Potatoes: Boil and mash the potatoes, seasoning them with salt, pepper, and any additional spices or herbs.
Assemble the Sandwich: Spread the potato mixture onto a slice of bread, add cheese if using, and top with another slice of bread.
Grill the Sandwich: Heat a pan or griddle with butter or oil, then grill the sandwich until golden brown and crispy on both sides.
Serving Suggestions
Grilled potato sandwiches can be served with a variety of sides, such as:
Use fresh, high-quality ingredients for the best flavor.
Ensure the potatoes are well-seasoned to enhance the taste.
Experiment with different types of bread and cheese to find your favorite combination.
Incorporating Grilled Potato Sandwich into Your Diet
A grilled potato sandwich can be enjoyed as a meal or snack. It’s versatile enough to be part of breakfast, lunch, or dinner. Pair it with nutrient-dense sides for a balanced diet.
FAQs
Can I make a grilled potato sandwich vegan? Yes, use plant-based butter and vegan cheese to make a vegan grilled potato sandwich.
What type of cheese is best for a potato grilled cheese sandwich? Cheddar, mozzarella, and gouda are excellent choices for a potato grilled cheese sandwich.
How can I add more flavor to my grilled potato sandwich? Add herbs like rosemary or thyme, or spices like paprika and cumin to the potato mixture.
Can I use leftover mashed potatoes for a grilled potato sandwich? Yes, leftover mashed potatoes work well and can save time.
What is the best type of bread for a grilled potato sandwich? Whole grain, sourdough, and ciabatta are all great choices for a grilled potato sandwich.
How can I make a gluten-free grilled potato sandwich? Use gluten-free bread and ensure all other ingredients are gluten-free.
Conclusion
The grilled potato sandwich is a delicious and versatile dish that can be enjoyed in many variations. Whether you prefer the classic version or the cheesy delights of a potato grilled cheese sandwich, there’s something for everyone. Follow our guide to create the perfect grilled potato sandwich and enjoy its rich, comforting flavors.
Kalmai Vadas are crispy and delicious appetizer. Fried patties made with lentil and potatoes, can be a delightful treat for any party or a tea time snack.
1-1/2medium size boiled and mash potatoesthis should be about 3/4 cup of mashed potatoes
2 chopped green chili adjust to taste (hari mirch)
1tbspchopped ginger (adrak)
3/4tbspsaltadjust to taste
1/2tbspcrushed black pepper
2 tbspcrushed coriander (dhania)
1/8tbspasafetida (hing)
2 tbspchopped cilantro (hara dhania)
Oil to fry
Instructions
Wash and soak chana and moong dal in four cups of water at least for four hours or more, after soaking dal will be about two times in the volume.
Blend dal coarsely, add water if needed to blend but not more than 2-3 tablespoons. I use Food processor; it does a good job for blending dal coarsely without much water.
Next mix all the ingredients together; this will make soft and crumbly dough.
Divide the dough into 7-8 equal parts and make them into patties.
Heat the oil in frying pan over medium high heat; frying pan should have about 1” of oil.
Note:Kalmi Vadas are double fried.
Fry the patties until they are golden brown it should take about 5-6 minutes.
Take them out over paper towel and let them cool of to the room temperature, now cut patties into four pieces.
Fry them again over medium high heat till they are golden brown. Take them out over paper towel.
NoteKalmi Vadas can be prepared ahead of time. Double fry Vadas just before serving, sliced Vadas (before double frying) can be refrigerated for 2-3 days or freezzed for about one month.
Rava Dosa is a popular South Indian thin and crispy flat bread. It looks like thin crepes. This is a mouthwatering culinary delight. Rava Dosas are quick to make. They can be served as a snack or part of a main meal.
Mix all three flours including semolina, rice flour and all-purpose flour. Make a thin batter using little water at a time and avoiding any lumps. Batter should have pouring consistency like buttermilk.
Add all other ingredients to the batter including cumin seeds, salt, asafetida, cilantro and green chili. Mix it well. Let the batter stand for about 30 minutes.
Heat the skillet on medium high. To check if skillet is ready sprinkle few drops of water over skillet water should sizzle. Wipe the skillet with few drops of oil.
Pour the batter with ladle on the skillet in a circular motion starting from the periphery to the center. Keep pouring the batter till it covers the whole skillet.
Note: pour the batter on the skillet from about 3 to 4 inches height. Don’t try to spread the batter otherwise the characteristic and appearance of Rava Dosa will not come. Rava Dosa should have holes like swiss cheese or have lacy look.
Sprinkle 1 teaspoon of oil around dosa.
Cook Dosa over medium heat for about 2 minutes or until Dosa becomes golden brown. Then turn the Dosa using spatula.
Let Dosa cook for about 1 minute from other side. Dosa will be golden brown on one side and light color on other side. Thin and crispy Rava Dosa is ready to serve.
Notes
Serving SuggestionsRava dosa is very flavorful. You may eat this snack with Hari Cilantro Chutney.Traditionally Rava Dosa is served with Sambar (lentil soup cooked with vegetables), and coconut chutney.I have the recipes for Sambar, Coconut Chutney, and Hari Cilantro Chutney on my web site.
How to make Rava Dosa: Your Guide to the Perfect Crispy Delight
Dosa is a popular south indian delicacy which looks like a crepe. It’s like a crisp and thin pancake made of rice and urad dal batter. Traditionally Dosa is served with sambar, aloo masala and coconut chutney. It is an Indian crepe made usually through rice batter, but here we have experimented and made many alternative dosa such as Oat Dosa, Besan Dosa, Rava Dosa, Sorghum Dosa. What is Rava Dosa: This preparation is using rava and is a bread based breakfast recipe that is vegan. The preparation entails skillfully combining pan techniques and manual dexterity to achieve the perfect bread cooked on non-stick skillets.
Mixing the Flours: Crafting the Perfect Rava Dosa Batter
Embark on your culinary journey to master the art of rava dosa by starting with the essential step of mixing the flours. In your quest to perfect the rava dosa recipe, combine three key flours – semolina, rice flour, and all-purpose flour. This trio forms the foundation of the batter, each contributing its unique texture and flavor.
As you blend the flours, ensure a smooth consistency by gradually adding water to the mix, meticulously stirring to prevent the formation of lumps. Aim for a batter resembling buttermilk, with a fluidity that promises to spread effortlessly on the skillet. This foundational step lays the groundwork for the success of your dosa rava recipe, setting the stage for a culinary masterpiece.
Flavorful Fusion: Adding the Finishing Touches to Your Dosa Rava Recipe
Elevate the rava dosa batter to new heights by infusing it with a harmonious medley of essential ingredients. Cumin seeds, salt, asafetida, cilantro, and green chilli converge to create a symphony of flavors that dance on the palate.
With a thorough mix, allow the batter to rest for approximately 30 minutes—a crucial period that allows the ingredients to meld and intermingle, enhancing the overall taste and texture of your rava dosa.
This resting period is a vital secret in the art of how to make rava dosa, imparting depth and complexity to the final dish. Embrace this moment of anticipation as the flavors marry and evolve, preparing to embark on a culinary adventure like no other.
Sizzling Skillet: Setting the Stage for Rava Dosa Magic
Prepare your skillet on medium-high heat, the stage upon which the magic of rava dosa unfolds. A simple water test unveils the skillet’s readiness – when sprinkled on the surface, the water should sizzle and evaporate in an instant, signalling the perfect temperature for dosa-making.
A touch of oil ensures a non-stick surface, laying the groundwork for the mesmerising dance of the rava dosa batter. With the skillet prepped and primed, you are poised to embark on a culinary journey filled with tantalizing aromas and mouthwatering flavors.
Artful Pouring: Creating the Signature Look of Rava Dosa
With finesse and precision, pour the rava dosa batter onto the heated skillet, employing a circular motion from the edges towards the centre. The key lies in maintaining a height of 3 to 4 inches while pouring, resisting the urge to spread the batter thinly.
This technique ensures the characteristic appearance of rava dosa – a delicate, lacy texture with enticing holes reminiscent of Swiss cheese. As the batter spreads and sizzles on the skillet, marvel at the artistry unfolding before your eyes, a testament to the skill and craftsmanship inherent in the rava dosa tradition.
Crispy Transformation: Cooking Your Rava Dosa to Perfection
As the rava dosa graces the heated skillet, sprinkle a teaspoon of oil around its edges, allowing it to cook over medium heat for approximately 2 minutes until it achieves a golden brown hue. With practised precision, skillfully flip the dosa using a spatula, revealing its crispy underside to the world.
Let it cook for an additional minute, ensuring that both sides are cooked to perfection. The end result is a thin and crispy rava dosa, a culinary masterpiece ready to tantalize your taste buds and transport you to culinary nirvana. With each bite, savor the symphony of flavors and textures that define the essence of this beloved Indian delicacy.
In conclusion, the journey of crafting the perfect rava dosa is a culinary adventure filled with precision, skill, and a touch of artistry. From mixing the flours to savoring the crispy transformation on the skillet, each step in the process is imbued with tradition and flavor, culminating in a dish that delights the senses and nourishes the soul.
So, gather your ingredients, fire up your skillet, and embark on a journey to discover the magic of rava dosa – a timeless classic that never fails to captivate and delight.
Serving Suggestions: Enhancing the Rava Dosa Experience
Rava dosa’s aromatic profile pairs exceptionally well with Hari Cilantro Chutney. For a traditional touch, serve it alongside Sambar, a lentil soup enriched with vegetables, and coconut chutney. Explore these culinary companions to elevate your Rava Dosa feast to new heights.
Bread with potato filling makes a mouthwatering snack. This is a perfect snack with afternoon tea or served as an appetizer. Bread Potato Rolls are crunchy outside, spicy and soft inside. Easy to prepare
2mediumpotatoes boiled peeled and mashed will make about 1-1/4 cup mashed potatoes
1/4cupgreen peas, boiledusing frozen peas
1tspoilcanola, vegetable
1/4tspcumin seedsjeera
1/2tspsalt
1/8tspred chili powderlal mirch
1/2tspmango powderamchoor
1tbspcilantro finely choppedhara dhania
1tbspgreen chili finely chopped
1tspginger finely chopped
oil to fry
Instructions
Heat the oil in a frying pan and add the cumin seed. When the cumin seed starts to crack, add green peas, green chili, and ginger, and stir for a few seconds.Add the potatoes and all the spices (chili powder, mango powder, salt, cilantro) and stir-fry for a minute. Turn off the heat.Taste the mixture; it should be a little spicier than you like, as it will taste milder inside the bread. Set aside.
Trim the edges of the bread slices and cut them into two pieces. Set aside. Roll 1½ tablespoons of the mixture at a time into an oval shape. Make twelve rolls. (The size of the potato rolls will depend on the size of the bread).
Fill a small bowl with water to wet the bread. Dip one side of a slice of the bread lightly in the water. Place the slice between your palms and press, squeezing out the excess water. This makes the bread moist.
Place the filling in the center of this bread and mold the bread to completely cover it all around, giving an oval shape. Repeat to make all the rolls. Before frying, let them sit for about five minutes. (This will evaporate some of the water from the bread so that it absorbs less oil while frying; also making the bread rolls crisper).
Heat the oil in a frying pan on medium high heat. Drop the rolls slowly into it, taking care not to overlap them.
Fry the bread rolls until they are golden brown, turning occasionally. This should take about two to three minutes. Take them out over a paper towel.
Notes
Serve them hot with hari cilantro chutney and tamarind sweet and sour chutney.
Bread potato rolls are a popular snack that combines the comforting flavors of potatoes with the crispy texture of bread. These rolls are perfect for parties, gatherings, or just as a tasty treat. In this article, we will explore the various aspects of bread potato rolls, including a detailed recipe, variations, and serving suggestions.
What are Bread Potato Rolls?
Bread potato rolls are made by stuffing a spiced potato mixture into slices of bread, rolling them up, and frying or baking until golden and crispy. This snack is versatile, quick & easy to prepare, and loved by all age groups.
Health Benefits of Bread Potato Rolls
While bread potato rolls are often considered an indulgent treat, they can also be nutritious when made with whole grain bread and a balanced filling. Potatoes provide essential vitamins and minerals, and whole grain bread adds fibre.
Simple Bread Potato Rolls Recipe
Ingredients:
Bread slices
Potatoes (boiled and mashed)
Spices (cumin, coriander, turmeric, chili powder)
Fresh herbs (coriander leaves, green chilies)
Oil for frying or baking
Method:
Prepare the Filling: Mix mashed potatoes with spices and herbs.
Assemble the Rolls: Flatten the bread slices, add the potato mixture, and roll them up.
Cook the Rolls: Fry the rolls until golden brown or bake them for a healthier option.
Variations of Bread Potato Rolls
Cheese Bread Potato Rolls: Add grated cheese to the potato mixture for a gooey, cheesy filling.
Vegetable Bread Potato Rolls: Incorporate other vegetables like peas, carrots, or corn for added nutrition and flavor.
Serving Suggestions
Bread potato rolls can be served with a variety of dips and sauces, such as mint chutney, tamarind chutney, or ketchup. They are perfect as appetizers, snacks, or even as a light meal.
Tips for Making the Best Bread Potato Rolls
Use fresh, high-quality bread for the best texture.
Ensure the potato filling is well-seasoned to enhance the flavor.
Fry on medium heat to ensure even cooking and prevent burning.
Incorporating Bread Potato Rolls into Your Diet
Enjoy bread potato rolls as an occasional treat. Pair them with a fresh salad or a bowl of soup for a balanced meal.
FAQs Frequently Asked Queries
What type of bread is best for potato rolls?
Whole grain or white bread works well, but ensure it’s fresh and soft for easy rolling.
Can I make bread potato rolls vegan?
Yes, use vegan bread and skip any dairy-based ingredients in the filling.
How can I store leftover bread potato rolls?
Store in an airtight container in the refrigerator for up to two days. Reheat in an oven or on a pan before serving.
Can I bake bread potato rolls instead of frying?
Yes, baking is a healthier alternative. Brush the rolls with a little oil and bake until golden and crispy.
What is the best dipping sauce for bread potato rolls?
Mint chutney, tamarind chutney, and ketchup are popular choices.
Can I make bread potato rolls in advance?
Yes, prepare the rolls and store them in the refrigerator. Fry or bake them just before serving.
Bread potato rolls are a delicious and versatile snack that can be enjoyed in many variations. By following our detailed recipe and tips, you can create the perfect rolls at home. Whether served as an appetizer or a snack, these rolls are sure to be a hit with family and friends.
This is a beautiful looking dish! Mouthwatering, heat from red chilies and sweet and sourness from tamarind make this dish exotic. This is a great dish for me and our family when we want a change from our regular tomato or yoghurt based gravy.
4 boiled 4 potatoes medium size, boiled peeled and cut into 1/3” cubes that will make about 3 cups of cubed potatoes
2tbspoil
1/2tbspmustard seeds (rai)
2whole dried red chilies
1/4tbspturmeric (haldi)
8-10curry leaves
1tbspsalt adjust to taste
3whole dried red chilies
1/4 cupgrated coconut
Approx. 2tbsptamarind pulp(imli)
1/2tbspmustard seeds (rai)
1tbspcoriander (dhania)
Instructions
Soak tamarind in about ¼ cup of hot water, mix it well and squeeze out the pulp, recipe needs about 2 tablespoons of pulp. Set aside.
For gravy dry roast chilies, mustard seeds and coriander over medium heat for about 1 minute.
First grind the dry ingredient red chili, mustard seeds, and coriander, into coarse powder. Add coconut, tamarind pulp and ¼ cup water to make it into a paste. While blending use water as needed to make paste. If you prefer mild take the seeds out of red chili before blending. Set aside.
Heat the oil in a sauce pan add mustard seeds red chilies, and curry leaves, as seeds crack add potatoes, salt and turmeric. Stir for about 1-2 minutes.
Add coconut paste and mix it well; add about 1-1/2 cups of water.
After potatoes come to boil let it cook covered for 4-5 minutes over medium heat.
Note: The dish absorbs water while sitting. Add more water as needed to keep the gravy consistency of your liking. Let it cook on low heat for few more minutes.
Potato Curry in Coconut Milk | Potato Coconut Curry Recipe | Potato in Coconut Gravy
How to Make Potato in Coconut Gravy: A Step-by-Step Guide to a Tasty Dish
Potato Curry in Coconut Milk, also known as Potato in Coconut Gravy, is a delectable Indian dish that beautifully combines the rich creaminess of coconut milk with the heartiness of potatoes. This recipe is a staple in many households, known for its aromatic flavors and creamy texture. Whether you are a seasoned cook or a beginner, this recipe will guide you through creating a dish that is both comforting and flavorful.
The Essence of Potato Curry in Coconut Milk
This dish is a perfect example of how simple ingredients can come together to create something extraordinary. The star of the recipe is, of course, the humble potato, which absorbs the flavors of the spices and the coconut milk beautifully. The creamy coconut milk not only adds a rich texture but also a subtle sweetness that balances the heat from the spices.
Origin and Popularity
The origin of Potato Curry in Coconut Milk can be traced back to South Indian cuisine, where coconut milk is a common ingredient in many dishes. Over time, this dish has gained popularity across different regions due to its unique taste and ease of preparation. It is now enjoyed by people all over the world who appreciate the blend of spices and the creamy consistency.
Why You’ll Love This Recipe
Simple Ingredients: This recipe uses everyday ingredients that are easily available.
Flavorful: The combination of spices and coconut milk creates a burst of flavors.
Vegan and Gluten-Free: It’s a great option for those with dietary restrictions.
Versatile: Can be served with rice, roti, or naan.
Variations of the Recipe
Exploring Manjula’s Kitchen reveals a treasure trove of other delicious variations that you can try. Here are some related recipes that you might enjoy:
Butter Paneer: This classic dish features paneer cubes in a rich and creamy tomato gravy, infused with aromatic spices like coriander and turmeric.
Paneer Tikka Masala: Marinated paneer pieces are pan-fried and then cooked in a luxurious tomato-based gravy, offering a smoky flavor with a hint of sweetness.
Paneer Methi: A creamy dish made with paneer and dried fenugreek leaves (kasoori methi), providing a unique slightly bitter taste that complements the creamy base.
Paneer Tomato Curry: A simple yet delicious curry made with fresh tomatoes and aromatic spices, with chunks of paneer absorbing all the delicious flavors.
Palak Paneer: A nutritious green curry made with fresh spinach and spices, providing a rich source of iron and vitamins.
Serving Suggestions
Potato Curry in Coconut Milk is incredibly versatile and can be enjoyed in various ways:
With Rice: Serve it over a bed of steamed basmati rice to soak up the creamy gravy.
With Naan or Roti: Use the bread to scoop up the curry for a satisfying meal.
As a Side Dish: Pair it with other Indian dishes like dal and vegetable curry for a complete meal.
Tips and Tricks
To enhance your Potato Curry in Coconut Milk, consider the following tips:
Use Fresh Coconut Milk: If possible, use fresh coconut milk for a more authentic flavor.
Adjust the Spices: Tailor the heat level to your preference by adjusting the amount of chili powder and green chilies.
Garnish: Garnish with fresh coriander leaves for a burst of freshness and color.
FAQs
Is Potato Curry in Coconut Milk Vegan?
Yes, this recipe is vegan as it uses plant-based coconut milk.
Can I Make It Ahead of Time?
Yes, you can prepare the curry in advance and store it in the refrigerator. Reheat gently on the stovetop before serving.
What Can I Serve with This Curry?
This curry pairs well with rice, naan, or roti. It can also be served alongside other Indian dishes for a complete meal.
How Spicy is This Curry?
The spice level can be adjusted to your taste. The coconut milk helps balance the heat, making it a mild to moderately spicy dish.
Vegetable curry in color and taste compliment any meal. This is a simple recipe but delicious and filled with flavors. Good way to incorporate a variety of vegetables in your meal.
2cups Approx. cauliflower cut into floretsphool gobhi
1cupgreen peashari matar
1carrot diced in about 1/2 inch pieces gajar
1/2cupsliced mushrooms
1mediumzucchini cut into bite size pieces with skin
6tomatoes medium size
1/2inchginger
1green chili
2tbspoil
1/2tspcumin seedsjeera
1/8tspasafetidahing
1/4tspturmerichaldi
1/4tspred chili powder
1tbspcoriander powderdhania
1tspsalt
1tspsugar
1tbspcorn starch
1/2tspgaram masala
2tbspcilantro finely choppedhara dhania
Instructions
Mix the cornstarch with ¼ cup of water and set aside.
Blend 5 sliced tomatoes, green chilies and ginger to make a puree. If you prefer mild take the seeds out of green chili before blending.
Slice 1 tomato length wise into 8-10 pieces and set aside.
Heat the oil in a saucepan. Test the heat by adding one cumin seed to the oil. If the cumin seed cracks right away, the oil is ready. Add the cumin seeds, and asafetida, as the seeds crack add tomato puree, coriander, turmeric, sugar, and salt. Cover the pot and cook for about 5 minutes.
Add all the vegetables and ¼ cup of water. Cover the pan and let it cook for about 10 minutes over medium heat stir a few times in between. Vegetables should be tender not mushy.
Add cornstarch mixture and let it cook for 2 more minutes. Cornstarch is added to thicken the gravy. If gravy is too thick add some hot water as needed.
Turn off the heat, add tomato slices, garam masala and cilantro, stir and cover the pan for few minutes before serving.
Notes
Serving Suggestion Serve Vegetable curry with Dal Puri, Lacha paratha, and side of Yogurt.
Keyword Everyday Meal, Gluten Free, Mixed Vegetable With Gravy, Vegan
Vegetable curryis a vibrant Gluten Freeand aromatic dish that’s beloved in cuisines around the world, particularly in South Asia and Southeast Asia.
This versatile vegan dish features a variety of vegetables cooked in a rich and fragrant sauce made from spices, herbs, and can be cooked with coconut milk or yogurt.
Vegetable curry is incredibly nourishing, packed with vitamins, minerals, and fibre from the assortment of vegetables used.
Benefits of Vegetable Curry:
Nutrient-Rich: Vegetable curry is packed with essential nutrients from a wide range of vegetables, including vitamins, minerals, and antioxidants. Eating a diet rich in vegetables has been linked to numerous health benefits, including reduced risk of chronic diseases such as heart disease, diabetes, and certain cancers.
Fibre-Packed: Vegetables are naturally high in fibre, which is essential for digestive health, weight management, and blood sugar control. Fibre that helps promote satiety and keeps you feeling full for longer periods, making vegetable curry a satisfying and filling meal option.
Customizable: Vegetable curry is highly customizable, allowing you to use vegetables you have on hand or prefer. From hearty root vegetables like potatoes and carrots to leafy greens like spinach and kale, the possibilities are endless for creating your own unique version of vegetable curry.
Flavorful and Comforting: Vegetable curry is bursting with bold and complex flavours from the spices and herbs used in the sauce. The aromatic blend of spices such as cumin, coriander, turmeric, and garam masala creates a warm and comforting dish that’s perfect for cosy nights in or sharing with loved ones.
Variations of Vegetable Curry:
Potato in Coconut Gravy: This is a beautiful looking dish! Mouthwatering, heat from red chilies and sweet and sourness from tamarind make this dish exotic. This is a great dish for me and our family when we want a change from our regular tomato or yoghurt based gravy.
Kela Ki Subji (Banana Curry): This is a delicious sweet and sour dish, and only takes few minutes to prepare. Kela Ki Sabji makes a great side dish. You will be amazed with the simplicity of this dish.
Sweet & Sour Tofu: Tofu and vegetables cooked with the tamarind sauce makes a very unique flavorful dish. This Sweet and Sour Tofu dish is vegan-friendly and It is enjoyable for just about anybody’s taste palette.
Aloo Matar: This is a popular north Indian dish. Potatoes and peas with spicy gravy makes a great main dish.
FAQs about Vegetable Curry:
Can I make vegetable curry ahead of time?
Yes, vegetable curry can be made ahead of time and stored in the refrigerator for up to 3-4 days. Reheat the curry gently on the stovetop or in the microwave before serving, adding a splash of water or coconut milk if needed to adjust the consistency.
Is vegetable curry gluten-free?
Yes, vegetable curry is naturally gluten-free as long as the ingredients used are free from gluten-containing additives or cross-contamination. Be sure to check the labels of packaged spices and sauces to confirm their gluten-free status.
Can I make vegetable curry vegan-friendly?
Absolutely! Vegetable curry is naturally vegan-friendly as it does not contain any animal products. Ensure that the ingredients used, such as curry paste, coconut milk, and yogurt substitutes, are also vegan-friendly.
What can I serve with vegetable curry?
Vegetable curry pairs well with a variety of accompaniments, including rice, naan bread, roti, or quinoa. Garnish the curry with fresh herbs such as cilantro or mint and serve with a side of yogurt or chutney for added flavor. Vegetable curry is a flavorful and nourishing dish that’s perfect for satisfying hunger and nourishing the body. With its versatility, health benefits, and endless variations, vegetable curry is a staple in many cuisines around the world. Whether enjoyed as a main course or a side dish, vegetable curry is sure to delight your taste buds and leave feeling satisfied and nourished.
Creamy Butternut squash sauce with spiral pasta is a fusionappetizer dish which is light, savory with beautiful spring colors. Garnishing with beetroot adds a gourmet touch.
Approx. 3cups butternut squash peeled and cut in about ½ inch pieces
2tbspoil
1-1/2tbspsalt adjust to taste
1tbspall-purpose flour (Maida)
1 cups milk
1/2cupcream
1tbspfennel seeds crushed (Saunf)
1/4tbspblack pepper
1/4cupbutternut squash shredded for garnishing
1/4cupbeetroot boiled and shredded for garnishing
Instructions
In a large pot boil the water with 1 teaspoon of salt and 1 tablespoon of oil. After water comes to the boil add the pasta. Cook the pasta until it is tender, this will take about 8-10 minutes. Drain the water and set pasta aside.
Cook the squash in about 1-1/2 cups of water until squash becomes very soft; puree the squash to creamy texture.
In a saucepan add 1 tablespoon of oil and all-purpose flour over medium heat and stir for a minute. While stirring slowly add cream making sure there are no lumps. After it comes to a boil, add milk and butternut squash puree.
Add salt, black pepper and fennel seeds; boil for 3-4 minutes over medium heat. Sauce should be creamy and pourable consistency.
Before serving pour the sauce over pasta and mix.
Garnish the individual pasta servings with shredded squash and top it with few slices of beetroot.
Notes
NotesI cook the beetroot in microwave, wrap it with wet paper towel and cook for about 4-5 minutes.
Butternut Squash Pasta: Savory Recipes and Flavorful Combinations
Butternut Squash Pasta is a delightful dish that brings together the creamy, slightly sweet flavor of butternut squash with the comforting texture of pasta. Whether you’re looking for a hearty meal or a unique twist on traditional pasta dishes, this recipe is sure to please your taste buds. Butternut Squash Pasta is not only delicious but also packed with nutrients, making it a wholesome choice for any meal.
The Essence of Butternut Squash Pasta
The key ingredient, butternut squash, is known for its vibrant color and rich, creamy texture. When cooked and pureed, it forms a luscious sauce that clings perfectly to the pasta. This dish is versatile and can be easily customized with various herbs, spices, and additional ingredients to suit your palate.
Origin and Popularity
Butternut squash is a popular ingredient in many cuisines around the world, especially in fall and winter when it’s in season. Its use in pasta dishes has gained popularity due to its ability to create a creamy sauce without the need for heavy cream or cheese, making it a healthier option that doesn’t compromise on flavor.
Why You’ll Love This Recipe
Nutritious: Butternut squash is rich in vitamins A and C, fiber, and antioxidants.
Creamy Texture: The pureed squash provides a creamy base that is both satisfying and healthy.
Versatile: This recipe can be adapted with various herbs, spices, and proteins.
Easy to Make: With simple steps and readily available ingredients, it’s a perfect dish for any home cook.
Variations of Pasta Recipe
Exploring Manjula’s Kitchen reveals a treasure trove of other delicious recipes that you can try. Here are some related recipes that you might enjoy:
Tomato Basil Pasta: This classic dish features a rich tomato sauce with fresh basil, providing a tangy and aromatic complement to the pasta.
Vegetable Pasta: Fresh vegetables and whole grain pasta with savoury tomato sauce makes a very colourful and delicious pasta dish. This is a simple pasta dinner. Serve with a side of salad and bread.
Creamy Spinach Pasta: This is a delicious pasta dish with fresh spinach and rich white sauce. It is my version of fettuccini alfredo. Creamy spinach pasta looks and tastes great. It’s a nice vegetarian appetizer.
Zucchini Pasta: Zucchini Pasta is a healthy replacement for pasta. This is a great recipe, super easy, quick and delicious..
Serving Suggestions
Butternut Squash Pasta can be enjoyed in various ways:
With a Side Salad: Pair it with a fresh green salad for a balanced meal.
As a Main Course: Enjoy it on its own as a hearty main course.
Tips and Tricks
To enhance your Butternut Squash Pasta, consider the following tips:
Roast the Squash: Roasting the butternut squash enhances its natural sweetness and adds depth of flavor to the sauce.
Use Fresh Herbs: Fresh herbs like sage or thyme can add a wonderful aromatic touch to the dish.
Add Protein: Incorporate grilled chicken, shrimp, or chickpeas to make the dish more filling.
FAQs Frequently Asked Questions
Is Butternut Squash Pasta Vegan?
Yes, this recipe can be made vegan by using plant-based milk and omitting any cheese.
Can I Make It Ahead of Time?
Yes, you can prepare the sauce ahead of time and store it in the refrigerator. Reheat and mix with freshly cooked pasta before serving.
What Can I Serve with This Pasta?
This pasta pairs well with a variety of sides, such as a green salad, roasted vegetables, or garlic bread.
How Long Does It Take to Make?
From start to finish, this recipe can be prepared in about 45 minutes, making it a great option for a weeknight dinner.
Rhubarb Chutney; you may call this relish or pickle. This Sweet and sour chutney with blend of spices taste grate and very addicting. This is a great complement to any meal.
4 green chili cut into ½-inch pieces (if preferred mild recipe remove the seeds from chilies)
Approx. 2 tbsp ginger thinly sliced
2tbsp oil
1/4 tbspturmeric
1/4tbsp fenugreek seeds
1-1/2tbsp coriander seeds
1tbsp fennel seeds
1tbspcumin seeds
1-1/2tbsp salt adjust to taste
1/4tbsp paprika for the color, optional
1/3cup sugar adjust to taste
Instructions
In a blender coarsely ground the fenugreek, coriander, fennel and cumin seeds.
In a saucepan put the oil and add all the ingredients except the sugar. Mix it well.
Cook over medium heat until the rhubarbs are tender. This should take about 4-6 minutes. Stir the rhubarb occasionally to make sure it does not burn from the bottom.
Add sugar to the rhubarb and cook on low heat for about 1 minutes after rhubarb start sizzling.
You can refrigerate this chutney for about 6 weeks.
Indian Rhubarb Chutney Recipe: A Tangy and Sweet Delight
Rhubarb Chutney is a delightful condiment that pairs tangy rhubarb with a medley of spices to create a sweet and savory relish. This Indian Rhubarb Chutney is perfect for adding a burst of flavor to your meals, whether you’re serving it with bread, rice, or as a side to your favorite dishes. Our easy rhubarb chutney recipe ensures you can create this delicious condiment with minimal effort and maximum taste.
The Essence of Rhubarb Chutney
The key ingredient in this recipe is rhubarb, a unique vegetable known for its tart flavor. When combined with spices and sweeteners, rhubarb transforms into a versatile chutney that enhances the taste of any dish. The recipe for rhubarb chutney involves cooking rhubarb with a blend of traditional Indian spices, resulting in a chutney that is both flavorful and aromatic.
Origin and Popularity
Rhubarb has been used in cooking for centuries, with its origins in Asia. It gained popularity in Indian cuisine for its unique taste and ability to complement spicy dishes. The Indian Rhubarb Chutney has become a beloved condiment, known for its perfect balance of sweetness and tartness, making it a staple in many households.
Why You’ll Love This Recipe
Simple Ingredients: This easy rhubarb chutney recipe uses everyday ingredients that are readily available.
Flavorful: The combination of rhubarb and spices creates a complex and delicious flavor profile.
Versatile: Can be used as a condiment, dip, or spread, enhancing a variety of dishes.
Quick to Make: With simple steps, you can prepare this chutney in no time.
How to Make Indian Rhubarb Chutney
The recipe for rhubarb chutney involves a few straightforward steps to create a condiment that will elevate your meals. Here’s a basic outline of the process:
Prepare the Rhubarb: Wash and chop the rhubarb into small pieces.
Cook with Spices: In a saucepan, combine the chopped rhubarb with sugar, vinegar, and a blend of spices such as cumin, coriander, and mustard seeds. Cook until the rhubarb is soft and the mixture thickens.
Cool and Store: Let the chutney cool to room temperature before transferring it to an airtight container. Store in the refrigerator for up to two weeks.
Variations of Chutney Recipe
Exploring Manjula’s Kitchen reveals a treasure trove of other delicious chutney recipes that you might enjoy. Here are some related chutney variations that you might find interesting:
Mango Chutney: A sweet and tangy chutney made with ripe mangoes and a blend of spices.
Tamarind Chutney: A classic Indian chutney made with tamarind pulp and spices, offering a tangy flavor.
Mint Chutney: A refreshing chutney made with fresh mint leaves, perfect as a dip or condiment.
Coconut Chutney: A creamy chutney made with grated coconut and spices, often served with South Indian dishes.
Methi Chutney: A sweet and tangy chutney made with apples and a mix of spices.
Serving Suggestions
Indian Rhubarb Chutney can be enjoyed in various ways:
With Bread: Serve as a spread on bread or toast for a flavorful snack.
As a Side: Pair with rice, roti, or naan to complement your main course.
With Cheese: Serve alongside a cheese platter for a unique taste combination.
Tips and Tricks
To perfect your Indian Rhubarb Chutney, consider these helpful tips:
Use Fresh Rhubarb: Fresh rhubarb will give the best flavor and texture to your chutney.
Adjust Sweetness: Adjust the amount of sugar based on your preference for a sweeter or more tart chutney.
Store Properly: Ensure the chutney is stored in an airtight container to maintain its freshness.
FAQs
Is Rhubarb Chutney Vegan?
Yes, this chutney is vegan as it uses plant-based ingredients.
Can I Make It Ahead of Time?
Yes, you can make this chutney ahead of time. It can be stored in the refrigerator for up to two weeks.
What Can I Serve with This Chutney?
This chutney pairs well with a variety of dishes, including bread, rice, and cheese platters.
Cereal Chivda is a great substitute for original chivda. This is a quick and easy recipe to make. Mix of different cereals, mildly spiced makes an enjoyable crunchy snack.
Heat the oil in a wide saucepan over medium high heat. After oil is moderately hot add mustard seeds.
As mustard seeds crack add asafetida, green chili, and curry leaves. As precaution cover the pan immediately for few seconds because as you add curry leaves to oil it will splatter.
Lower the heat to medium low, stir-fry for about 30 seconds; add raisins, peanuts and chana dal, stir-fry for one minute.
Add fennel seeds, chili powder, turmeric, and salt mix it well.
Add rice crispy cereal and corn flakes (crush the corn flakes before adding to the mix) stir the mixture gently, add potato sticks mix it well quick and turn off the heat. Chivda is ready.
Let the cereal chivda cool of to room temperature before serving.
Cereal chivda can be kept for several days in airtight container.
A Delightful Crunch: Exploring the Versatility of Cereal Chivda
Cereal Chivda is a delightful, crispy snack that combines the crunch of cereals with the flavors of traditional Indian spices. This cereal chivda recipe is perfect for those looking for a diet-friendly snack that doesn’t compromise on taste. Whether you’re enjoying it with your afternoon tea or packing it for a quick snack on the go, this homemade chivda cereal snack is sure to satisfy your cravings.
The Essence of Cereal Chivda
Cereal Chivda is a modern twist on the traditional Indian chivda, a savory snack mix. By incorporating cereals, this snack becomes lighter and perfect for those watching their calorie intake. The blend of spices, nuts, and dried fruits adds layers of flavor and texture, making it a versatile snack that can be enjoyed any time of the day.
Origin and Popularity
Chivda has been a popular snack in Indian households for generations. Traditionally made with flattened rice (poha), it has evolved to include a variety of ingredients, such as cereals, to cater to modern dietary preferences. This diet chivda with cereal is a testament to its adaptability, offering a healthier option without losing its deliciousness.
Why You’ll Love This Recipe
Healthy Snack: Made with wholesome cereals, nuts, and spices, this chivda is both nutritious and delicious.
Easy to Make: Simple steps and readily available ingredients make this recipe easy to follow.
Flavorful: A perfect balance of spices and textures ensures every bite is packed with flavor.
Versatile: Can be enjoyed on its own or paired with other dishes.
How to Make Cereal Chivda
Here’s a step-by-step guide on making cereal chivda:
Prepare the Ingredients: Gather your choice of cereals (cornflakes, puffed rice, or any diet-friendly cereal), nuts (peanuts, cashews), curry leaves, and spices (turmeric, mustard seeds, green chilies, and salt).
Roast the Nuts: In a large pan, dry roast the peanuts and cashews until they are golden brown. Remove and set aside.
Toast the Cereals: In the same pan, add the cereals and toast them lightly until they become crispy. Remove and set aside.
Prepare the Spice Mix: Heat a small amount of oil in the pan. Add mustard seeds and allow them to splutter. Then add curry leaves, finely chopped green chilies, and turmeric powder. Sauté until the curry leaves are crispy.
Combine and Mix: Add the roasted nuts and toasted cereals back into the pan. Sprinkle salt and mix everything well, ensuring the cereals and nuts are evenly coated with the spice mix.
Cool and Store: Let the mixture cool completely before transferring it to an airtight container. This ensures the chivda remains crispy.
Variations of the Recipe
Exploring Manjula’s Kitchen reveals a treasure trove of other delicious snack recipes that you might enjoy. Here are some related variations that you might find interesting:
Spicy Chivda: Spicy chivda crunchy savory snack is quick and easy to make. Chivda, also known as poha, is flattened rice that is flavored with spices.
Masala Peanuts: Spicy and crunchy peanuts that make for a perfect snack.
Spicy Sev: Thin, crispy strands made from chickpea flour and spices, perfect for munching.
Roasted Chickpeas: A healthy and crunchy snack made with chickpeas tossed in spices and roasted until crispy.
Methi Mathri: Crispy, savory crackers made with fenugreek leaves and spices.
Serving Suggestions
Cereal chivda can be enjoyed in various ways:
As a Snack: Enjoy it as a standalone snack during tea time or as a healthy mid-day treat.
With Yogurt: Pair it with a bowl of yogurt for a delicious and satisfying snack.
As a Topping: Use it as a crunchy topping for salads or soups.
For Travel: Pack it as a travel-friendly snack for road trips or flights.
Tips and Tricks
To perfect your chivda cereal recipe, consider these helpful tips:
Use Fresh Ingredients: Fresh nuts and cereals will enhance the flavor and crunchiness of your chivda.
Adjust Spices: Tailor the amount of green chilies and turmeric to your spice preference.
Store Properly: Ensure the chivda is completely cool before storing to maintain its crispiness.
FAQs
Is Cereal Chivda Vegan?
Yes, this recipe is vegan as it uses plant-based ingredients.
Can I Make It Ahead of Time?
Yes, this chivda can be made ahead of time and stored in an airtight container for up to two weeks.
What Can I Serve with This Chivda?
This chivda pairs well with yogurt, can be used as a topping for salads, or enjoyed on its own as a snack.
How Long Does It Take to Make?
The preparation and cooking time for this chivda is about 30 minutes.