Blog

  • Besan Puda – Cheela (Gram Flour Dosa)

    Besan Puda – Cheela (Gram Flour Dosa)

    Besan Puda Dosa

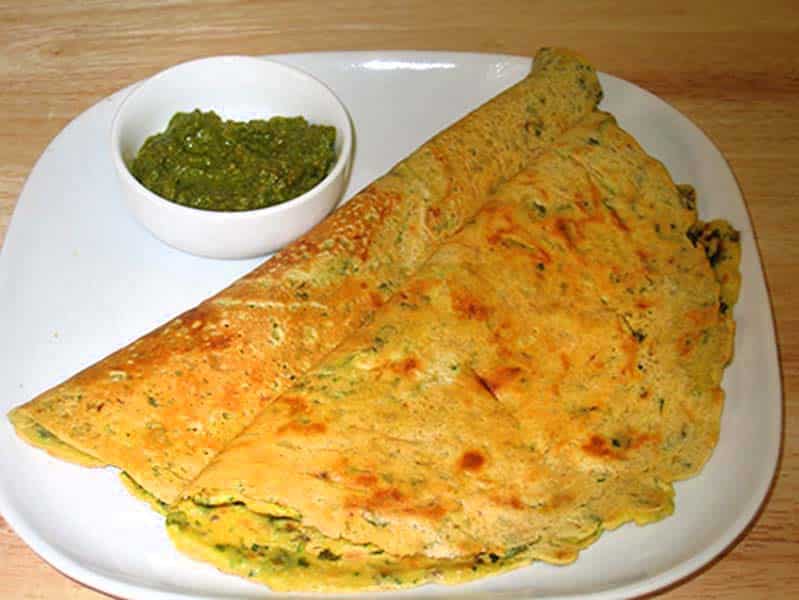
    Besan Puda – Cheela – Gram Flour Cheela

    Basen Ka Puda is a tasty low fat, quick & easy, vegan dish for breakfast or a light lunch. This recipe is quick to prepare and can be served many different ways. In my house this is a favorite dish for breakfast, folded with cheese.
    4.20 from 5 votes
    Prep Time 10 minutes
    Cook Time 15 minutes
    Total Time 25 minutes
    Course Breakfast
    Cuisine Indian
    Servings 3 people

    Ingredients
      

    • 1 cup besan gram flour
    • 1/4 cup rice flour chawal ka atta
    • 1 tsp salt
    • 3/4 cup water, use as needed
    • 1/2 tsp cumin seeds jeera
    • 1 tsp green chili finely chopped
    • 1 cup zucchini shredded
    • 1 tabs cilantro finely chopped hara dhania
    • 6 tbsp oil for cooking use as needed

    Instructions
     

    • Shred the zucchini with the skin and keep aside.
    • Mix all the dry ingredients together: besan, rice flour, cumin seeds, and salt. Add the water slowly to make a smooth batter, the consistency of pancake batter or Dosa batter. Add the green chilies, cilantro, and zucchini. Mix well.
    • Use a non-stick skillet and place on medium-high heat. Test by sprinkling a few drops of water on it. Water should sizzle right away. Pour about 1/2 cup of the batter into the skillet and spread evenly with a back of spoon. Starting from the center, spiral the batter outward evenly to form a circle about 7″ in diameter.
    • When batter starts to dry, gently spread one teaspoon of oil over it. Wait about 30 seconds; flip the puda using a flat spatula.
    • Press the puda lightly all around with the spatula to make the puda cook evenly. Turn the puda three to four time, until crisp and brown on both sides.
    • Repeat for the remaining pudas.

    Notes

    Tips:
    Spread the batter quickly, or it will begin to dry and will be difficult to spread.
    Serving Suggestions:
    You can serve the puda with yogurt, hari chutney, spicy pickles.
    Pudas can also be served as quesadillas. Fold the pudda with shredded cheddar cheese, sliced tomatoes, or roasted vegetables.
    Variations
    Zucchini can be replaced with finely chopped spinach, shredded potatoes, or  finely shredded cabbage.
    If you make the puda without vegetables, do not use rice flour. This will cause the pudas to be very dry.
    Cilantro can be replaced with ground coriander powder.
    Keyword Besan Cheela, Healthy Breakfast, Quick And Easy
    Tried this recipe?Let us know how it was!

    How to Make Besan Cheela: Crafting a Delightful Indian Pancake

    Besan Cheela is a quick & easy bread based breakfast recipe ideal for those on a gluten free and looking for low fat vegan alternative.  Besan cheela, also known as chilla or besan chilla, is a savory Indian pancake that’s not only delicious but also packed with nutrients. Made primarily from gram flour (besan), this versatile dish can be customized with various ingredients to suit individual tastes. From shredded vegetables to aromatic spices, each component contributes to the overall flavor and texture of the cheela. Let’s delve deeper into the art of crafting the perfect besan cheela, step by step.

    Step 1: Shredding Zucchini for Besan Cheela

    The journey to creating the perfect besan cheela begins with the humble zucchini. Its vibrant green hue and delicate flavor make it an ideal addition to this traditional recipe. Start by carefully shredding the zucchini, ensuring to retain its nutritious skin. This step not only adds a delightful texture to the besan cheela but also enhances its nutritional value. Once the zucchini is finely shredded, set it aside, eagerly awaiting its incorporation into the besan cheela batter.

    Step 2: Preparing Dry Ingredients for Besan Chilla

    The foundation of a perfect besan chilla lies in the precise combination of dry ingredients. In a mixing bowl, amalgamate besan, rice flour, cumin seeds, and salt, creating the essential base for the besan cheela batter. Gradually introduce water, achieving a smooth consistency akin to that of pancake or dosa batter. The inclusion of finely chopped green chilies, fresh cilantro, and the shredded zucchini further enriches the mixture, imparting a burst of flavors and a harmonious medley of textures.

    Step 3: Heating the Skillet for Making Besan Cheela

    An indispensable element in the besan cheela-making process is a well-heated skillet. Place a non-stick skillet over medium-high heat and confirm its readiness by performing the quintessential water droplet test – the sizzle upon contact indicates the skillet’s optimum temperature for crafting the perfect besan chilla.

    Step 4: Pouring and Spreading Batter for Besan Chilla

    With the skillet primed and ready, it’s time to pour approximately 1/2 cup of the besan cheela batter onto its surface. Using the back of a spoon, adeptly spread the batter evenly, starting from the center and spiraling outward. This technique ensures the formation of a well-rounded besan chilla, approximately 7 inches in diameter, ready to be adorned with flavorful toppings.

    Step 5: Cooking the Besan Cheela to Perfection

    As the besan cheela begins to set on the heated skillet, delicately spread a teaspoon of oil over its surface. After a brief interval of about 30 seconds, gracefully flip the cheela using a flat spatula. Applying gentle pressure with the spatula ensures uniform cooking, and this process is repeated three to four times until the besan chilla attains a crisp, golden-brown exterior on both sides, tantalizing the senses with its aroma and visual appeal.

    Step 6: Repeating the Process for Besan Cheela

    The besan cheela-making process is a delightful rhythm that beckons for subsequent rounds. Repeat the aforementioned steps for the remaining batter, creating a succession of besan chillas, each promising a savory and gratifying experience. Whether enjoyed as a snack or a light meal, besan chillas stand as a testament to their versatility and irresistible charm.

    In conclusion, mastering the art of making besan cheela is not only a culinary feat but also a journey of exploration and creativity. With each step carefully executed and each ingredient thoughtfully incorporated, you can create a dish that delights the palate and nourishes the body. So, gather your ingredients, heat up your skillet, and embark on the flavorful adventure of making besan chillas – a dish that’s sure to become a favorite in your kitchen repertoire.

  • Aloo Paratha

    Aloo Paratha

    Aloo Paratha

    Aloo Paratha

    Aloo Paratha, is a whole wheat flat bread stuffed with spicy potato mix. Parathas are made plain or variety of different fillings, but potato filling is most popular. This delicious Aloo Paratha is very popular in north India, for any time of the day. Specially in Punjab Aloo Paratha is staple for breakfast.
    5 from 9 votes
    Prep Time 20 minutes
    Cook Time 20 minutes
    boiling pototoes 25 minutes
    Total Time 40 minutes
    Course Main Course
    Cuisine Indian
    Servings 3 people

    Ingredients
      

    Dough

    • 1 cup whole-wheat flour
    • 1/4 tsp salt
    • 1/2 cup water use as needed

    Filling

    • 2 medium potatoes
    • 1/4 tsp salt
    • 1/2 tsp cumin seeds jeera
    • 1 tbsp green chili finely chopped
    • 1/2 tsp garam masala
    • 1/2 tsp mango powder amchoor

    Also Need

    • 1/4 cup whole wheat flour to roll parathas
    • 3 tbsp oil to cook parathas

    Instructions
     

    Making Dough

    • Mix flour, salt, and water together to make a soft dough (add water as needed).
    • Knead dough for two minutes on a lightly greased surface to make the dough soft, smooth and pliable. Set the dough aside and cover it with a damp cloth. Let the dough rest at least ten minutes.

    Filling

    • Boil 2 medium potatoes until tender. Once cooked, drain the water and let the potatoes cool down. Note: Do not cool the potatoes under running water, as they will absorb the water and come out too soft.
    • Once the potatoes are cool enough to handle, peel and mash them. Add green chilies, cilantro, cumin seeds, garam masala, mango powder, and salt to mashed potatoes. Mix well.

    Making Paratha

    • Divide the dough into six equal parts and form into balls. 
    • Then divide the potato filling into six parts and shape into balls. Potato balls should be 1½ times larger than the dough balls.
    • Roll dough ball into a 3” circle. Place a filling ball in the center. Pull the edges of the dough to wrap it around the potato filling. Repeat to make all six balls. Let the filled balls settle three to four minutes.
    • Meanwhile heat an iron or other heavy skillet on medium high heat until moderately hot. To test, sprinkle water on the skillet. If the water sizzles right away, the skillet is ready.
    • Press the filled ball lightly on dry whole wheat flour from both sides. Using a rolling pin, roll the balls lightly to make six-inch circles, keeping the sealed side of the balls on top. If the dough sticks to the rolling pin or rolling surface, lightly dust the parathas with dry flour.
    • Place the paratha on the skillet. When the paratha start to change color and begins to puff up, flip it over. You will notice some golden-brown spots.
    • After After a few seconds, drizzle one teaspoon of oil over the paratha. Flip the paratha again and lightly press the puffed areas with a spatula.
    • Flip again and press with a spatula making sure the paratha is golden-brown on both sides. Repeat for the remaining parathas.
    • Paratha are best served hot and crispy. They will be soft if not served hot. If you are not going to serve them right away, cool them on a wire rack to keep them from getting soggy.

    Notes

    Notes
    Parathas can be kept unrefrigerated for up to two days wrapped in aluminum foil or in a covered container.  For later use, parathas can be refrigerated three to four days or frozen for up to a month. Re-heat using a skillet or oven.
    Variations
    Substitute chopped cilantro with ¼ cup finely chopped mint leaves, or experiment with your favorite herb. Be sure to pat the herbs dry before adding to the mixture.
    Serving Suggestions
    Parathas can be served with Tomato Chutney, Plain Yogurtmattar Paneer, or Green Chilli pickle.
    Serve it like a Mexican quesadilla by topping it with cheese and sliced tomatoes, then folding it in half.
    Keyword Aloo Spicy Bread, Breakfast, Stuffed Paratha
    Tried this recipe?Let us know how it was!

  • Palak Paneer (Spinach)

    Palak Paneer (Spinach)

    Palak Paneer

    Palak (Spinach) Paneer

    Palak Paneer is creamy spinach dish with paneer . This is a popular dish with youngsters and served in every indian resturant. The creamy texture of spinach with paneer is a good combination. I like to serve Palak Paneer with Naan or Tandoori Roti.
    4.72 from 7 votes
    Prep Time 10 minutes
    Cook Time 30 minutes
    Total Time 40 minutes
    Course Main Course
    Cuisine Indian
    Servings 4 people

    Ingredients
      

    • 1 10 oz packet of chopped frozen spinach or 4 cups of fresh finely chopped spinach
    • 1/3 lb paneer
    • 2 med tomato pureed
    • 1 tsp chopped ginger
    • 1 tsp corinader powder dhania
    • 1/2 tsp turmeric haldi
    • 1/2 tsp red chili powder lal mirch
    • 1 tbs oil canola or vegetable oil
    • 1/2 tsp cumin seed jeera
    • 1/8 tsp asafetida hing
    • 1/2 tsp salt
    • 2 tbs whole wheat flour
    • 1/3 cup heavy cream
    • 1/2 tomato thinly sliced for garnishing

    Instructions
     

    • If using frozen spinach thaw and blend it just for a minute so spinach has a creamy texture but without becoming pasty.
    • blend the tomatoes and ginger to make puree.
    • Mix coriander, turmeric, and red chili with tomato puree and set aside.
    • Mix whole-wheat flour with heavy cream and set aside.
    • Cube the paneer in about half inch pieces and deep fry them on medium high heat just for few minutes so paneer become very light gold in color, take paneer out on paper towel so extra oil can be absorbed.
    • Heat the oil in a saucepan. Test the heat by adding one cumin seed to the oil; if it cracks right away it is ready.
    • Add hing and cumin seed. After cumin seeds crack, add the tomato puree mixture, and let it cook for a few minutes until the tomato puree is about half in volume.
    • Add the spinach, and let it cook on low medium heat for about 10 minutes covered.
    • Add heavy cream mixture and let this cook another four to five minutes.
    • Add paneer and fold it gently with spinach and let it simmer for a 2-3 minutes. Pot should remain covered until the cooking is finished, otherwise the spinach will splatter.
    • Transfer the spinach to a serving dish and spread the tomato slices over the top, and cover the dish so tomato slices get tender with the steam from the spinach.

    Notes

    You can replace the heavy cream with 1 1/2 cups of milk.
    serve Palak Paneer with Naan or Tandoori Roti
    Tried this recipe?Let us know how it was!

    How to Make Palak Paneer Masala by Manjula’s Kitchen

    Paneer Palak, a beloved North Indian dish, epitomizes the perfect party recipe with its creamy spinach and delectable paneer in rich gravy. This is not merely a culmination but a convergence, as the paneer becomes an integral part of the spinach symphony.

    1. Blanch the Spinach: Bring a large pot of water (6 cups) to a boil. Add the spinach and cook for precisely one minute. Drain the water immediately and immerse the spinach in ice-cold water for two minutes. This step preserves the vibrant green color of the spinach.
    2. Create the Palak Paneer Base: Prepare a smooth puree by blending the blanched spinach with ginger and green chili. Aim for a creamy consistency, avoiding an overly thick paste.
    3. Soften the Paneer: Soak the cubed paneer in hot water (3 cups) for at least five minutes. This step softens the paneer, allowing it to absorb the flavors of the masala.
    4. Temper the Spices: Heat oil in a large saucepan over medium-high heat. Add cumin seeds and asafetida. Once the cumin seeds crackle, introduce the chopped tomatoes and cook for 1-2 minutes.
    5. Incorporate the Spices: Add coriander powder, turmeric powder, red chili powder, salt, and a hint of sugar to the simmering tomato mixture. Stir well to combine and allow the spices to release their aroma.
    6. Cook the Spinach Puree: Reduce heat to low and add the prepared spinach puree. Simmer for 5-6 minutes without a lid to retain the vibrant green color of the spinach.
    7. Thicken the Gravy: For a thicker consistency and richer flavor, create a slurry by mixing flour with water. Gradually whisk the slurry into the simmering palak paneer mixture. Additionally, incorporate cream for a touch of silkiness.
    8. Incorporate the Paneer: Gently fold in the softened paneer cubes and simmer for another five minutes. This allows the paneer to absorb the flavors of the masala.

    Serving: Enjoy your Palak Paneer hot with rice or naan bread.

    Tips:

    Spinach Selection: Use fresh, young spinach for the best color and flavor. Wash thoroughly to remove any dirt or grit.

    Blanching Technique: Don’t overcook the spinach during blanching (step 1). One minute is sufficient to preserve the vibrant green color and prevent mushiness.

    Creamy Texture: For a richer and creamier gravy, add a dollop of heavy cream or cashew paste at the end.

    Spice Level: Adjust the amount of green chili or red chili powder to suit your preference.

    Flavor Boost: Include a bay leaf or a green cardamom pod while tempering the spices for a deeper flavor profile.

    Suggestions:

    Serving: Pair your Palak Paneer with basmati rice, jeera rice, naan, or roti for a complete and satisfying meal.

    Garnish: For a fresh touch, garnish your Palak Paneer with chopped cilantro or a dollop of plain yogurt.

    Leftovers: Store leftover Palak Paneer in an airtight container in the refrigerator for up to 2-3 days. Reheat gently on the stovetop before serving.

    Variations:

    Vegetable Palak Paneer: Add chopped vegetables like carrots, peas, or bell peppers for extra color, texture, and nutrients.

    Mushroom Palak Paneer: Substitute paneer with sliced mushrooms for a vegetarian twist.

    Coconut Palak Paneer: Stir in a can of coconut milk for a creamy and tropical twist.

    Dry Palak Paneer: Reduce the amount of water or simmer for a longer duration to create a thicker, dryer gravy.

    FAQs:

    Can I substitute spinach with another green leafy vegetable?

    Yes, you can use Swiss chard or kale, but the color and flavor will be slightly different.

    Can I use paneer alternatives?

    Yes, firm tofu can be used as a vegetarian substitute for paneer.

    Is Palak Paneer healthy?

    Yes, Palak Paneer is a healthy dish packed with protein from paneer, iron from spinach, and fiber from both ingredients.

    How long does it take to make Palak Paneer?

    The total preparation time is typically around 30-40 minutes.

    Enjoy making and savoring this delicious and versatile Palak Paneer recipe!

    If you liked this recipe. You must also try: Masala Bell Pepper Curry, Gulab Jamun, Pineapple Kulfi Ice Cream, Makhana Mutter Curry, and Ragda Puri Chaat

  • Zucchini Rice

    Zucchini Rice

    Zucchini Rice

    Zucchini Rice

    Zucchini rice is a great gluten free, vegan side dish along with main course for any time of the day. Serving for 4.
    5 from 2 votes
    Course Side Dish
    Cuisine Indian
    Servings 4 people

    Ingredients
      

    • 1 cup rice
    • 2 cups water
    • 1 cup shredded zucchini with skin
    • 1 tbsp of oil
    • 1 tsp of butter
    • 1/2 tsp cumin seed jeera
    • 1/2 tsp black mustard seed rai
    • 4 red peppers whole
    • 2 Bay Leaves tajpat
    • 1/2 tsp salt
    • 1/2 inch small piece of cinnamon stick dal chini
    • 1 tsp lemon juice

    Instructions
     

    • Heat the oil and butter in a heavy saucepan over medium high heat.Test the heat by adding one cumin seed to oil; if the cumin cracks right away oil is ready.
    • Add cumin seeds and mustard seeds to the oil. After seeds crack add red pepper and bay leaves. Add rice and stir-fry for about 2 minutes.
    • Add water, zucchini, salt and lemon juice. Stir and bring to boil.
    • After rice comes to a boil turn the heat down to low and cover the pan. Cook rice for about fifteen minutes or until the rice is tender and the water has evaporated.
    • Serve as is, with soup, yogurt, and pickle.

    Suggestions

    • Melt some cheddar cheese over rice.

    Variations

    • Replace zucchini with 1 1/2 cup finally chopped spinach.
    Tried this recipe?Let us know how it was!

    Elevate Your Cooking with Zucchini Rice: A Flavorful and Nutritious Delight

    Zucchini rice offers a delightful gluten-free option for those seeking quick and easy vegan meals. Made primarily with rice and zucchini, this dish is not only flavorful but also nutritious. Zucchini, rich in vitamins and minerals, adds a refreshing crunch and subtle sweetness to the rice. With minimal ingredients and simple cooking methods, zucchini rice is perfect for busy weeknights or as a side dish for larger gatherings.

    1. Heating the Oil and Butter: Preparing for Flavorful Zucchini Rice

    Begin crafting the delightful zucchini rice by heating a combination of oil and butter in a sturdy saucepan over medium-high heat. To ensure the oil reaches the optimal temperature for sautéing, conduct a quick test by introducing a single cumin seed into the oil. If the seed crackles upon contact, it signifies that the oil is primed and ready to infuse its essence into the dish.

    2. Tempering the Spices: Enhancing Aromatics in Zucchini Rice Recipe

    Elevate the flavor profile of the rice zucchini recipe by adding a medley of aromatic spices to the heated oil and butter. Sprinkle in cumin seeds and mustard seeds, allowing them to crackle and release their enticing aroma into the culinary canvas. Follow this with the addition of red pepper and bay leaves, infusing the dish with layers of complexity and depth.

    3. Sautéing the Rice: Fostering Texture and Flavor in Zucchini Rice Recipes

    Introduce the rice to the fragrant spice blend, stirring vigorously to coat each grain with the aromatic oils. Continue to stir-fry the rice for approximately 2 minutes, coaxing out its nutty flavors and enhancing its texture in preparation for the upcoming infusion of moisture and flavor.

    4. Adding Water and Zucchini: Building Layers of Flavor in Rice Zucchini Recipe

    Elevate the zucchini rice recipe to new heights by incorporating water, fresh zucchini, salt, and a splash of invigorating lemon juice into the saucepan. Stir the mixture well, allowing the flavors to meld harmoniously as it comes to a gentle boil, infusing the rice with the vibrant essence of the zucchini and citrus.

    5. Simmering to Perfection: Achieving Tender Texture in Zucchini Rice

    Once the rice mixture reaches a rolling boil, reduce the heat to low and cover the pan, initiating the gentle simmering process. Allow the rice to cook undisturbed for approximately fifteen minutes, or until the grains are tender and have absorbed the flavorful liquid, resulting in a tantalizing medley of textures and tastes in the completed zucchini rice recipes.

    6. Serving Suggestions: Enhancing Enjoyment of Zucchini Rice

    Indulge in the delightful simplicity of zucchini rice by serving it as is, alongside comforting accompaniments such as soup, yogurt, and pickle. For a decadent twist, consider melting a generous portion of cheddar cheese over the rice, imparting a luscious richness that elevates the dish to new heights of indulgence.

    Suggestions for Variation: Experimenting with Flavors in Zucchini Rice

    For a refreshing twist on the classic recipe, consider substituting zucchini with 1 1/2 cups of finely chopped spinach, infusing the dish with vibrant green hues and the earthy essence of leafy greens. This variation offers a delightful alternative for those seeking to explore new flavor profiles while retaining the comforting appeal of zucchini rice.

    If you loved our zuchini rice recipe then you must also check out other variants of Rice: Vegetable Biryani, Masala Khichdi, Mango Rice, Quinoa Vegetable Pilaf and Lemon Rice