
How to make Paneer
How To Make Paneer
Ingredients
- 8 cupa milk, half gallon
- 1/4 cup lemon juice
Instructions
- Mix lemon juice in half cup of hot water and put aside.
- Boil the milk in a heavy bottomed pan over medium heat, stirring occasionally, making sure not to burn milk.
- As the milk comes to a boil, add the lemon juice gradually and stir the milk gently. The curd will start separating from the whey, turn off the heat.
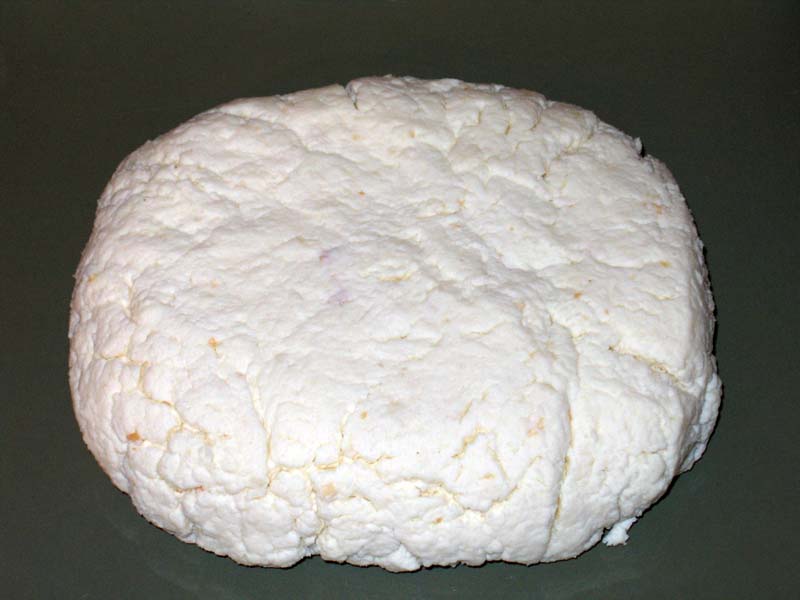
- Once the milk fat has separated from the whey, drain the whey using a strainer line with cheesecloth, or muslin cloth. Wrap the curds in a muslin cloth, rinse under cold water, and squeeze well. This process takes out the sourness from the lemon.
- To take out the excess water, press the wrapped paneer under a heavy pan for about 1 hour.
Notes
Homemade Paneer Recipe By Manjula’s Kitchen
Here is a detailed Guide on How to Make Homemade Paneer at Home from Milk. Learning the art of paneer-making at home allows you to enjoy fresh and homemade cheese in your favorite recipes. Learn the art of crafting delightful homemade paneer with this step-by-step guide on how to make paneer at home from milk. Whether you’re a novice or an experienced cook, discover the joy of creating your paneer with this comprehensive walkthrough.
Section 1: Gathering Ingredients and Tools
To embark on your homemade paneer journey, it’s crucial to gather the essential ingredients and tools. Begin with selecting quality milk, a heavy-bottomed pan, fresh lemon juice, and a strainer lined with cheesecloth or muslin cloth. Choosing the right milk is key; opt for 2% milk for desserts like rasgullas and ras malai, and regular milk for savory dishes such as sandaish or peda.
2.1 Boiling the Milk
The first step to creating a homemade paneer is to start by pouring the milk into a heavy-bottomed pan and placing it over medium heat. Stir occasionally to prevent the milk from burning. Maintain a watchful eye until the milk reaches a gentle boil, signaling the beginning of the paneer-making process.
2.2 Adding Lemon Juice
While the milk is heating, mix fresh lemon juice with hot water and set it aside. Once the milk starts boiling, gradually introduce the lemon juice into the mix, all while stirring gently. Witness the magic unfold as the curds separate from the whey, signifying a crucial phase in how to make paneer from milk.
2.3 Draining and Wrapping
Upon achieving the desired separation of curds and whey, turn off the heat. Utilize a strainer lined with cheesecloth or muslin cloth to drain the whey, leaving you with the precious curds. Next, wrap the curds in muslin cloth, rinse under cold water, and give it a good squeeze to remove any excess liquid.
2.4 Removing Sourness
To eliminate the lemony tang, rinse the wrapped paneer under cold water. This step ensures that the paneer remains neutral in flavor, ready to adapt to both sweet and savory culinary creations.
2.5 Pressing and Shaping
The pressing stage is crucial in how to make paneer from the milk recipe to determine the texture of your homemade paneer. Lay the wrapped paneer under a heavy pan, pressing it for about an hour. Before pressing, knead the paneer sufficiently to prevent it from becoming crumbly. Adjust the pressing duration based on your preference for a softer or firmer texture. Once pressed, cut the paneer into the desired shapes, ready to be incorporated into various dishes.
Section 3: Testing Paneer Consistency
A pivotal test to ensure the right water content in your paneer involves rubbing a small piece on your palm. After 15-20 seconds of rubbing, the paneer should form a firm yet smooth ball, indicating the optimal consistency for culinary use.
Section 4: Tips and Variations
4.1 Tips for Dessert Dishes
For a truly authentic taste of desserts, many Indian chefs prefer to do paneer make at home, allowing them to control the quality and freshness of the cheese. For those planning to use paneer in desserts, refrigerate it for 1 to 2 days. The choice of 2% milk is recommended for sweets like rasgullas, ras malai, and chamcham, imparting a rich and creamy texture to these delicacies.
4.2 Tips for Main Dishes
When preparing paneer for main dishes, knead it thoroughly before pressing to prevent crumbliness. Vary the pressing time to achieve the desired level of firmness. Paneer for main dishes can be refrigerated for a few days or frozen for long-term storage.
4.3 Variations in Flavor
Elevate the flavor profile of your homemade paneer by experimenting with variations. Add salt to the paneer for a savory twist and incorporate spices such as black pepper, roasted cumin seeds, chopped green chilies, or cilantro to suit your taste preferences.
Mastering the art of making paneer at home from milk is a rewarding culinary skill that allows you to customize this versatile ingredient for a myriad of dishes. This detailed guide ensures you understand each step involved, from selecting the right ingredients to testing the consistency and exploring variations. Embrace the satisfaction of creating fresh and flavorful homemade paneer, ready to elevate your culinary creations.
284 Responses
Leave a Reply
You must be logged in to post a comment.

I live in Canada and recently bought paneer. However its not like a block. Its sorta mixed with a bit of left over curd from the preparation process – probably to increase shelf life (to get am image of what I’m saying google neilsen cottage cheese haha). I was wondering if I can drain it out and use it or use it directly in cooking paneer bhurji? Or are there some other useful recipes?
Hello! I could have sworn I’ve visited this
website before but after looking at many of the
posts I realized it’s new to me. Regardless, I’m definitely happy I came across
it and I’ll be book-marking it and checking back often!
ummmm just wondering. You do realize that not paneer it ricotta right? Just saying, its still yummy though.
Ma’am , can we use UHT milk for making Paneer or we use the full fat milk. Which option is better to use lemon juice or vinegar for making paneer.
Amit, full fat milk
Hello mam,
How to make Malai namkeen paneer?
I have been trying to add common salt to paneer by different methods but all in vain.
Please help.
Kamal, sorry I did not understand your question.
Thanks for the tips. I’ve just made paneer for first time and it tastes awesome. All bcoz of you. Thanks.
My wish of making panner by myself at home is completed and its all because of you Mam. Thanks for the recipe and I need to tell you that its very delicious.
Ankita, Thank you, I appreciate
very nice recipe i love it
I had got fresh paneer from india,had frozen it before keeping in the bag. On arriving home we refrigerated it. But then it started crumbling n was a total waste.
How do u freeze paneer to save it fr long term use n how to defrost it?
Bush, when I buy paneer here from Indian grocery store, I cut them in small pieces and freeze. when you are ready to use put in hot water for about 10 minutes and use,
We are in Kullu India now and have tried CURD which is really very runny lemony yogurt and love the flavor. The recipes I see here make hard cheese. How can I make the runny stuff? Just drain, don’t squeez?
Firts time I made paneer and all thanks to your lovely recipe. Thanks very much. Something that made me feel good.
Can i use lemon to broke milk and make paneer from it directly is it ok ?
Ankita, I don’t understand your question, because I use lemon to separate
Wow!! Nice way to prepare paneer
I too make paneer just like you but rinse the milk solids under water before putting a weight on it. I noticed that you didn’t do that. I am wondering if paneer sets better if you don’t wash the milk solids?
BTW- Great pictures and lovely blog.
mam it is very useful to make panner can I use this for a week or two to three days
babu, 2-3 days
Can I use fresh market paneer.
Deepti, the paneer we find in USA doesn’t work good for any sweet dish.
Love your recipes. Am both gluten and dairy free. Have tried a few of your recipes containing yogurt and have successfully substituted them with coconut milk. Have you attempted to make paneer with coconut milk?
Can I make rasugullah with frozen paneer
Maria, for rasgulls paneer needs to be fresh
WOW just what I was searching for. Came here by searching for gain muscle rapidly
Thank you for this video – very well done! and i made the paneer successfully. Can you please tell me what you mean by 2% milk?
Also i don’t think you mentioned what you did with the whey (unless i missed that). I hope you don’t throw it away! It is very nutritious and high in protein – i use it for soups or just drinking
Thank you Manjula
Regards Caroline
2% milk is also referred to as skimmed milk.
Thank you manjula, your cooking is great and inspiring.
Zaynab, Skimmed milk is different.
Yes there is quite a difference between skimmed and 2%.
2% milk is called semi-skimmed in the UK. Skimmed is 0% fat.
Hi,
Saw your rasgullas recipe. What happens if use whole milk?
Thanks.
Hi Manjula,
What kind of milk can I use if I live in the states? I believe you live in the United States too, right? Isn’t all milk here pasteurized? I just tried making the paneer and got a sliver amount and after reading your comments on youtube saw that it will not work with ultra pasteurized mik. I don’t know if mine is ultra pasteurized but it is pasteurized. What are my other options for making paneer? My husband LOVES paneer and I did have a lot of fun making it just now…just yielded hardly nothing for all of that milk. Please help! 😀 😀
Hey, just wanted to answer your question, as I don’t see any other replies. I live in Canada, so our milk is the same. I have made this recipe before with 3.25% milk, which is a lot fattier, and it worked perfectly. Maybe try that?
Ultra pasteurized milk is also known as “shelf stable” or UHT milk. It doesn’t require refrigeration before use. If you purchase milk from the fridge section of your grocery store you should be fine.
I’ve tried a few recipes for making paneer but this is the best. Works out beautifully. I’m British but lived for a long while in India traveling the country. The best paneer I had was in Rajasthan but your paneer, Manjula, is perfect 🙂
Hello Manjula Aunty,
Can I use white vinegar instead of lemon juice?
Kay,
you can use vinegar, I prefer lemon juice
Can you use lemon concentrate from a bottle?
Yes That will work
Manjulaji,
Could you tell me how to prepare fresh cream at home?
Kani
Di
I really like the way you explain…luv ur recipes.Just wanted to know that from 8 cups of whole milk how much amount of paneer would be obtained
Thnx
Thank you!
I’ve just tried the recipe once, and it worked fairly well, but it seemed that I produced an awful lot of whey, and relatively little curd. Do you have any suggestions about how to encourage more solidification? Perhaps adding more acid?
Thanks
Anne
Yeah, it does that, but the whey is great for so many things. Don’t see it as a bad thing, or pour the whey down the drain. Use it wherever a recipe calls for water. It works wonders. One of my wife’s favorites is to make bread and stuff it with the cheese. You want the whey to make that bread, for instance.
Hi I would like to make my Paneer with “soy milk” not the regular milk, for vegan. but my soy milk is not separate with adding lemon jounce then what should I do please help me with that, thanks a lot 🙂
That would make tofu, not paneer! You can make tofu/”soy paneer” with lemon juice as solidifier, but I think it is easier to use apple cider vinegar. The resulting “cheese” will not have the same properties as paneer made with milk, of course. Do a search for “home made tofu” and you will find a plethora of sites to help you!
hi…. i am about to make chum chum and i have made it b4 by following ur video and they came out a little flat… now my question is that can i add baking soda to paneer? or in the milk for making the paneer?
Roman,
No baking soda, kneed the paneer more
Hello ,
Can u please tell me “Paneer” should be best made out of which Milk?
I mean
1) Whole Milk
2) 2% Fat Milk
3) 1% Fat Milk
4) Half and Half Milk
Saakshi
Whole milk or 2% milk
can i use this paneer for making pizza or paneer curry ?
I made paneer this exact method, and it was excellent.
Howmuch paneer will get from one litre milk?
about 150 grams of paneer
can I make paneer from broken milk before the expiry date?
As i am planning to start the panner in small scale .Please help
the water is not completely separated from paneer, can i reboil it to separate the water completely.
please guide
Oh Thank you very much for this recipe. I have always loved paneer dishes but was too scared to try to make it at home. I would drive like 20 miles to eat at the buffet restaurant or go many miles to the Indian Grocery & pay $6 just for a few ounces of paneer. After watching your recipe (like 5 times) times, I got up the nerve to try it….I was so sure it would go wrong and I’d end up throwing it away that I only used a half gallon LOL, but it turned out GREAT!!! , and the only problem was that we wanted more, since then I have made it several times using a whole gallon. Thanks so much. I LOVE you!!
I made paneer the other week and it was DELICIOUS. I moved into a small town and missed the Indian food including the paneer I was able to obtain from living in the larger city. I decided to learn how to make my own.
Your recipe is simple, easy to follow and most of all the finished product is DELICIOUS! Nothing beats fresh homemade cheese from farm fresh milk that I can get living in a small town. So now I have the flavors I learned to adore, added to the freshness of small town life in my very own kitchen. Thank you!
Thanks manjula ji. Now it is very clear to me.
I will try today paneer and its really very good thanks alot……
Thank you, Manjulaji.
I always enjoy your Recipies.
Thank you, Manjula. I always enjoy your videos.
Thank you very much for providing an explanation on how to prepare a key ingredient otherwise completely unknown to suburbanite Colorado, in that it has allowed my family to be able to explore the wonderful world of Indian food, and this very night my dad makes Saag for the first time.
Much obliged,
A Coloradan suburbanite.
Lasda,
There are a few good Indian grocers in aurora. I go there to get hing and amchur.
manjula aunty how r u ?? well i tried today paneer and its really very good thanks alot
Thank you very much for your recipies!
We will try out pakora and then paneer to prepare Chum Chums 🙂
We are great fans of indian food, especially vegetarian style.
Kind regards from Germany!
Thank you fdor such a stright forward recipe,I shall try it out today. Other recipes are so complicated needing thermometers or various gadgets. I love experimenting but that would all be too much. I was just looking for a recipe to use up milk which is too old to use as in drinking or coffee and tea and came across this one. If it is as easy and tastes as good as it looks I shall definately look in to many more recipes. Well done !!!!!
Hi Manjula – I am writing you from Copenhagen Denmark and just thought I would let you know that I am a fan of your site. I have been doing curries for a while – but one day I just had some squash and searched for indian inspiration to do it and came across your spicy squash. Very delicious. So I got fascinated with the way you make it look easy and now I am a regular visitor. Now I am even contemplating making paneer myself – a thing which would never have happened if I had not found your site. Thanks for the great inspiration. Br Nanna
Hi Manjulaji,
I did the paneer and it came out wonderful. But I was feeling sad to throw away all the water that lefts out of the milk after curdling. Can you suggest the ways we could use that water ?? In cooking or something else ?
Thanks,
Jaya
Jaya,
You can use water for making dough or use in making any gravy dish.
Hi Manjula,
I was always afraid to make paneer or even where to begin thinking it was very complicated. I watched your video and I was blown away at how simple you made it seem! I am looking forward to using the recipe as well as using your oil vs ghee method on paranthas :p Mine always come out too crispy. Thank you for your continued recipes!! :p
It actually worked out great. I made 4 cups of paneer for my pedas.
i love ur paner
Hi Manjula ji.
Thank you so much..I made the mattar ki kachori and it was delicious.. i check ur website for almost very recipe you have added..Being an vegeterain myself, I just love ur site..
Thank you very much…
Thought you’d be interested in this “how to make Paneer Cheese”
Nancy
I was really pleased with the method of ” How to make paneer “.
Very well put together in a very simplified way.
Great! Can we have a receipe for a proper punjabi kebab and chicken tandoori please.
Regards,
Surjit.
Mr Surjit – Manjula is vegetarian – this is a vegetarian website.
Dear Manjula
I made ”paneer” and went out delicious. I do not know why but when I tried to knead my cake sticks. Why? It’s too fat cheese? Cheese cake have to be fresh or have to sit in the fridge for a while?
i want paneer prepation technique
Dear Manjula
I love to learn new and interesting things are and especially when I serve. But it must also have a good teacher. And in the kitchen you’ve found such a teacher. Along with written recipes videos are very helpful. In many recipes are several small “secret” for good food out. You reveal us and these little secrets. I remember when I was young and someone gave me a prescription with the words “as you put flour contains” skip it. Over time I have met homeowners who revealed the mystery to me “as comprising flour” and I could do and those recipes. Also when I was young I wanted to learn to crochet and knitting. And I found that not everyone has the talent to explain. And so it was at school, not every teacher has the talent to teach no matter how intelligent they are. I can tell you’re a good teacher. I admire your patience and dedication to post so many recipes and others. God bless you and bless you for your work.
I love the way you teach your recipes. I thank you for sharing your wonderful Indian dishes.
can I use lime instead of lemon? or if I use vinegar, do I use white vinegar? and do I also mix it up with water?
thank you,
I have raw milk around 10% to 15% fat. What would be the difference in texture?
Ber
Hello Aunty,
I would like to try this recipe and use it in the Palak Paneer recipe, I need 1/3 pound paneer for this.
I wanted to ask, how much paneer does this recipe provide?
Formula of paneer
milk+boil at 90¤c +maintain at 60¤c+setric acid(satri)(1%)+curding+out whey frm chena+dbab thoda sa paneer pr only 20 minut k liye +ice water 5¤c me dubona after det paneer is ready 4 u.
Hi Auntyji,
I made paneer exactly with the instructions given by you. I was able to make it well. But,the paneer became crumbly after cutting and dissolved into particles when I put in the gravy. Could you please let me know the reason behind and the steps to be taken to avoid making the mistake next time.
I appreciate your response.
Hello,
it sounds like you did not knead the cheese enough before pressing it; that will prevent it from being crumbly.
This looks so good and easy! Thanks so much!
Groan!! Aunty I cannot understand what I did wrong. How come my paneer is so crumbly? While cutting I had to be extremely careful not to break the pieces, and they looked so untidy with rough edges. Finally, when added to a hot sauce, they became even more fragile and some more crumbs came off and my sauce lost that clear look that makes it so attractive. Taste wise, I guess I had no problem and my encouraging husband ate up so it didnt go to waste.
I am trying to buy Indian products in Las Vegas. Trader Joe’s now has Palek Paneer
but where can I buy paneer, already made and tandoori masala. Thank you.
Hi Manjula Aunty,
I have tried many recipes of urs..Its comes out very well…
My family just loves it..
I also tried paneer and dat too comes out very well!!!!!!!!!!
Thank u Manjula Aunty!!!!!!!
Thanks Manju…Panneer comes out very well….:)
Can you use ricotta cheese as a substitue for paneer in your recipes?We don’t get full cream milk
did u mean chena by paneer or cheese? in bengali paneer means cheese…if i use salt to make paneer how much i can use?
Thank you Auntie! You’re the best!
how much waight paneer its gona be in making paneer
Hello Manjula! 🙂
I just wanted to say…YOUR RECIPE’S ROCK!!! They are the BEST!!!
I am in Cottonwood Arizona U.S., and I have to say that your recipes are the best and you should have your own t.v. show here!!!
I have learned so much from you and love watching your very well done videos!!!
THANK YOU SO MUCH!!!
Love, Light & Cosmic Infinity! 🙂
You are simply the best. What would I ever do without you?
Since I got engaged two years ago I needed to learn to make Indian food and you saved my life. My husband cant believe I make idli sambar vada burfi jalebi etc. I really want to say thank you so much Manjula aunty!
please can you make paneer out of soya milk?
Teri
please can you make paneer out of soya milk?
That’s what tofu is!
Teri, soy milk won’t separate and form paneer like cow’s milk does. For Pea’s question…tofu is made by a different process than is used to make paneer.
For some dishes, tofu can be substituted by the flavor and texture is not the same as paneer, but it’s not too bad either. Sort of a matter of personal preference.
You can make tofu using Nigari salt, I don’t think it works with lemon juice.
I have used tofu to replace paneer when was not available in my pantry and it was very good.
This also does not work with lactose free milk.
Thanks! This is fantastic to know how to make great food from scratch no preservatives and healthy. Thanks again
This is a really great post.Very informative and I love the video you made.thank you so much for this!
Thank you so much for your clear and concise videos and recipes! I just discovered you today on YouTube and I could not be more thrilled! I’ve got my shopping list together and you have inspired me more than you know. I cannot wait to cook all of the foods I loved so much from when I was in India right from scratch and not using the premades at the Indian grocers. You are number one!
Very best regards,
Kim
Hasina Mehndi & Body Art
Dear Ma’am,
My name is lavanya from Mysore, Karnataka, India.
As i am a jain too I am very fond of vegetarian cooking. I have tried most of ur receipe and its really great. My constant support and encouragement will always be there for u. U r doing a great job.
Keep up the good work.
Lavanya
I made this with my 6 year old son today and it turned out great!! It was very simple and the panir stayed firm even when I fried it. It tasted great with mango chutney. I plan to make it again soon but this time I will season it!
Are you familiar with methods used to make VEGAN paneer? I don’t drink milk and I do my best to stay away from dairy. I’m curious if there’s a Master Vegan Paneer Maker out there.
Paneer made with anything other than milk will have a different taste and texture. Tofu can be used to replace milk based paneer, but you give up authenticity in the taste. For some recipes, tofu just doesn’t work and cannot be used as a substitute.
i tried making this but i think i did something wrong. it seemed good and the paneer was nice and firm after i pressed it. i then went to use it in your butter paneer masala recipe, and found that it started to melt when i fried it.. so i didn’t fry it completely. when i used it in the recipe, i found that the paneer melted and disintegrated quit a lot into the sauce! what went wrong? i thought paneer was not supposed to melt!
oh, when i drained the paneer in the cheesecloth, i found it stuck in the cloth and was hard to remove..
i have tried this 2 times but it not make dry its made too sticky its not live the cloth i m so upset 2 time it didnt make i put havy weight also
Excellent demonstration. I followed your video and prepared paneer. It came out really well.
Thank you so much for posting this recipe + the video demonstration. I made this exactly as you directed (to use in palak paneer), and it turned out perfectly. So glad to have a foolproof method and recipe for making this wonderful cheese.
This is the best recipe easy to follow with the demonstration video that I have found. I feel confident that I can now make this delicious cheese. Thanks.
Wow Manjula, I am so impressed! I am not a very good cook but my paneer turned out excellent! The milk immediately started to curdle! It’s like a small little miracle.
I would like to reassure everyone: yes, paneer works even if you use vinegar. I wanted to use lemon juice but I didn’t have enough for 1/4 cup, so I added vinegar. It still curdled fine. My paneer doesn’t have a vinegar or lemon taste.
use curd instead of lemon juice …
•8 cups (half gallon) milk
•1 cup curd(dhai)(yogurt) or more thn that
p.s u can use the remaining milk in sabji or roti(chapatti)
Aunty,
Thank you so much for this recipe and video! I lived in New Delhi in 2007-2008 and have craved paneer every since I moved back to the U.S. I don’t live close to an Indian grocer so I cannot buy paneer. I made it for the first time this weekend and used it in a tikka masala. It was just like I had in India! I will be trying many of your other recipes, too!
Namaste,
Tifany
hello aunty,
i tried making paneer yesterday but it got really crumbly when i made karhai paneer with it! i think i didnt knead it before pressing it under weight!my cloth used for straining was i guess not muslin cloth n wz very small so the paneer wz smelling of lemon!im very new to cooking. Il try it once again with everything available.please can u tell me,can we use vinegar instead of lime juice…i read it somewhere.
thanx!
can i use vinegar instead of lime juice?
how to make low fat paneer ??????????????????????????
and low fat paneer body and flaver same like full milk paneer
Hardik, you probably can’t. If low fat food tasted as rich as full fat food than it would all be really easy!
A few pieces of paneer will not ruin your health. Like anything rich and delicious, you must eat in reasonable amounts.
how come no one talks of whey?? Y throw it away? so rich in everything !!!
Hello Ms Manjula,
What I want to know is: if the paneer is to be used for a curry dish like Palak Paneer, should it be cut into cubes/sticks right away after removing it from under the heavy pan, or do you knead it to make it smooth? The paneer in your video looks rather crumbly, like it may fall apart during cooking.
My family loves Palak Paneer but they’d turn up their noses if it didnt look good too.
F, You can cut the paneer after it’s been under the weight for about an hour. It will not be crumbly.
Can I use soymilk to make paneer?
Soymilk + coagulant = tofu, not cheese.
namaste Manjula Ji
Really ur all recipes works. I am having very good image among my circle due to you only. I prepared bangali rasgula which was very hard and also not doubled of the size. once again I am going to try this. Please guide me how to make soft and big ragullas
hi Neeru,
u have to take out the right amount of water by pressing the paneer under heavy weight for 1 to 2 hours and then comes the process of kneading paneer.
either u can do with your hands like Manjula Aunty does or if u have a blender u can do it in that also. like i have a magic bullet so i knead it in this only. and u have to blend the paneer till the time u see a dough forming.then u can start making your rasgullas. so try it and then tell me.
i made paneer tonight and it was easier than i expected! i used it for the matar paneer.
i didn’t have cheesecloth so i used coffee filters and it worked beautifully!
Thank you Ms. Manjula!
I live in Ottawa, where good paneer is hard to find and soo expensive.
I will try making this for my family.
Wish me luck!
hi manjula aunty,
can i use citric acide(limbu na ful) to make paneer??? my lemon are very old so will it be good to use to make paneer???
please reply soon
thanks…
Nisha – White distilled vinegar works the best because it’s more acidic than lemon juice and works almost instantly with no added taste to the paneer. It’s called “white” vinegar, but is actually clear like water.
Hello Manjulaji,
I frequently watch your recipes and have tried some successful attempts.
I tried making paneer with whole milk 1 galloon. But my lemon juice was less so I added some vinegar. And now the paneer is been resting overnight but still it is mushy like thick curd. What should I do?
What would have been the actual problem? The vineger or the tying was not proper?
Can I still use this in any recipe? Should I try the whey with more lemon juice now? Please guide or else I will need to throw away that which I do not like.
Hi D,
Using vinegar and lemon juice together should be ok. The way you describe your paneer I think the curd did not separated from the whey all the way. May be you needed to add little more vinegar until whey is very clear.
But do not throw the paneer mix little bread and bake it till it is firm and then use like paneer or make paneer burfi, follow the recipe I have posted earlier.
Thank u. I also saw the recipe u have for malai kofta. so was planning for that. But the paneer is too much. so can try with barfi too.
Thank again for such a quick reply
thasnks
you are graet
thankyou very much
you are great
I don’t even bother with cheesecloth. Use a strainer with a very fine mesh.
Hello Auntyji, Thanks for this awesome video. Where do I buy cheese cloth? I am fairly new to cooking. Is there any other alternative I could use?
Hello Manjula,
I am addicted to indian food, and will eat it whenever i go, thank you for this wonderful site, thank you for sharing with us how to make paneer, i hope to try it for my family soon!
amina
Eritrea
how do i make curd cheese?
Namaste Aunty,
What are some of the things we can do with the whey that we strained? It seems a shame to throw it away.
Thank you.
helo can you use 2% milk for making paneer?
Hi Lulu,
yes you can use 2% milk.
Hi Manjula aunty!
Please let me know how long the paneer can be stored.
Fresh paneer does not have any preservatives and will spoil fairly quickly. Keep it covered in the fridge for only a few days. Try to use it within one to two days of making it so the flavor and freshness are at its best.
unbelievable site!! Manjula aunty you are awesome!
Thankyou very much for this website . you have done a great work and my appreciation for your efforts.
THANK YOUUUUU for showing a loserkid from the midwest how to make all the great food she enjoys but can NEVER find(without driving for an hour) I LOVE your site and have tried many of your recipes and have enjoyed them all! Ill be trying this paneer recipe for the first time tonight and im sure that it will be smashing! i very much enjoy that you have videos to accompany the recipes! very helpful to actually see it done! Thanks again!
can i use any milk? like the ones that come in the cartons?.. pasteurized / commercialized ones… thanks
Dear Madame: I am a vegetarian and do not use milk or dairy products. Can this paneer be made with rice milk?
Your website is really precious!!!! I’m going to try palak paneer tomorrow but would appreciate your prompt on how to store the remaining paneer in the freezer? and do i thaw it before frying it or just leave it outside for a while? thank you so much.
Hi. manjula.
I have tried few recires, All turn out very tasty.
I would prefer a written recipes .After watching vedeo.
As i found for paneer. really is very helpful.
I just print out and make or share with friends.
thankyou.
sometimes milk curds up due to improper storage or boiling, can that alsobe used to make paneer?
Milk that has curdled from improper storage is spoiled and should be thrown out. It can make you sick, plus it will taste awful!
Milk that has curdled just from boiling (without adding any lemon juice or vinegar) is not familiar to me. Why would it curdle just from boiling alone?
ALWAYS use only fresh, properly stored milk for drinking and cooking.
Thank you so much for putting together such a great website! I just finished making paneer–and it came out great! I look forward to turning it into palak paneer tomorrow after work. Anchorage, AK
Hi Manjula,
Today i tryed making paneer following ur recipe but my curds were not as big as your’s. I drained as much water as i could but its still prety wet and not able to cut it into squares. even though i pressed it under heavy pots. wat did i do wrong? please help.
thanks.
If you used lemon juice, it was not acidic enough to seperate the curds and whey. Also…make sure you have brought the milk to a boil before you add the lemon juice or vinegar. That may have been the problem too.
I use white vinegar for paneer because lemon juice doesn’t always work unless you add a lot of it and vinegar doesn’t leave a flavor to the paneer.
thank you so much for your delicious recipies, you share your artfulness and love of cooking,
me and my family sincerely apreciate it
from new caledonia
cécile
Instead of lime t0 curdle milk to make paneer try diluted vinegar (50 percent water added to vinegar) no need to wash paneer then as it does not have bitter lime smell
Manjula aunty!!! after 15 years of trying, i was able to make a decent paneer with your recipe! The flavour and consistency is much like the one from the local Indian restaurant!!! Thanks again for another wonderful ans easy recipe! <3
Thankyou so much Manjula for showing me how to make Paneer. I had already been told how to do it but your video has given me more confidence to give it a go for myself… Wonderfully helpful! x
I recently became vegetarian. I do realize the importance of protein in my diet, so I’ve opted for the high fibrous and rich in protein bean salads/soups and dishes. I decided to do research on tasty vegetarian recipes and I found that Indian recipes use a lot of spices and flavors to season their dishes. I also discovered that Manjula has the easiest and most delicious recipes. Thank you, Manjula!
Thank-you for wonderful videos! I am learning to cook indian food-wish I had some classes near me in North Carolina. Where would I find the Steel tins to store my spices? I’m stocking my pantry now. Thank-you again!
Hello Aunty,
In the written version u mentioned to knead the paneer to use for main dishes.
But in video u dont say that..Also in video u say 6 cups…But in the written version it says 8 cups..Can u plz let me know which one is correct ?
Wanna try it soon..Eagerly waiting for ur reply..
Thanks
does not matter 6 cups or 8 cups it is up to u how much paneer u wanr and try using distilled vinegar diluted with water 50 50 say 2 table spoonfuls each
tame gujrati chho ne? pls reply.
Hello Vaishali,
I am from UP.
namastey auntigi,
just today i saw ur raciepies i liked it it is very easy to make now i wil try to make it. if u dont mind i want some veg kababs. i don’t know u have on ur web.
hi,
thank u for the method .
can paneer be made using tetrapak milk.
Thanks from Baton Rouge, Louisiana! This worked like a charm, and I have no doubt that I’ll be using this recipe for years to come.
hi chef
thx 4 ur website its really useful in our daily kitchen, plz tell me instead of using lemon juice can we use something else ?????
hi aunty…..
Am sakthi.doing my MCA…..i watch your recipes often….its really excellant aunty…….simply superb aunty…..i tried gulfi and it came well…….
Dear Aunty,
Just wondering if you could plz suggest me? what is Gallon milk? and what other option do we have here?
as i live in Australia? i tried making paneer other day with full cream milk it didnt turn well…please suggest me
Thanks….eager to hear from you
Mrs.Jain
Manjula means, use a half a gallon of milk for the recipe . . . a volumetric measurement. 1 gallon = 4 liters = 16 cups.
Full cream sounds like whipping cream (35 percent), you would want to use partly skimmed milk, (which is 2 percent) or homo milk (which is 4 percent). Cottage cheese can be made in a very similar way with skimmed milk (which is 1 percent or lower). The percentage of the milk refers to he Milk Fat content or MF for short.
Hope that helps
THANKS VERY MUCH>>>>>…
MYSELF BEING IN JAPAN…..YOUR SITE IS A TOTAL USEFUL PACKAGE FOR US
THANKS A LOT….
Hi,
Thank you so much for your recipe and video. While I was making my first ever batch of paneer, and having no luck with the curdling process, I saw your recipe, and after adding a lot more lemon juice, it magically curdled! I had been stirring for 1/2 hour before seeing your recipe online. Next time, I bet my time will be cut by at least 1/2 hour.
Hi manjula akkaa, nuvvu chaala masthuga chesthavu vantalu anni gaani…my langage is telugu.. i was just telling that you really cookk wonderfully… i love it..:P
Thanks Manjulaben for all the fantastic recipes!
you’re just like my dadima, only a lot more patient!- i watch your videos again and again… my mum better watch out, i’m getting pretty good.
thankyou!
Shria
Dear Manjula aunty
Can you please show us how to make ghee at home from collected milk cream
i shall be very greatful
zita
My darling Manjula ! Thanks million times for your beautiful recipies ! Thanks for being you and your wonderful job .I am from Odessa Ukraine and I make your dishes .They are so tasty and healthy . Thanks once again .
Manjula Aunty, You are like our mom outside India!!!!!!!! teaching us all these wonderful recipies!!! you are the best!! i can say for all of us.. WE LOVE YOU!! 🙂 🙂 🙂 please keep adding more wonderful recipies
HI Manjulaji,
Thanks a lot for all the effort you out in on this website, its really helpful to learn new dishes from this site. i tried making panner but unfortunately it didnt work out well, do we need to use whole milk for this purpose i used semi skiimed milk 🙁
Thank you so much for this recipe! I have always loved Indian cuisine and paneer especially but have been hesitant to try making it on my own. After trying a different recipe that failed (I don’t think the recipe called for enough lemon juice), I came across this website. The instructional video was so helpful! I made it last night and it turned out perfectly. Thanks again!
Dear Manjulaji
Been watching your videos on youtube . Thank you for sharing your lifetime of hardwork and love . I reside in Israel and miss the varoius indian veg dishes a lot. It reminds me of the sweet tastes of mother india
Thank you and GOD Bless you
best of health , wealth , prosperity and good fortune
Guy Yagish Alter
Dear manjulaji,thnks a ton fr ur recipe .I took down the paneer recipe i am south indian
and panaeer is not made at our homes but ny daughter loves it she tastes it from her north
indian friends. You have taken a lot of trouble to start ur website(I am a new comer so
i do not when it was started ) and given the viewers so many minute details.I am
staying in karawang which is in jakarta and paneer is not available in any shop.
I shall keep in touch with u.Wish u good health and success!
Manjulaji, I’ve been watching a lot of your videos. Thanks a bunch for all the effort you put in. Awesome job!
Hello,
If curdling milk with lemon juice to make paneer is the procedure, I was wondering whether I could prepare paneer from curds, instead of boiling milk etc.
Hi Mrs Jain,
Thank you very much for this simple recipe. its simply great. I just made paneer from packeted fresh milk. it turned out right. but was slightly sour and edges were not firm. do i have to kneed it? Pls advice.
thanks,
Ami
HI Manjula aunty,
I love your recipes…they are so simple and easy to follow.
I want to know how to freeze paneer and keep if I am not using it. Can you please help me out with that.
Thankyou,
Sneha
hi manjula aunty!!
i made paneer yesterday for pedas and both things tuned out amazingly.Pedas ver really awesome
i hav a question about paneer that when it is brought from market its sour in taste….
can u please tell me how to make paneer little sour to use in paneer samosas n any other main dishes??
Thank you very much for ur wonderful and easy recipes:)
Hi Manjulaji,
Love your website. Am a great food fan and love to try out recipes and also try out putting my own spin to what I make. I like the fact that most of the recipes on this website are simple, requiring the bare minimum of ingredients and steps. Too drawn out process might make great dishes, but who has the patience and time to try them out anyway.
I have made Mathri’s exactly like your recipes. Turned out great, only problem was they were eaten faster than I thought they would be. I make paneer at home too. Use 1- 1 1/2 cups of yogurt for 1 gallon of milk instead of lemon sometimes. Lemon method produces better tasting paneer for sweets. However adding yogurt makes a little more paneer, good for main dishes.
I had a question: How to make yogurt at home? Tried it several times. Used good live cultures yogurt. Kept the milk warm. Nothing works.
Prachee
Hello Prachee, I am not sure how to show this recipe. The main and most important ingredient for yogurt is the starter but I did not have any good results unless I am using the starter from home made yogurt.
Dear Manjula Ji,
Like your recipes made basan laddu and Rasgullas Basan laddu were little dry ? Please advise.
Thanks
Hi Brite,
Add little more butter.
Hello, I am so impressed with your video tutorial! We usually get take out, but recently have tried to make more at home. This video was perfect. I made some paneer tonight, and it turned out excellent (except for the fact I didn’t kneed the paneer before using it in my main dish). I am excited to try more of your recipes. Thanks.
Hi Manjula
I find all your receipes simple to follow. I have learnt how to make quite few things from you. Thank you so much. Keep bringing us new receipes. God bless you.
Manjulaji, when I discovered you on You Tube – it was like I found a unique treasure! You are so amazing,
your manner of presentations is so straightforward and simple – I enjoy each and every tutorial – I am maried in a traditional gujarati lohana
family who pride themselves on their cooking expertise – but I personally never learnt to cook due to professional commitments.
Now married to a husband who loves entertaining I make new dishes from your recipes and have become the talk of the town on
what a good cook I am! – thank you so much and keep on posting new recipes.
Hi! Manjula Aunty
This is neeju from uk, i have tried to make paneer , paneer separated from water but my paneer is very soft.
I want to cut off into square shape to add in dry vegetable so what i have to do to make it in small square shape
After draining off the water, put the paneer under a heavy weight for a few hours in the fridge. It will be more firm and solid when you take it back out.
Thank you so much! It turned out well, but it did not have the store bought consistency….could you please tell me if there is a way to make it hard enoud=gh to grate or cube…
Hello Sandhya,
Home made paneer will never be the same consistency as store baught.
To make paneer hard, you must put a heavy weight (5 pounds or so) on it and leave it in the fridge for a few hours.
Ironically, soft paneer is considered the best. You don’t need to grate fresh, soft paneer. Just crumble it between your fingers.
Hello Aunty;
Can we use this paneer for making Palak Paneer dish?
Yes yiou can use home made paneer any way you will loke.
Namaskar ma,
After watching paneer and rasgulla recipes, I could successfully prepare at my home. It is unbelievable.
I have stopped buying paneer from the market. I use full cream milk for paneer and reuse the whey (instead of water) to dilute the curd in Punjabi curry.
Thanks a lot for a great website.
Nidhi S
Hello Manjula,
you are wonderfull….i learn a lot of things from this website…!!!! Thanks
Hello,
I have some questions with respect to making paneer:
1. After making paneer, the drained water is not clear in color but still looks like milk and sets like curd. Is this normal?
2. Can we re-use this drained water for any other purposes?
3. Should be using un-boiled milk for making paneer?
Thanks in advance for your answers.
Best Regards,
Mytreyi
If the water drained from the paneer can set like curd, then you are either not using enough lemon juice or vinegar to fully seperate the solids and whey in the milk AND/OR you must let the seperated milk sit for a minute before straining it.
There is almost no uses for the liquid. Usually it just gets discarded.
You can use store bought homogenized/pasteurized milk for paneer. The paneer will come out good. In the U.S. anyhow, un-boiled milk is very hard to obtain due to health and sanitation reasons unless you can get it directly from a milk farm.
Hi I just tried making paneer for the 1st time just a few minutes ago – I can’t believe how easy it is! Thanks for the recipe and video 🙂
Regarding reusing the drained water (whey) – although this is the 1st tme I’ve made paneer I have been making a differnet type of soft cheese from my homemade yogurt for a while now. The whey is very high in nutrients and vitamin B12 and is wonderful to reuse.
I’m sure there are many ways to reuse it but some of the ways I know are to use the whey instead of or in addition to water in making stock, casseroles, soups or even adding it to vegetable and fruit drinks (though you will have to experiment with amounts for the taste). It’s also great for cats and dogs – my cat won’t touch milk but loves yogurt and whey and it gives them a lovely healthy coat.
Cheers
can we make paneer using milk powder please advise and how
Hi Reena, sorry I dont think so.
Hello Aunty,
Really u r doing a great job.I am trying ur recipes, turns up great.Thank u so much.Please do prepare more different recipes.
Hello Manjula,
Your recipes look amazing, I am waiting to have some time to try some of them.
Could you PLEASE tell me what BBRAND & STYLE pan did you use to boil the milk. I cannot seem to
ever boil milk without scorching the bottom of the pan. Even with the non-stick pans, I get a dark
film that as I stir makes the rest of the milk brown.
Thanks for your time,
Sully
Hi Sully,
It is always good to have the heavy pan for cokking, I like Calphalon brand. Add about 1/8 inch of water in the pan before putting the milk, that also helps milk not to burn in the bottom of the pan.
Namaste Aunty, this is priya agarwal from australia can you please give the recipie for karela without onion and garlic and please reply to my message.
Thankyou
I will be doing Karela recipe soon.
Hello Aunty,
For some reason my paneer is becoming rubbery and can’t seem to understand why? can you pls help so that I am able to make soft paneer.
Thanks in advance.
First thing that comes to my mind is you are using too much lemon juice, vinegar or whatever you’re using to separate the milk once it boils.
Hi Jaya,
That might be the case…shall try again this time with exactly the measures given by aunty…hope it works.
Thanks again.
Cheers
Taru
Hello Aunty-
Thank you so much for posting these recipes! I love Indian food but can never seem to make it come out right. I can’t wait to try your recipes.
I do have one question about the paneer…what do you mean by “pressing” it? How is this done?
Thank you again! 🙂
I love your videos. Thank you so much. Almost 30 years ago I lived in Bombay for a short time. The culture became part of the fabric of my life. I learned to cook then, but have not had much opportunity to cook Indian food until now. It took time but now Indian food is very trendy. Your videos are a great refresher for the things I learned so long ago.
Manjula,
I am lactose intolerant. Can this cheese be made with goat’s milk?
I also have a yeast allergy, your Roti recipe will satisfy my bread cravings.
I have bookmarked your website and will be back to peruse it thoroughly.
Peace be with you,
Shannon
Hi! Manjula aunti, for making paneer, you put that the 2% milk, 4% milk and regular milk.what’s that? i don’t understand. it means 2% milk added to water? will you please explain me?
Thanks,
vaideki
In the US, milk is sold by the percentage of milk fat. 2% is the same as low fat milk here, and 4% is highest fat milk sold in the grocery stores.
If you live outside of the US, I can’t help because I don’t know how milk is labeled where you are.
Hello Manjula Aunty,
I have a question about the paneer making process. When you pour the lemon juice, do you turn off the heat or do you retain the heat and let it boil for some more time as you pour the lemon juice ?
Thanks,
Deepa
turn off the heat as soon you see the water seprating
Manjula Ji ……..i just love love ur receipes
u gave me new confidence to cook.
my mothers name is also Manjula…..n she is of ur age
u alwys reminds me of her in US
i will tell all my frds abt u.
thanks
Hello manjula Aunti
I’m very much delighted after finding ur website ur recipe is so delightful and wonderful which i tried and it turn out so nice.
i would like to ask u one thing that is i would like to make home made paneer for
that can i use expired date milk or already churned milk,most of the time
i am wasting that milk,expecting ur reply
thank u so much
jamy
Hello manjula aunti, I am so happy to fine ur web ur receipes is so helpfull. it turn out so perfect. thank u so much for u help.
thank u so much.
alpa
Without lemon or vinegar, you cannot make paneer. Can you purchase at least one of them from a local store?
pls tell me what can replace lemon n vinegar.if both things i dont have
if lemon is not their then what can replace lemon.
Manjuri you can try limes instead of lemons or vinegar…
u can use curd instead of lemon also..it helps a lot and ur paneer wud be softer
Hi Manjulaji,
I today tried for rasamalai. The paneer I made was in light brown colour and the milk I used was 8.5% milk solids and 3% milk fats. Also the stuff was not so soft as we get in shops. I did not refrigerate the paneer. I squeezed the water out and cooled and tried a pinch of paneer to make a ball. As it worked i continued doing balls and pressure cooked. Also mention the time for the sugar syrup to get boiled before the balls are dropped.
Hello Gitanjali, It is not a good idea to make paneer with 1% milk. may be you added too much lemon juice.
Hello Manjula Aunty,
I tried making paneer today with 1% milk. I followed the exact measurements. However, the paneer came out in crumbles. I am wondering what I did wrong. Can you please help me.
Thank you so much for your help
Regards
Gitanjali
FYI, I’m a vegan and have found your recipes very easy to veganize.
Fom experience making fermented soy cheeses, etc., that a heavy plant pot hanger over your sink, with a bowl underneath, greatly facilitates making homemade cheeses.
Or to put another way, a hanger for a heavy pot plant. It just needs to be somewhere where you can put a bowl to collect the whey.
That way your don’t have to watch it, just time it.
Hello,
Today my gf and I attempted paneer and found your videos helped out. She followed another recipe with 1.5 L of raw milk and nothing happened, just a few small insignificant curdles. We kept adding lemon juice, then lime juice, then vinegar and nothing. I then tried one cup of milk, and it worked, then 3 cups and it worked fine too, although it was quite crumbly so maybe too much vinegar. Any reason why the first batch wouldn’t have worked? Too hot? The milk did boil over..
Thanks
hi deepi,
Ghee can be made at home from unsalted butter slabs, you can get them at any American grocery store.
Take as many slabs as you wish to make ghee. On medium heat, let butter simmer in a non-stick pan. Keep stirring the mixture every few minutes to avoid sticking. When ghee is ready, you will see white base of small cream like particles at the bottom & clear hot liquid ghee floating on top.
Let the liquid cool down – as it cools, you will see the ghee formation.
When it is completely cold, strain this with a strainer. The ghee will form once you refrigerate & temperature of liquid ghee reduces.
Thanks Manjulaji. Now i make paneer at home
and i must say, homemade paneer is always better than store bought.
I m staying in US. My husband does not take store bought ghee on tuesdays due to vrata. Have u tried making ghee at home?? what type of milk shud be used?
Thanks a lot !!!
when i was a kid, my mothers friend from Trinidad used to make roti with crushed chickpea’s and/or, curry powder inside of the roti’s. She would make curry chicken on the side. very delicious. how do you make the roti that is filled like i speak of with the chic peas?
hai..!aunty namaste its very happy for me .i tried the palak paneer yesturday its very testy n my famliy members felt very happy also but i am not able to download your recepies.plz tell me any alternaative way other than youtube to download your testy recepies
Hi Joe,
You dont need to add the oil in dough. I think while rolling the roti you used too much dry flour, that can make roti very dry.
Hi Manjula,
Love your video-cook shows. I am a Chinese Singaporean, I love cooking foods from various culture. Our family loves Indian foods.. Tandoor, Naan, Chapati, Dal and such.
I tried making chapati a few times. I followed your recipe. However, I did not add the oil. The final product was quite dry and tough. Should I add some oil? Also, does the dough need to be a little sticky??
Thanks
Hi Laxmi,
I never had good result using curd but I know some people who use this, their Rasguuls are ok but try it and let me know.
Manjula
namaskaram.
your receipes are fantastic being a south indian i am able to make all north indian. punjabi .Bengali and all dishes . some people sujjest that instead lemon juice if curd is used for making panner for rasagulla we can get pure white rasagullas is it correct please tell me i followed your process and came out well for this diwali
thanks
all the best
with respects
Laxmi subramanian
when you say, take enough water out does it mean, get all the water out or just enough to make the balls. i use your recipe and try to squeeze all the water out but the rasgullas split a little while cooking.
i used white vinegar and that worked perfectly too.
thank you for all the wonderful recipes
Hello Sudha, yes you can make rasgullas using refrigerated paneer.
Hello Manjula-ji,
I tried making Paneer looking at your video and it has come out perfect..just like the store bought one. I have refrigerated it. I have a question for you.. Can I use the refrigerated Paneer to make rasgullas ? please let me know. Thank you.
Hi Jaya,
Thanks a lot for the tip mentioned,I will try making it again.
Hi Gunjan,
I have used Hood, Garelick, and Oakhurst brand milks for paneer with no problems
.
If you use vinegar, make sure it’s the clear “distilled” vinegar.
What could have gone wrong? Possibly you did not use enough of the lemon juice or vinegar and/or you did not bring the milk to a full boil before adding the lemon juice or vinegar.
Bring the milk to a full, bubbling boil until it starts to come up the sides of the pot and then turn the heat off and quickly add the lemon juice or vinegar. Hope this helps. 🙂
Hello Aunty,
I tried making paneer using Hood full cream milk,but after adding lemon juice also it did not curdle up.After that i tried with vinegar also but it did not work out.What i guessed was that the milk might contain preservatives that prevented it from curdling up even after adding lemon or vinegar.
Can you please tell the brand of milk that you used for making paneer ?Also let me know where i went wrong.I stay in United states.
Thanks
Hi Aruna,
You can purchase cheese cloth from the cooking/baking section of most grocery stores or kitchen supply stores. It may also be called “muslin cloth”, but in the U.S., “cheese cloth” is a common term.
If you cannot find it, you can use any clean cotton kitchen towel that is not too thick. 🙂
Namaste Aunty,
Could you please let me know where I can find the cheese cloth to make paneer? or is there any other way that we can make paneer with out cheese cloth (Using any other cloths) ? Thanks in advance.
Aruna
Hi! We watche and made paneer by ourself it came very nice and fresh, I appreciate you for your time & effort by uploading a video for paneer making.
Jaya Ji, thank you for ur reply……………………it was of great help.
I use white vinegar and you need much LESS vinegar. I don’t measure it, just pour it slowly into the boiled milk while stirring the milk. Once you see the milk start to seperate, stop the vinegar.
For 8 cups of milk, add 1 tablespoon of vinegar and then slowly add another tablespoon until the milk seperates.
Sorry I don’t have exact measurements, but about 2 to 3 tablespoons should be sufficient.
Hi Aunty ji,
I tried paneer with lemon juice and it came up well. Now, some people also use white vinegar to make paneer ; what quantity of vinegar should be added if replaced with lemon juice.
Hello Leslie,
it appears you squeezed too much water or added too much lemon juice.
Hello Gayathri, with your discription it should be gulab jamun with cream
Thankyou so much, I tried sweet dishes like rasagulla and ras malai it just turned out the perfect way even for the first time. I like to try other dishes too!
Recently I saw a sweet dish in a indian store, It was dark in colour, oval shape with a split in between which had a cream on the split, my son calls it as Hot-dog sweet!
I would like to know the name of it and how to make it?
Thanks
gayathri
Hi Aunty-ji. Thank you for your beautiful website. I made paneer today for the first time, following your instructions, with 2% milk, but it came out quite crumbly and not smooth, and I was unable to cut it into squares to fry it for my palak dish.
Any suggestions?
Thanks so much. Keep up your wonderful work!
Leslie
Thank you for showing us how to make indian recipes.
I like very much the videos.
Now I am no more afraid to try paneer !
Thara – France
Hello bhavika, Paneer can be stored in fridge for 3 to 4 days or freeze for months. If you are freezing good idea to chopp the paneer in the size you will be using.
Hello aunty,
Namaste.
For how long can the paneer be stored?
Should it be kept in the fridge or freezer?
Thanks
Dear Auntyji,
You have a delightful website and it’s so nice to ask questions and get answers to make one’s cooking better.
Jaya
Hello Jaya, thank you, I really appreciate and enjoy your precipitation this makes it very interesting and meaningful, so thank you again.
Manjula
Hi Jennifer, I am another reader and have tried soy. I’m vegetarain, but not vegan.
Calling soy a “milk” is misleading when it comes to cooking, true milk is the basis for success with paneer and milk based sweets.
I’ve used tofu as a replacement for paneer cubes in veggie dishes as times, it’s passable but the taste and texture is not authentic. My husband didn’t go for it.
But to get back to your original question, I have never come across a way around using soy milk in place of cow’s milk.
Hi Manjula, your recipes are amazing! The way things look, I could be marrying a Pakistani man in a few years, and I could not be happier. As an avid chef and lover of Desi foods myself, I’ve been looking into a lot more Indian / Pakistani dishes lately (I wouldn’t want to deny him his cultural foods), so your website has been a GREAT help. I’ve just got one question… As a vegan, I have always wondered if paneer could be made with soy milk. I know tofu would suffice for certain recipes, but for things like ras malai, a favorite dish of my lucky man, tofu is out of the question. I’ve been dying to try some of these recipes calling for this kind of paneer, but the chemist inside me tells me that the properties of soy and cows’ milk are so different soy milk would not make good paneer. Any thoughts? If it wouldn’t work, is there something that could be added to soy milk in addition to lemon juice to make a good paneer?
Hi manjula- Thanks a million for telling us how to make panner… i have been buying it from indian store which i think is expensive so inspite of liking it so much , we rarely used to buy it…now i can make it at home & enjoy !!
Thanks to you again.. Your recipies are gr88888, please keep uploading more n more videos….
Mrs. Jain:
Thank you so much! This came out great. I gave up making paneer years ago, because it kept breaking apart. Later, I found out that the cookbook author admitted that she had the recipe wrong! 🙂 Yours worked absolutely perfectly, and I made your navratan korma recipe with it. Yum!
THANK YOU MS MANJU FOR SHOWING US HOW TO PREPARE PANEER, I HOPE I WILL BE SUCESS IN PREPAING IT SOMEDAY SOON RITA IN HOUSTON, TX
Hi, Aunty i just saw your website today,it is beautyful congratulation on creating a website, i love all of your recipes though i do not make snacks as often as i want try your recipes thank you.
but when i need to make i
Whey has lot of proteen, you can use making dough, soup, or any dal
Auntyji,
As a great believer in not wasting anything, is the whey of any use at all?
Hey Lem,
Thanks a million!!
I really appreciate your time and your sincerity towards cooking!! 😉
Thats fantastic.
Now I know a little more about..MILK!!!!
Cheers,
Malini
Thank you Lem, you have explained it so well and I like that interaction and sharing the knowledge and experiences.
Please excuse me Auntyji for jumping in with an answer here. Firstly, many, many thanks to Aunty Manjula for sharing her knowledge and years of experience so freely with all.
2% milk is comparatively a low-fat milk, there’s even lower ones between 0.5% and 1% fat, which would probably be unsuitable for making paneer. See Standards Australia for definitions of milk:
http://www.foodstandards.gov.au/newsroom/factsheets/factsheets2008/milkpermeateapril2003903.cfm
[I’m sure the US and other countries have similar standards governing what the word “milk” is and how much fat, protein etc it should contain].
Your normal full-cream milk will be about 3.4% fat, which is just about how it comes from the cow (!) – practically nothing added or taken away. I’ve used this type of milk successfully to make paneer, but have to warn you not to be surprised how much milk is needed to make a small amount of cottage cheese. There is so much whey left after the process!
If you’re very busy, you can always substitute with commercially made paneer, I’ve found an Australian made one called “Lemnos”, and the paneer is very firm and well-pressed, very suitable for making vegetable dishes (palak paneer, subji etc.). The commercially made ones are good to keep handy (sealed vacuum packed, quite long shelf-life in the fridge), just in case you have to make a dish in a hurry. But home-made is better when it has to be blended into softer dishes like koftas or like aunty’s lovely sounding paneer burfi.
Namaste auntyji,
Can I ask you what is 2% milk?
I live in sydney, and I buy normal full cream milk. Could you please explain what it means?
Thank you,
Malini