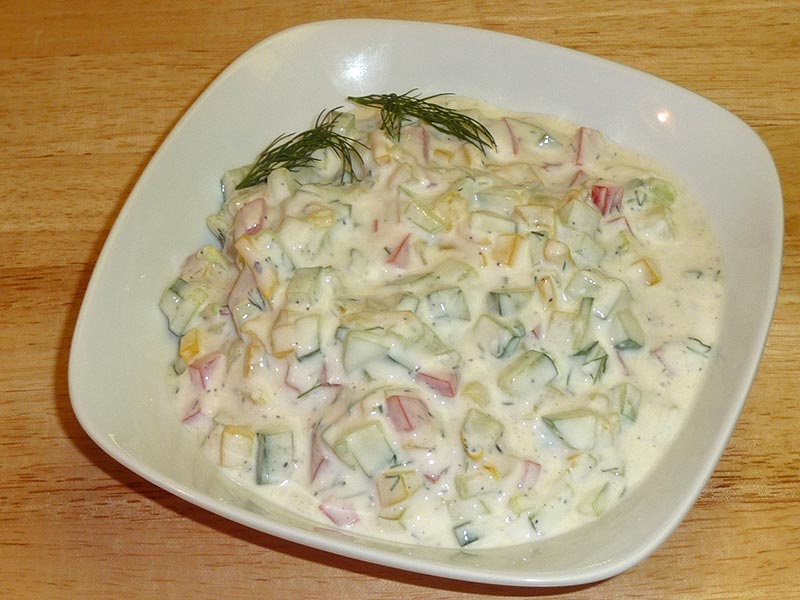
Kid-Friendly Vegetarian Recipes: Delicious Indian Food for Kids
Finding recipes that are both nutritious and appealing to kids can be challenging. Indian cuisine offers a variety of vegetarian recipes for kids that are both delicious and easy to prepare. Whether you’re looking for vegetarian kid-friendly recipes, Indian food for kids, or specific Indian recipes for kids, Manjula’s Kitchen provides an extensive collection of dishes to suit every palate. Let’s explore some fantastic recipes that will make mealtimes enjoyable for your little ones.
Classic Vegetarian Recipes for Kids
Aloo Paratha
Aloo Paratha is a popular Indian flatbread stuffed with spiced mashed potatoes. This dish is a classic example of vegetarian recipes for kids that are both hearty and satisfying. Serve it with yogurt and a bit of butter for a complete meal. The soft texture and mild spices make it appealing to children.
Paneer Butter Masala
Paneer Butter Masala is a rich and creamy curry made with paneer (Indian cottage cheese) cooked in a tomato and cream sauce. This dish is a favorite among vegetarian kid-friendly recipes. Serve it with naan or jeera rice to make it a meal your kids will love.
Easy Indian Food for Kids
Vegetable Pulao
Vegetable Pulao is a fragrant and flavorful rice dish cooked with a variety of vegetables and mild spices. This dish is perfect for kids who enjoy rice. It’s a nutritious and delicious option in the category of vegan Indian food for kids. The colorful vegetables make it visually appealing as well.
Chole (Chickpea Curry)
Chole is a mild chickpea curry that is both tasty and nutritious. This dish is ideal for those looking for easy indian vegetarian recipes for kids. Serve it with rice or roti for a wholesome meal. The soft texture of chickpeas makes it easy for kids to eat and enjoy.
Healthy Vegetarian Kid-Friendly Recipes
Moong Dal Khichdi
Moong Dal Khichdi is a simple and healthy dish made with rice and split yellow lentils. It’s one of the best vegetarian kid-friendly recipes as it is easy to digest and packed with nutrients. This dish can be served with a dollop of ghee and a side of yogurt.
Palak Paneer
Palak Paneer is a nutritious dish made with spinach and paneer. It’s a great way to introduce leafy greens to your child’s diet. This dish is a fantastic example of vegetarian Indian recipes for kids that are both healthy and delicious. Serve it with chapati or rice.
Quick and Simple Indian Recipes for Kids
Besan Chilla
Besan Chilla, or chickpea flour pancake, is a quick and easy option that fits well within vegetarian recipes for kids. Made with chickpea flour and a variety of vegetables, this dish is a nutritious choice. It can be enjoyed with a side of green chutney and is perfect for breakfast or a snack.
Masala Dosa
Masala Dosa is a thin, crispy crepe made from fermented rice and urad dal batter, filled with a spiced potato mixture. This dish is a favorite in Indian food for kids. The crispy exterior and soft filling make it a hit with children. Serve it with coconut chutney and sambar.
Snacks and Appetizers for Kids
Samosas
Samosas are crispy pastries filled with spiced potatoes and peas. This snack is a favorite among vegetarian Indian recipes for kids and is perfect for lunchboxes or as an after-school snack. Serve them with tamarind or mint chutney for added flavor.
Pakoras
Pakoras are deep-fried fritters made with vegetables like spinach, potatoes, and cauliflower. This snack is a popular item in the vegetarian kid-friendly recipes category and is perfect for tea-time or as an appetizer. Serve pakoras with a side of green chutney.
Sweet Indian Recipes for Kids
Gulab Jamun
Gulab Jamun are soft, deep-fried balls made from khoya (dried milk) soaked in a sweet syrup flavored with cardamom and rose water. This dessert is a staple in traditionalIndian food for kids and is often enjoyed during festivals and special occasions. The melt-in-your-mouth texture and sweet flavor make it a favorite among many.
Kheer
Kheer is a creamy rice pudding flavored with cardamom and garnished with nuts and raisins. This dessert is a classic in north indian vegetarian recipes for kids and is easy to prepare. Kheer is a perfect ending to any meal and is often enjoyed during celebrations.
Elevating Your Kid-Friendly Menu
To elevate your kid-friendly menu, consider adding dishes from various categories that enhance these vegetarian recipes for kids. Including Indian snacks like samosas and pakoras can introduce a variety of flavors and textures.
For a sweet finish, explore Indian desserts such as gulab jamun and kheer. Offering nutritious recipes like moong dal khichdi and palak paneer can provide lighter meal options.
Planning a kids’ party? The popular party recipe category offers numerous dishes that are sure to delight your young guests and make your celebration unforgettable. Incorporating North Indian recipes like aloo paratha or paneer butter masala can bring an authentic touch to your meal.
Frequently Asked Questions (FAQs)
Q: What are some popular vegetarian recipes for kids?
A: Some popular vegetarian recipes for kids include Aloo Paratha, Paneer Butter Masala, Vegetable Pulao, Chole, Moong Dal Khichdi, Palak Paneer, Besan Chilla, Masala Dosa, Samosas, Pakoras, Gulab Jamun, and Kheer. These dishes are flavorful, nutritious, and perfect for children.
Q: How can I make traditional Indian food suitable for kids?
A: To make traditional Indian food suitable for kids, try recipes like Aloo Paratha, Paneer Butter Masala, and Moong Dal Khichdi. These recipes are mild in spices and easy to eat, making them perfect for children.
Q: What are some easy Indian recipes for kids?
A: Some easy Indian recipes for kids include Besan Chilla, Masala Dosa, Vegetable Pulao, and Samosas. These dishes are quick to prepare and provide the necessary nutrients for growing children.
Q: Can I prepare Indian recipes for kids in advance?
A: Yes, many Indian recipes for kids can be prepared in advance and stored. Dishes like Vegetable Pulao and Chole can be made ahead of time and refrigerated, while snacks like Samosas and Pakoras can be prepped and frozen.
Q: What are some healthy vegetarian kid-friendly recipes?
A: Some healthy vegetarian kid-friendly recipes include Moong Dal Khichdi, Palak Paneer, Besan Chilla, and Vegetable Pulao. These dishes are nutritious, mild in flavor, and perfect for maintaining a healthy diet for kids.
Conclusion
Vegetarian recipes for kids are a celebration of diverse flavors and nutritious ingredients. Whether you’re looking for vegetarian kid-friendly recipes, Indian food for kids, or specific Indian recipes for kids, these dishes will bring variety and flavor to your meals. So, gather your ingredients, try out these recipes, and enjoy the rich and diverse world of Indian food for children. Happy cooking and happy eating!
By incorporating these dishes into your menu, you’ll be able to enjoy a wide variety of delicious and nutritious foods that your kids will love. Whether you’re looking for snacks, main courses, or desserts, there’s a vegetarian recipe for kids to suit every taste. Don’t forget to check out Manjula’s Kitchen for more inspiration and culinary delights. Happy cooking and happy eating!
Heat the oil in a saucepan on medium-high heat. Test the heat by adding one cumin seed to the oil. If the cumin seed cracks right away, the oil is ready.
When the cumin seeds crack, add hing, red chilies and urad dal.
Stir-fry for half a minute, stop if the urad dal changes color.
Add green beans and peas, mix it well, and cover the pan. Turn down the heat to medium.
Let it cook for five to six minutes until the peas and beans are lightly tender. Do stir once in between.
Remove the cover and add the coriander powder, salt, and turmeric.
Let beans and peas cook without cover to allow the water to evaporate, this way the beans don’t become mushy. Stir the beans occasionally. Beans and peas should be lightly moist.
After turning of the heat add lemon juice.
Notes
Suggestions
Urad dal can be replaced with washed moong or chana dal.
Wash and soak the kidney beans in about six cups of water for at least 6 hours (the beans will double in volume ).
Cut the tomatoes in small pieces, green chili slice lengthwise and take out the seeds (if you prefer mild). Blend tomatoes, green chili, and ginger and make a paste.
Heat the oil in pressure cooker. Test the heat by adding one cumin seed. If the seed cracks right away, the oil is ready. Add asafetida and cumin seeds, as the cumin seeds crack add tomato paste, coriander, turmeric, chili powder, black pepper, and paprika.
Stir-fry for two to three minutes, until the oil begins to separate from the mixture. Add kidney beans, salt, and three cups of water. Close the cooker. Cook over medium high heat.
When pressure cooker starts to steam, turn the heat down to medium and cook twelve minutes.
Turn off the heat. Wait until the steam has stopped before opening the pressure cooker.
Kidney beans should be soft and tender. Stir and mash them gently. Adjust salt and pepper to taste.
How To Make Rajma Chawal Recipe: A Jain Rajma Recipe with Tips and FAQs
Rajma Chawal, a quintessential North Indian dish, is beloved for its rich flavors and comforting texture. While traditionally made with kidney beans simmered in a tomato-based gravy, there are various regional and dietary variations to this dish. In this rendition, we present a Jain version of Rajma Chawal, devoid of onion and garlic, yet bursting with aromatic spices and wholesome goodness.
Preparation:
Wash the kidney beans thoroughly under running water to remove any dirt or impurities.
Soak the kidney beans in about six cups of water for at least 6 hours or overnight. This helps in softening the beans and reducing cooking time.
Making the Paste:
Cut the tomatoes into small pieces and slice the green chilies lengthwise, removing the seeds if you prefer a milder taste.
Peel and chop the ginger.
In a blender, combine the tomatoes, green chilies, and ginger to make a smooth paste. Set aside.
Cooking:
Heat the cooking oil in a pressure cooker over medium heat.
To test the oil temperature, add one cumin seed. If it crackles right away, the oil is ready.
Add a pinch of asafetida followed by the cumin seeds. Allow the cumin seeds to crackle.
Once the cumin seeds start crackling, add the prepared tomato paste to the cooker.
Stir in the coriander powder, turmeric powder, red chili powder, black pepper powder, and paprika. Mix well.
Stir-frying:
Stir-fry the mixture for two to three minutes or until the oil begins to separate from the sides. This step enhances the flavor of the spices and ensures a rich gravy.
Adding Kidney Beans:
Drain the soaked kidney beans and add them to the pressure cooker.
Season with salt according to taste.
Pour in three cups of water and mix well to combine all the ingredients.
Pressure Cooking:
Close the pressure cooker with its lid securely.
Cook over medium-high heat until the pressure cooker starts steaming.
Reduce the heat to medium and continue cooking for twelve minutes.
Finishing Touches:
Once the cooking time is complete, turn off the heat and allow the pressure to release naturally.
Once the steam has stopped, carefully open the pressure cooker lid.
Mashing and Adjusting Seasoning:
The kidney beans should be soft and tender. Gently stir and mash them to thicken the gravy.
Taste the Rajma and adjust the salt and pepper as per your preference.
Garnishing:
Serve the Jain Rajma hot, garnished with chopped tomatoes for a refreshing burst of flavor.
Tips and Suggestions:
Soaking the kidney beans overnight or for at least 6 hours is crucial as it helps in reducing the cooking time and ensures even cooking.
Use mustard oil for an authentic flavor, but if unavailable, any cooking oil can be substituted.
Adjust the quantity of green chilies and red chili powder according to your spice preference.
For a creamier texture, you can mash some of the kidney beans before serving.
Garnish the Rajma with freshly chopped cilantro for added freshness and aroma.
Serve Rajma Chawal with steamed rice or Indian bread like roti or naan for a wholesome meal.
Benefits of Rajma Chawal:
High in Protein: Kidney beans are an excellent source of plant-based protein, making Rajma Chawal a nutritious meal choice, especially for vegetarians and vegans.
Rich in Fiber: Rajma is loaded with dietary fiber, which aids digestion, promotes satiety, and helps maintain a healthy weight.
Essential Nutrients: This dish provides essential nutrients such as iron, potassium, and folate, which are vital for overall health and well-being.
Heart-Healthy: Consuming kidney beans regularly may help lower cholesterol levels and reduce the risk of heart disease.
Satisfying and Comforting: Rajma Chawal is not only nutritious but also deeply comforting, making it a favorite comfort food for many.
FAQs (Frequently Asked Questions):
Q: Can I use canned kidney beans instead of dried ones?
A: Yes, you can use canned kidney beans for convenience. However, dried beans are preferred for their texture and flavor.
Q: Can I skip soaking the kidney beans?
A: Soaking the kidney beans is essential as it helps in reducing cooking time and aids in digestion. Skipping this step may result in unevenly cooked beans.
Q: How do I make Jain Rajma without onion and garlic?
A: In this Rajma recipe, we have omitted onion and garlic to make it suitable for a Jain diet. The rich flavor comes from a blend of aromatic spices and tomatoes.
Q: Can I make this Rajma recipe without a pressure cooker?
A: While a pressure cooker significantly reduces the cooking time, you can cook Rajma on a stovetop in a heavy-bottomed pot. It will require longer cooking time and frequent stirring to prevent sticking.
Q: How long can I store leftover Rajma?
A: Leftover Rajma can be stored in an airtight container in the refrigerator for up to 3-4 days. Reheat thoroughly before serving.
Jain Rajma Chawal is a delicious and wholesome dish that can be enjoyed by everyone, regardless of dietary preferences. With aromatic spices, creamy kidney beans, and a rich tomato gravy, it’s a comforting meal that’s perfect for any occasion. Follow this simple rajma chawal recipe and savor the authentic flavors of North Indian cuisine right in your own kitchen. Explore more delightful Rajasthani recipes on Manjula’s Kitchen, Explore more appetiser recipes on Manjula’s Kitchen: Vegetable Samosas, Paneer Tikka, Crispy Spinach Pakoras, Mango Lassi, Masala Chai, Gulab Jamun, Kheer (Rice Pudding)
Mango Lassi is a soothing cold drink for hot summer days or to brighten up any meal. This pale drink is a blend of mango and yogurt. A popular beverage in Indian restaurants.
Blend yogurt, mango, and 2 tablespoons sugar and taste before adding more sugar. How much sugar is used depends on the sweetness of the mango and the yogurt.
Add and cardamom powder and blend. If it is too thick, add some water to desired consistency. Pour into a tall glass and garnish with mint leaves. ice and cardamom powder and blend again.
Notes
TipsAdjust ingredient quantities depending on the sweetness of the mango and the thickness of the yogurt. Mango Lassi it is better if the mangoes are not fibrous.You may also enjoy Falooda, Lemonade
Remove the crust from all sides of the bread. Slice the bread lengthwise into 3 equal parts.
Mix all the dry ingredients together: Gram flour (besan), rice flour, asafetida, cumin seeds, and salt. Rice flour adds to the crispness. Add the water slowly to make a smooth batter. (Batter should be the consistency of pancake batter or dosa batter)
Next, add the green chilies and cilantro. Mix well.
Heat the oil in a frying pan on medium high heat. Frying pan should have at least 1 inch of oil. To check if the oil is ready, put one drop of batter in the oil. The batter should come up but not change color right away.
Dip the bread slices in the batter one at a time and slowly drop into the frying pan. Fry the Pakoras in small batches. The pakoras will take about 4 to 5 minutes to cook.
Turn them occasionally. Fry the Pakoras until both sides are golden-brown. Repeat this process. The crispy, delicious Bread Pakoras are ready to serve.
Notes
Tips:If oil is too hot Pakoras will cook too fast and will not be crispy; if oil is not hot enough Pakoras will be greasy. You may have to adjust the heat as needed while cooking.Variations:Use 1/4 cup of chopped spinach or 2 tablespoons of chopped fenugreek leaves as a substitute for the chopped cilantro.Serving suggestions:The bread pakoras are best when dipped with a fresh cilantro chutney or Pakoras taste best when they are served hot.Pakoras can be made one day in advance do not refrigerate. When ready to eat, place on a cookie sheet and heat in the preheated oven on 300 degrees.
Indian meals are not complete unless the meal includes a yogurt dish such as a Vegetable Raita. This is a colorful raita and can brighten up any meal. Serving for 4.
Learn How to make Vegetable Raita by Manjula’s Kitchen
What is Vegetable Raita: Raita is an accompaniment for any Indian meal and can be created in the form of Vegetable Raita, Spinach Raita, Boondi ka Raita, Cucumber Raita & Lauki ka Raita. Here we are focussing on making vegetable raita, it is a simple quick & easy, gluten free, kid friendly and nutritious yogurt-based recipe featuring vegetables and a selection of Indian spice powders. In the realm of culinary exploration, the creation of a delectable mix vegetable raita stands as a testament to the artistry that can be achieved with a few simple ingredients. This versatile dish, known for its refreshing taste and vibrant medley of flavours, offers a delightful twist to traditional raita recipes. Let’s embark on a culinary journey, unravelling the intricacies of crafting a mix vegetable raita that captivates the palate.
Mixing the Yogurt Base:
The journey begins with the heart of the mix vegetable raita—yogurt. A foundational step involves thoroughly mixing the yogurt to create a smooth and creamy base. If the yogurt happens to be thick, akin to pudding, a strategic addition of milk is introduced to attain the desired consistency reminiscent of a yogurt drink. This meticulous process sets the stage for the infusion of various flavours that will transform the humble yogurt into a culinary delight.
Seasoning the Base:
To elevate the taste profile, a symphony of seasonings is introduced. Salt, chopped dill, black pepper, roasted cumin seeds, and paprika come together in perfect harmony, each contributing its distinct note to the mix vegetable raita. This amalgamation not only imparts a depth of flavour but also showcases the versatility of the dish, making it a fitting accompaniment to various culinary creations.
Balancing Flavours:
A key consideration in perfecting the mix vegetable raita is achieving a harmonious balance of flavours. If the yogurt tends towards sourness, a touch of sugar is introduced, striking the perfect equilibrium between sweetness and tanginess. This thoughtful addition ensures that every spoonful of the raita delivers a well-rounded and satisfying taste experience.
Infusing Freshness with Vegetables:
The introduction of chopped cucumber, tomatoes, and yellow bell pepper adds a burst of freshness and colour to the mix vegetable raita. These crisp and vibrant vegetables not only enhance the visual appeal but also contribute a delightful crunch, transforming the raita into a sensory delight. The careful selection and preparation of vegetables elevate the dish from a simple condiment to a standalone culinary creation.
Variations and Personalization:
The beauty of mix vegetable raita lies in its adaptability. Variations abound, allowing for creative culinary expressions. Dill, a traditional choice, can be replaced with chopped mint or cilantro, offering a different herbal note to the ensemble. The vegetable composition can also be tailored to individual taste preferences, making the mix vegetable raita a versatile canvas for culinary innovation.
Expert Tips for Culinary Success:
No culinary journey is complete without a few expert tips. To enhance the flavour profile, dry roasting cumin seeds is recommended. This process is performed on medium heat until the seeds turn brown, releasing the distinctive aroma of cumin. Post-roasting, grinding the cumin seeds, once cooled to room temperature, ensures that the spice is evenly distributed throughout the mix vegetable raita, intensifying the overall taste experience.
Conclusion: A Culinary Symphony Unveiled
In conclusion, the process of creating a mix vegetable raita is not just a culinary endeavour; it’s a symphony of flavours, textures, and creativity. From the careful mixing of the yogurt base to the strategic addition of seasonings and the infusion of fresh vegetables, each step contributes to the creation of a culinary masterpiece. The variations and personalised touches open the door to endless possibilities, allowing individuals to tailor the mix vegetable raita to their unique taste preferences.
As we navigate the intricacies of the mix vegetable raita recipe, it becomes apparent that this dish is not merely a side accompaniment but a culinary journey that showcases the art of harmonising diverse elements. It is an invitation to explore, experiment, and savour the richness of flavours that unfold with every bite. The mix vegetable raita, with its vibrant medley and thoughtful nuances, stands as a testament to the creative potential within the realm of culinary arts.
Jalebi is a warm crispy, delicious treat. It can best be described as funnel cake. In my home town jalebi was served for the breakfast treat like pancakes. It was a treat to have jalebi and kachori for a hearty breakfast. Jalebi was mostly eaten by themselves, but some time we soaked the jalebi in warm milk and that tasted delicious. I know jalebi is mostly served as dessert but for me jalebi still makes the best breakfast treat.
Dissolve the yeast in warm water and let it sit for about five minutes.
Mix the flour, besan (gram flour), oil, and sugar together. Add the yeast solution to the flour and mix to make a smooth batter. Set the batter aside in a warm place for one hour.
Make sure the batter is fermented, but do not over-ferment. After fermenting the batter will be a little lacy.
Making the Syrup
Boil the sugar and water together. Add the lemon juice and saffron and turn off the heat. (The lemon juice keeps the mixture from crystallizing).
Making Jalebis
Heat the oil in a flat frying pan about one inch deep. To test, put one drop of batter in the oil. The batter should sizzle and rise into a ball without changing color right away.
Fill the Jalebi batter into a piping bag with a #3 nozzle. You can also use an empty ketchup or mustard bottle.
Squeeze the Jalebi batter out into the hot oil in pretzel shapes about two inches in diameter. Fry the Jalebis until light golden-brown on both sides.
Transfer them into the warm syrup. Let the jalebis soak in the hot syrup a few seconds, then take them out.
Serve hot. Enjoy!
Notes
VariationsTry sprinkling cinnamon powder or drizzle melted chocolate over the Jalebis for a creative touch.Serving SuggestionIn North India Jalebi is a breakfast treat accompanied with Urad Dal Puri and Methi Chutney.
Cube the paneer into half inch pieces and deep-fry them on medium high heat. Fry until the paneer becomes a light golden color. Take the paneer out and place on a paper towel so the extra oil is absorbed.
Mix cornstarch with three tablespoons of water and keep aside.
Blend the tomatoes and ginger to make a puree.
Heat the oil in a saucepan. Test the heat by adding one cumin seed to the oil. If the cumin seed cracks right away, the oil is ready. Add the asafetida (hing), cumin seeds, bay leaves and cinnamon and stir-fry for a few seconds.
Add the tomato paste, coriander, turmeric, chili powder and paprika. Cook until the mixture reduces to half.
Add the green peas and 1/4 cup of water. cook on medium heat pan should be covered. When the peas are tender, add the salt and paneer.
To thicken the gravy add corn starch mix. Cover the pan and let it cook for 3-4 minutes.
Notes
Suggestion: Add 1 tablespoon fresh chopped fenugreek leaves or 1/2 tablespoon dried fenugreek leaves to the gravy when cooking.
Indulge in the perfect gluten-free, kid-friendly matar paneer recipe, specially crafted to elevate any occasion as this dish is a mouthwatering party recipe that’s popular among all individuals from children to adults. This delightful dish boasts a rich and flavorful gravy that will captivate both young and adult palates, ensuring a memorable dining experience.
Begin the journey of How To Make Matar Paneer by meticulously cubing the paneer into half-inch pieces. The key is to deep-fry these paneer cubes over medium-high heat until they attain a delicate golden hue. This crucial step not only imparts a delightful texture to the paneer but also sets the foundation for the indulgent experience that Matar Paneer promises. Once fried to perfection, transfer the paneer cubes onto a paper towel, allowing any excess oil to be absorbed, ensuring a balanced and flavorful outcome for this Matar Paneer sabji.
Step 2: Creating a Thickening Agent – Essential in Matar Paneer Masala
In the second step of the Matar Paneer masala preparation, take a moment to mix cornstarch with three tablespoons of water, creating a thickening agent that will contribute to the luscious consistency of the dish. This clever addition enhances the overall texture of the Matar Paneer gravy, ensuring it coats the paneer cubes and green peas harmoniously. The cornstarch mix, now prepared and set aside, is a key player in perfecting the Matar Paneer sabzi.
Step 3: Crafting a Tomato-Ginger Puree – Essence of Matar Paneer
Embark on the flavorful journey of Matar Paneer by crafting a tomato and ginger puree. This vibrant mixture lays the groundwork for the dish’s aromatic essence, infusing it with the natural sweetness of tomatoes and the subtle warmth of ginger. As the soul of the Matar Paneer recipe, this puree forms the base of the rich gravy that envelops the paneer and peas, creating a delightful symphony of flavors in this quintessential Matar Paneer masala.
Step 4: Infusing Flavorful Elements – Matar Paneer Unleashed
Heat oil in a saucepan to initiate the fourth step in the Matar Paneer saga. The aromatic journey begins by testing the oil’s readiness with a cumin seed. Once it crackles, add a melange of flavorful elements, including asafetida (hing), cumin seeds, bay leaves, and cinnamon. This infusion of spices elevates the Matar Paneer sabzi, creating a fragrant and appetizing atmosphere that sets the stage for the subsequent layers of taste in this Matar Paneer recipe.
Step 5: Crafting the Tomato Base – Foundation of Matar Paneer Recipe
As the oil embraces the aromatic symphony, introduce the tomato paste, coriander, turmeric, chili powder, and paprika to the saucepan. This marks a pivotal step where the foundation of the Matar Paneer recipe takes shape. Cook this amalgamation until it reduces to half its volume, allowing the tomatoes to release their inherent sweetness and harmonize with the array of spices. This transformative process is integral to achieving the distinctive taste that defines Matar Paneer masala.
Step 6: Introducing Green Peas – Matar Paneer Masala Symphony
For the sixth step in perfecting Matar Paneer, introduce the green peas and a quarter cup of water to the pan. Let this vibrant combination simmer on medium heat, ensuring the pan is covered. The green peas, tenderized to perfection, contribute a burst of color and freshness to the Matar Paneer masala. As the peas become tender, add salt and the previously prepared paneer cubes, creating a symphony of textures that makes Matar Paneer a delightful and wholesome sabzi.
Step 7: Thickening the Gravy – Culmination of Matar Paneer Recipe
Concluding the Matar Paneer journey, focus on thickening the gravy by incorporating the cornstarch mix. Cover the pan, allowing the Matar Paneer to simmer for an additional 3-4 minutes. This final step ensures that the Matar Paneer masala reaches its optimal thickness, creating a cohesive and flavorful gravy that clings to the paneer and peas. With this last flourish, the Matar Paneer recipe unfolds into a hearty and satisfying dish, ready to be savored in all its aromatic glory.