Category: North Indian Recipes
North Indian Recipes: A Journey Through Flavors
There’s something irresistibly comforting about North Indian cuisine. It’s not just the rich, aromatic spices that tantalize your senses, but the sheer warmth and heartiness of the dishes that make you feel at home, no matter where you are. Today, let’s explore some North Indian recipes, perfect for any occasion, and delightfully vegetarian to boot.
Rajma Galouti Kebabs
Imagine biting into Rajma Galouti Kebabs, where the robust flavor of kidney beans meets a medley of aromatic spices. These kebabs, a wonderful example of North Indian vegetarian recipes, are perfect for starting your meal. They pair beautifully with a refreshing sip from one of the many delightful Indian beverages, perhaps a tangy aam panna or a cooling lassi.
Methi Malai Matar
The gentle bitterness of fresh fenugreek leaves mingles with the sweet pop of peas in Methi Malai Matar. This dish, creamy and subtly spiced, epitomizes the charm of North Indian food recipes. It sits wonderfully alongside a bowl of fragrant rice or warm naan, complemented by a light, crisp salad from the array of soups and salads recipes available.
Pindi Chana
For those who crave a hearty, robust dish, Pindi Chana offers chickpeas enveloped in a symphony of spices, each bite bursting with flavor. This traditional gem from North Indian recipes is best enjoyed with fluffy bhature or poori. Add a tangy, spicy pickle from the pickle chutney selection to elevate the experience.
Enhancing Your North Indian Menu
To elevate your North Indian feast, consider adding delightful Indian snacks like dhokla or kachori. These snacks bring a playful variety of textures and flavors that dance on your palate.
To end on a sweet note, indulge in Indian desserts recipes such as the delicate, syrup-soaked rasmalai or the creamy, comforting shrikhand.
For healthier options, dishes like dal makhani and bhindi masala offer deliciously light choices, perfect for those mindful of their diet.
For your next gathering, explore the wealth of recipes in the popular party recipe collection to ensure your menu impresses every guest.
More North Indian Vegetarian Recipes
Dum Aloo
Imagine baby potatoes, cooked gently until tender, then enveloped in a rich, spiced gravy that epitomizes comfort food. This is Dum Aloo, a beloved staple in North Indian vegetarian recipes. It’s a dish that not only satisfies but also invites you to savor each mouthful. Pair it with a vibrant side from the vegetables sautéed / dry recipes, like a simple yet flavorful stir-fry.
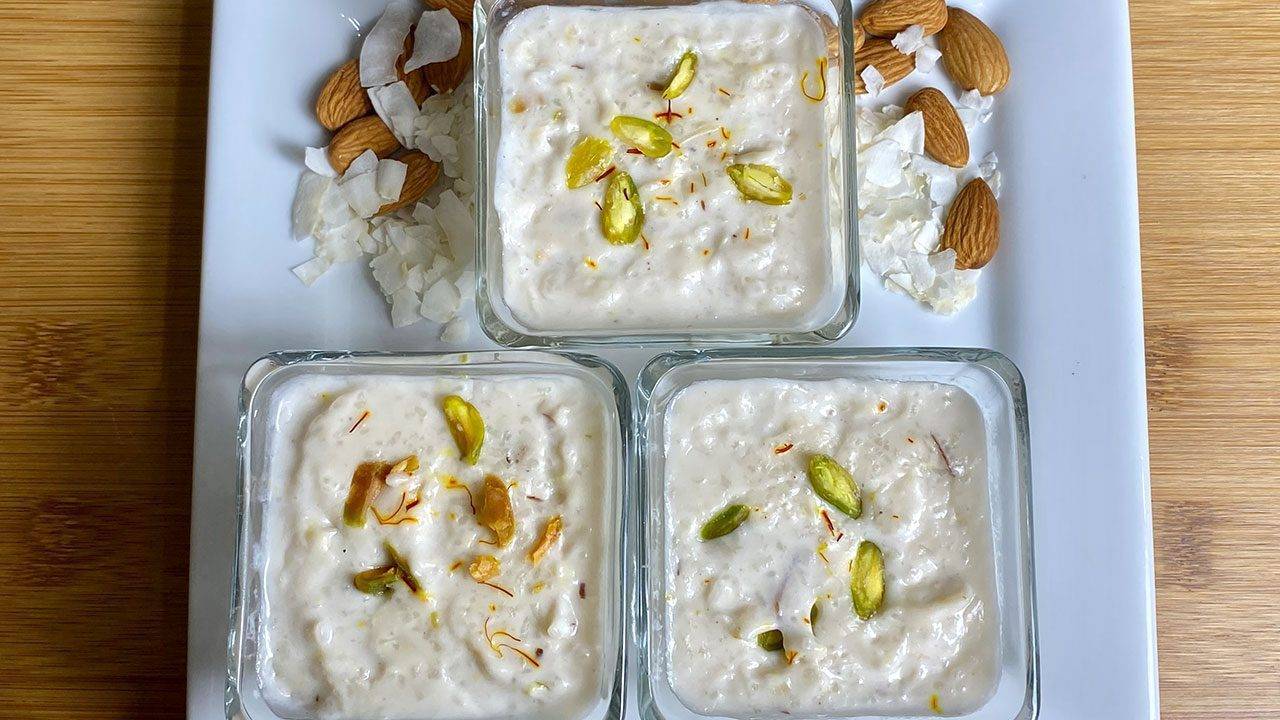
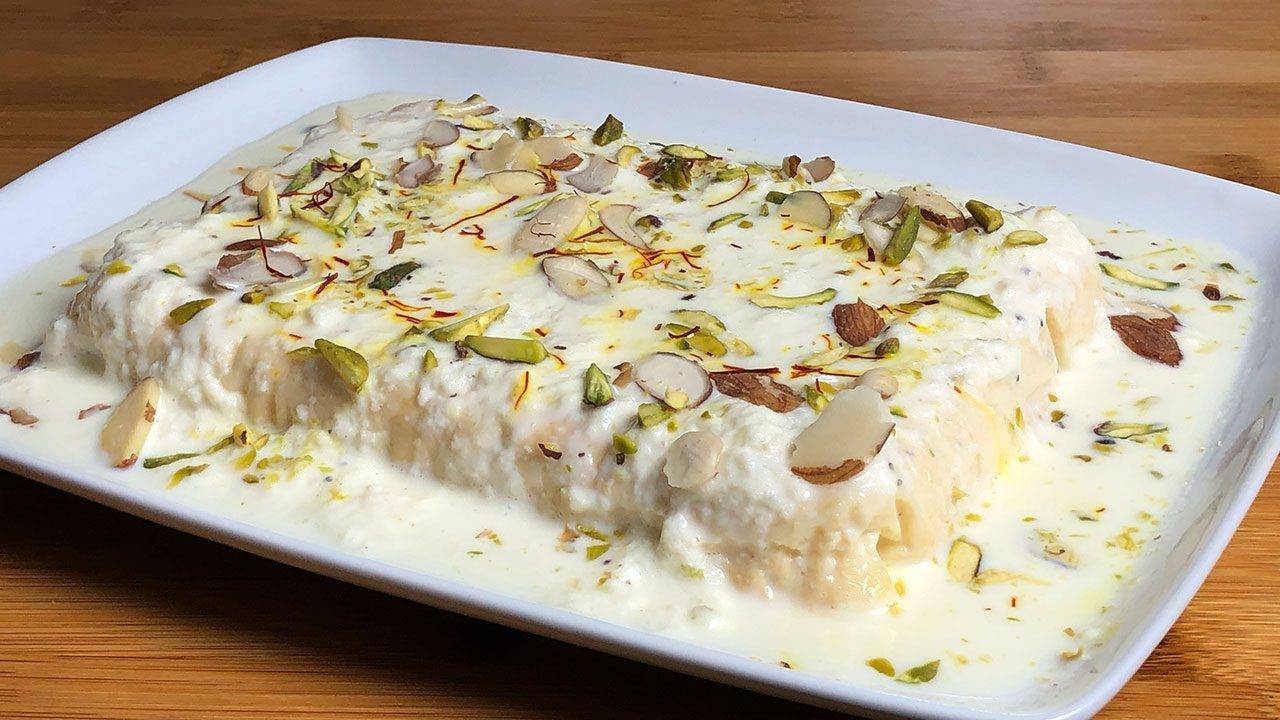
Sweet Endings: Gulab Jamun and Kheer
No meal is complete without a sweet indulgence. Gulab Jamun, those soft, syrup-drenched delights, and Kheer, a creamy rice pudding adorned with cardamom and nuts, are perfect for rounding off your feast. These desserts, highlighted in the Indian desserts recipe category, add a touch of sweetness to your culinary journey.
Frequently Asked Questions (FAQs)
Q: What are some popular North Indian recipes?
A: Some popular North Indian recipes include Rajma Galouti Kebabs, Methi Malai Matar, Pindi Chana, Dum Aloo, Gulab Jamun, and Kheer. These dishes are flavorful, nutritious, and perfect for any occasion.
Q: How can I make traditional North Indian food suitable for a vegetarian diet?
A: To make traditional North Indian food suitable for a vegetarian diet, try recipes like Rajma Galouti Kebabs, Methi Malai Matar, and Dum Aloo. These recipes are hearty, flavorful, and perfect for vegetarians.
Q: What are some easy North Indian vegetarian recipes?
A: Some easy healthy vegetarian recipes include Rajma Galouti Kebabs, Methi Malai Matar, and Pindi Chana. These dishes are quick to prepare and provide the necessary nutrients for a healthy diet.
Q: Can I prepare North Indian food recipes in advance?
A: Yes, many North Indian food recipes can be prepared in advance and stored. Dishes like Rajma Galouti Kebabs and Pindi Chana can be made ahead of time and refrigerated, while snacks like dhokla and kachori can be prepped and frozen.
Q: What are some sweet North Indian food recipes for special occasions?
A: Some sweet North Indian food recipes for special occasions include Gulab Jamun and Kheer. These desserts are classic, easy to prepare, and perfect for celebrations.
Conclusion
North Indian recipes are a celebration of diverse flavors and rich cultural heritage. Whether you’re looking for North Indian vegetarian recipes, specific North Indian food recipes, or comprehensive vegetarian Indian recipes, these dishes will bring variety and flavor to your meals. So, gather your ingredients, try out these recipes, and enjoy the rich and diverse world of North Indian cuisine. Happy cooking and happy eating!
By incorporating these dishes into your menu, you’ll be able to enjoy a wide variety of delicious and nutritious foods. Whether you’re looking for snacks, main courses, or desserts, there’s a North Indian recipe to suit every taste. Don’t forget to check out Manjula’s Kitchen for more inspiration and culinary delights. Happy cooking and happy eating!
-
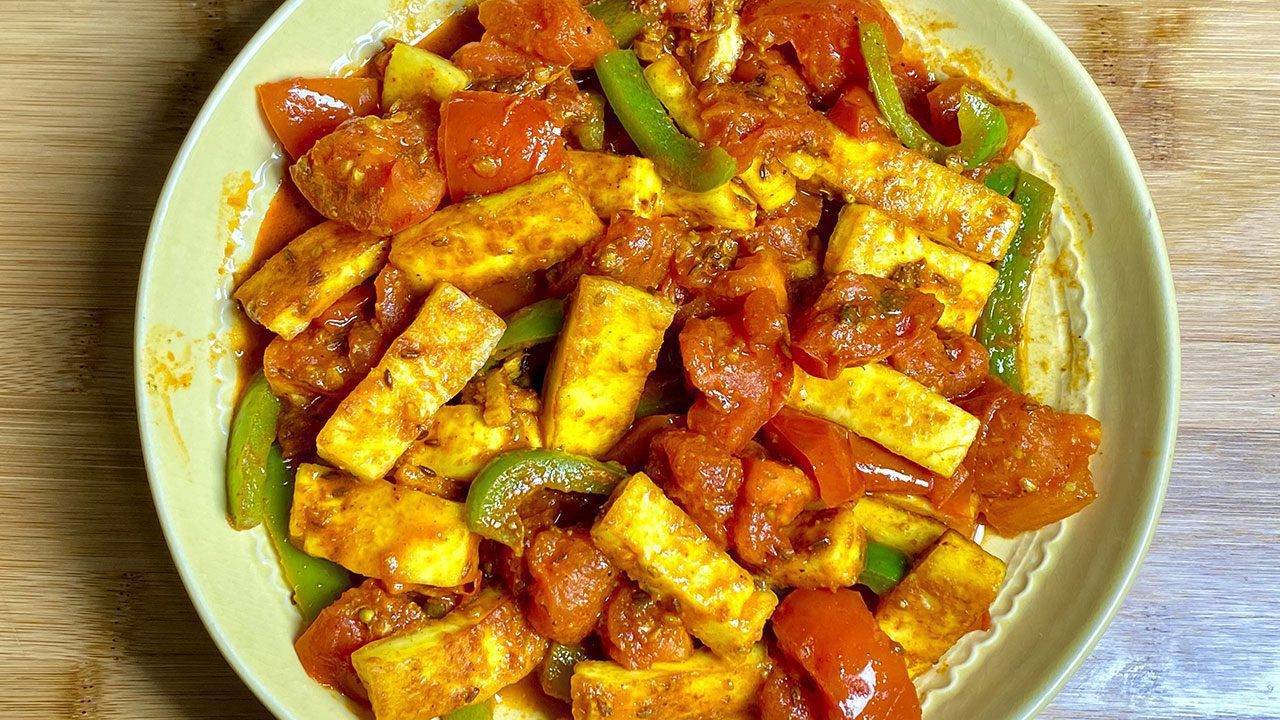
Paneer Tomato Curry
How to make Tomato Paneer Curry Recipe By Manjula’s Kitchen
Paneer tomato curry, also known as tomato paneer curry, is a delightful and aromatic dish that captures the essence of Indian cuisine. This paneer based gluten free veg gravy dish combines the rich and creamy texture of paneer (Indian cottage cheese) with the tanginess of tomatoes and a blend of aromatic spices. In this detailed exploration, we will take you through each step of the paneer tomato recipe, highlighting the significance of each element to create a dish that tantalizes the taste buds.
Step 1: Heating the Oil and Grilling the Paneer
The first step in making tomato paneer curry is heating one tablespoon of oil in a flat saucepan over low-medium heat. This is a crucial step as it sets the foundation for the flavor development in the dish. The low-medium heat allows the oil to gradually heat up, preventing it from smoking and ensuring that the paneer pieces cook evenly.
Once the oil is heated, the paneer pieces are spread in the pan and grilled on one side until they achieve a golden brown color. Grilling the paneer serves multiple purposes. It imparts a subtle smokiness to the paneer, enhancing its flavor profile. The golden brown color also adds visual appeal to the dish. After grilling, the paneer is taken out from the pan and set aside, ready to be reintroduced later in the cooking process.
Step 2: Adding Cumin Seeds, Asafetida, and Sliced Ginger
In the same pan that was used for grilling the paneer, the remaining oil is added. It is essential to use the same pan to retain the flavors that have infused into it during the initial step. Waiting until the oil is moderately hot, cumin seeds are introduced. The crackling of cumin seeds in hot oil releases their aromatic oils, infusing the entire dish with a warm and earthy essence.
Asafetida, a pungent spices with a unique flavor, is added along with sliced ginger. Asafetida contributes a distinct umami note to the dish, enhancing the overall taste. Ginger, known for its subtle spiciness and freshness, complements the other ingredients, creating a harmonious balance of flavors. Stir-frying these elements for about 30 seconds allows their flavors to meld and infuse into the oil.
Step 3: Stir-Frying Bell Pepper with Spices
Next in the process is the addition of bell pepper to the pan. Stir-frying the bell pepper for about half a minute ensures that it retains its crispness and vibrant color. The bell pepper not only adds a crunchy texture but also contributes a slightly sweet and fruity undertone to the dish. At this stage, the ground spices – coriander powder, turmeric, and red chili powder – are introduced.
Coriander powder provides a warm and citrusy flavor, turmeric adds a golden hue and earthy notes, while red chili powder imparts the desired level of spiciness. Stir-frying the bell pepper with these spices allows them to coat the vegetables evenly, creating a flavorful base for the curry.
Step 4: Adding Tomatoes, Salt, and Sugar
The introduction of tomatoes is a crucial step in paneer tomato curry, as it forms the base of the gravy. Tomatoes bring a tangy and slightly sweet taste to the dish. Adding salt at this stage not only enhances the natural flavors of the tomatoes but also helps in their cooking process by drawing out moisture.
A touch of sugar is included to balance the acidity of the tomatoes, creating a harmonious blend of sweet and tangy notes. Cooking the tomatoes, stirring for about 2-3 minutes, ensures that they are just tender but not mushy. This careful monitoring of the tomatoes’ texture is essential for achieving the desired consistency in the final dish.
Step 5: Cooking Paneer in Tomato Gravy
Once the tomatoes reach the desired tenderness, the grilled paneer is reintroduced to the pan. Cooking the paneer in the tomato gravy for about 5 minutes allows it to absorb the flavors of the spices and the tanginess of the tomatoes. Stirring occasionally ensures that the paneer is evenly coated with the aromatic mixture, creating a cohesive and well-balanced dish.
During this stage, it is crucial to maintain a balance between cooking the paneer thoroughly and preserving its distinct texture. The goal is to have paneer covered with spices while retaining visible tomato pieces in the curry.
Step 6: Final Touch – Sprinkling Garam Masala
As a finishing touch, the heat is turned off, and a sprinkle of garam masala is added to the tomato paneer curry. Garam masala, a blend of warm spices like cinnamon, cardamom, and cloves, contributes a final layer of complexity and depth to the dish. Adding garam masala at the end preserves its volatile flavors, ensuring that they are not overpowered by the other spices during the cooking process.
Stirring the garam masala into the curry distributes its aromatic compounds evenly, elevating the overall fragrance of the dish. This final step enhances the complexity of flavors, making the paneer and tomato curry a symphony of tastes and aromas.
Conclusion:
In the art of crafting paneer in tomato gravy, each step plays a pivotal role in building layers of flavor and texture. From grilling the paneer for a smoky undertone to carefully stir-frying spices for a well-balanced taste, every action contributes to the overall success of the dish. The interplay of ingredients like cumin seeds, asafetida, ginger, bell pepper, and a medley of ground spices creates a curry that is not just a meal but a culinary experience.
This detailed exploration of the tomato paneer recipe highlights the importance of technique, timing, and ingredient selection in Indian cuisine. The result is a dish that showcases the versatility of paneer and the vibrancy of tomatoes, bringing together the best of both worlds in a savory and satisfying curry.
Whether you call it paneer tomato curry, tomato paneer curry, paneer tomato recipe, paneer and tomato curry, paneer in tomato gravy, or tomato paneer recipe, this flavorful creation is sure to become a staple in your culinary repertoire.
Note:
Paneer with Tomato is delicious and super simple this goes well with plain rice, roti, paratha, puri or naan.
-
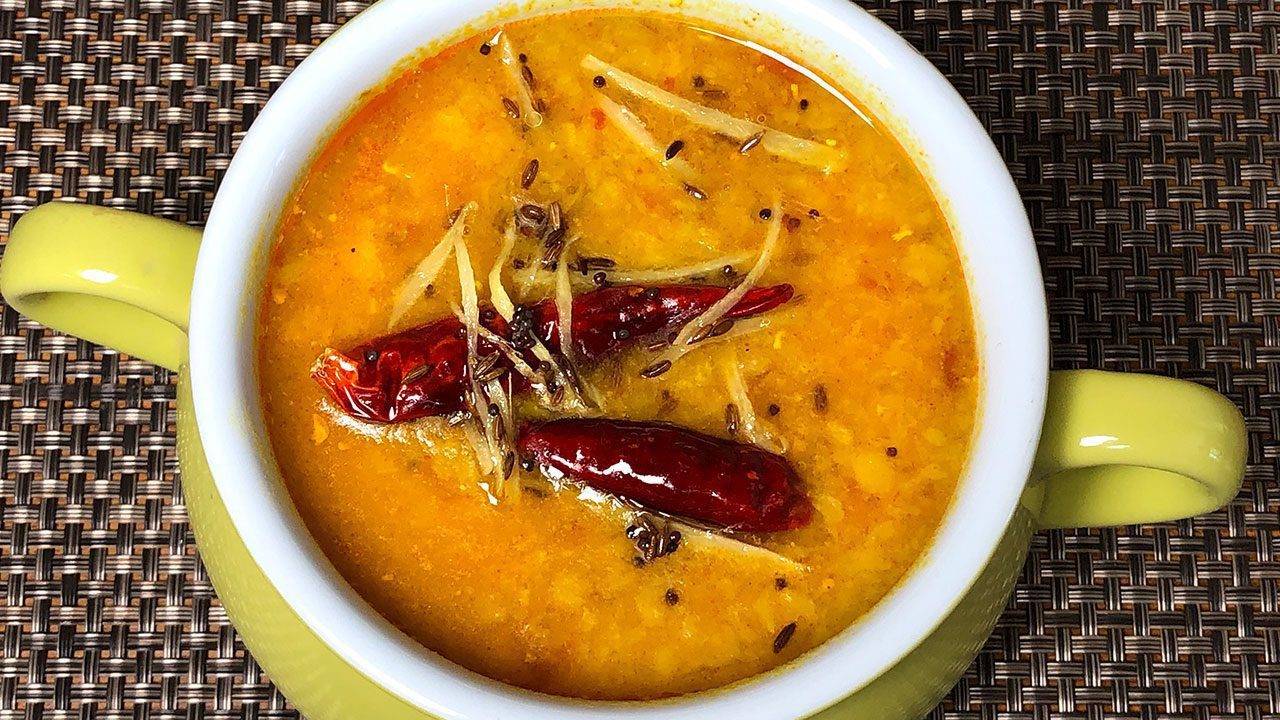
Red Lentil Dal (Instant Pot Recipe)
Instant Pot Red Lentil Dal: A Quick and Flavorful Meal
Red Lentil Dal is a nutritious and flavorful dish made from red lentils, which are rich in protein, fibre, and essential nutrients. It is suitable for individuals with diabetes, as it has a low glycemic index and helps regulate blood sugar levels. Additionally, it is gluten-free, making it suitable for those with gluten intolerance or celiac disease.
This dish can be easily prepared in an Instant Pot, allowing for quick and convenient cooking. It is low in fat, making it a healthy option for those looking to reduce their fat intake. As a vegan dish, it does not contain any animal products, making it suitable for those following a plant-based diet.
The dish is typically prepared by cooking red lentils with a variety of vegetables, such as tomatoes, and spinach, in a flavorful curry or gravy made from spices like cumin, coriander, turmeric, and ginger. The result is a hearty and satisfying meal that is both delicious and nutritious.
Instant Pot Red Lentil Dal, also known as Masoor Dal, is a popular Indian lentil dish known for its simplicity, flavor, and quick preparation. This Instant Pot Red Lentil Dal recipe offers a convenient way to enjoy the rich flavors of lentils infused with aromatic spices in a fraction of the time. Perfect for busy weeknights or whenever you’re craving a hearty and nutritious meal, this dish is sure to become a staple in your recipe repertoire.
Step 1: Preparation of Lentils
Begin by rinsing the red lentils (masoor dal) under cold water until the water runs clear. This step helps remove any impurities and starch from the lentils, ensuring they cook evenly and maintain their shape. Once rinsed, drain the lentils and set them aside while you prepare the other ingredients.
Step 2: Sautéing Aromatics
To infuse the dal with flavor, heat oil or ghee in the Instant Pot using the “Sauté” function. Add aromatics such as cumin seeds, mustard seeds, and dried red chilies to the hot oil, allowing them to sizzle and release their fragrance. Then, add ginger, sautéing until they turn golden brown and aromatic.
Step 3: Adding Spices
Next, it’s time to add a medley of spices to the Instant Pot to create a robust flavor base for the dal. Incorporate ground turmeric, ground coriander, ground cumin, and red chili powder, stirring well to coat the aromatics. Toasting the spices in oil helps enhance their flavors and aromas, elevating the taste of the dal.
Step 4: Cooking Lentils in Instant Pot
Once the spices are well-incorporated, add the rinsed red lentils to the Instant Pot, stirring to coat them with the aromatic spice mixture. Pour in water or vegetable broth, ensuring that the lentils are fully submerged. Close the lid of the Instant Pot and set it to “Pressure Cook” mode, cooking the dal for the specified time until the lentils are tender and cooked through.
Step 5: Natural Pressure Release
After the cooking cycle is complete, allow the Instant Pot to naturally release pressure for a few minutes before carefully opening the lid. This gradual release of pressure helps prevent the dal from splattering and ensures that the lentils are fully cooked and tender. Once the pressure has been released, gently stir the dal to combine the flavors.
Step 6: Adjusting Consistency and Seasoning
At this stage, you can adjust the consistency of the dal by adding more water or broth if desired. Taste the dal and adjust the seasoning by adding salt and freshly ground black pepper according to your preferences. For added freshness, squeeze in a splash of lemon juice or garnish with chopped cilantro leaves before serving.
Step 7: Serving and Enjoying
Serve the Instant Pot Red Lentil Dal hot, garnished with additional cilantro leaves for a pop of color and freshness. This versatile dish pairs well with steamed rice, naan bread, or roti, making it a satisfying and wholesome meal option for any occasion.
Tips for Perfect Instant Pot Red Lentil Dal
Rinse Lentils Thoroughly: Be sure to rinse the red lentils thoroughly under cold water before cooking to remove any dirt or debris.
Control Spice Level: Adjust the amount of red chili powder and dried red chilies according to your spice tolerance. For a milder dal, reduce the amount of chili powder or omit the dried red chilies altogether.
Experiment with Spices: Feel free to customize the spice blend to suit your taste preferences. Additions such as garam masala, cinnamon, or cloves can add depth and complexity to the flavor profile of the dal.
Variations of Instant Pot Red Lentil Dal
Coconut Red Lentil Dal: Incorporate coconut milk or coconut cream into the dal for a creamy and indulgent variation with a hint of sweetness.
Spinach Red Lentil Dal: Add fresh spinach leaves to the dal during the cooking process for an extra dose of greens and nutrition.
Tadka Tempering: Elevate the flavor of the dal by adding a tadka (tempering) of ghee, cumin seeds, and dried red chilies to the finished dish before serving.
Benefits of Instant Pot Red Lentil Dal
High in Protein: Red lentils are a rich source of plant-based protein, making this dal an excellent option for vegetarians and vegans.
Rich in Fiber: Lentils are also high in dietary fiber, which helps promote digestive health and keeps you feeling full and satisfied.
Quick and Convenient: Cooking dal in the Instant Pot drastically reduces the cooking time compared to traditional stovetop methods, making it a convenient option for busy lifestyles.
Frequently Asked Questions (FAQs)
Can I use other types of lentils for this recipe?
Yes, you can substitute other varieties of lentils such as green lentils or brown lentils for the red lentils in this recipe, although the cooking time may vary.
Can I make this recipe on the stovetop instead of using an Instant Pot?
Absolutely! Simply follow the same steps using a large pot or saucepan on the stovetop, adjusting the cooking time as needed until the lentils are tender.
Can I freeze leftover dal for later?
Yes, you can freeze leftover dal in airtight containers for up to 3 months. Thaw it in the refrigerator overnight before reheating and serving.
Explore more delightful Indian recipes on Manjula’s Kitchen, such as Chana Masala for another culinary adventure.