Paneer Tomato Curry

Paneer Tomato Curry
Ingredients
- 3 cups tomatoes cut into large pieces, I used 4medium tomatoes.
- 6 oz paneer cut into about 1/4 inch thick and 1-1/2 inch long
- ¼ bell pepper cut into thin slices.
- 2 Tbsp oil divided.
- 1 tsp cumin seeds jeera
- ⅛ tsp asafetida hing
- 2 Tbsp thinly sliced ginger
- 2 tsp coriander powder
- ¼ tsp turmeric haldi
- ½ tsp red chili powder
- 1 tsp sugar
- 1 tsp salt
- ½ tsp garam masala
Instructions
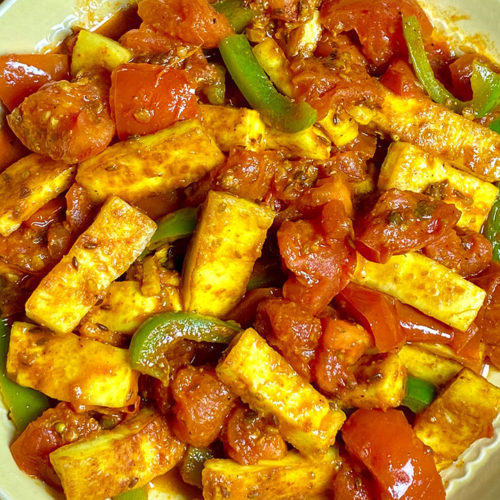
- Heat one tablespoon oil over low medium heat in a flat saucepan, spread the paneer pieces and grill them for one side till they are golden brown. Take them out from the pan and set aside.
- In the same pan add the remaining oil. Wait until oil is moderately hot add cumin seeds as the cumin seeds crack add asafetida and sliced ginger, stir fry them for about 30 seconds.
- Add bell pepper and stir fry them for about half a minute add coriander powder, turmeric and red chili powder and stir.
- Next add tomatoes, salt, and sugar, cook them stirring for about 2-3 minutes tomatoes should be just tender add paneer and cook for about 5 minutes stirring occasionally. Paneer should be covered with spices and tomatoes should be still not mushy, you should be able to see tomato pieces. Turn of the heat sprinkle the garam masala and stir.
- Paneer with Tomato is delicious and super simple this goes well with plain rice, roti, paratha, puri or naan.
Notes
How to make Tomato Paneer Curry Recipe By Manjula’s Kitchen
Paneer tomato curry, also known as tomato paneer curry, is a delightful and aromatic dish that captures the essence of Indian cuisine. This paneer based gluten free veg gravy dish combines the rich and creamy texture of paneer (Indian cottage cheese) with the tanginess of tomatoes and a blend of aromatic spices. In this detailed exploration, we will take you through each step of the paneer tomato recipe, highlighting the significance of each element to create a dish that tantalizes the taste buds.
Step 1: Heating the Oil and Grilling the Paneer
The first step in making tomato paneer curry is heating one tablespoon of oil in a flat saucepan over low-medium heat. This is a crucial step as it sets the foundation for the flavor development in the dish. The low-medium heat allows the oil to gradually heat up, preventing it from smoking and ensuring that the paneer pieces cook evenly.
Once the oil is heated, the paneer pieces are spread in the pan and grilled on one side until they achieve a golden brown color. Grilling the paneer serves multiple purposes. It imparts a subtle smokiness to the paneer, enhancing its flavor profile. The golden brown color also adds visual appeal to the dish. After grilling, the paneer is taken out from the pan and set aside, ready to be reintroduced later in the cooking process.
Step 2: Adding Cumin Seeds, Asafetida, and Sliced Ginger
In the same pan that was used for grilling the paneer, the remaining oil is added. It is essential to use the same pan to retain the flavors that have infused into it during the initial step. Waiting until the oil is moderately hot, cumin seeds are introduced. The crackling of cumin seeds in hot oil releases their aromatic oils, infusing the entire dish with a warm and earthy essence.
Asafetida, a pungent spices with a unique flavor, is added along with sliced ginger. Asafetida contributes a distinct umami note to the dish, enhancing the overall taste. Ginger, known for its subtle spiciness and freshness, complements the other ingredients, creating a harmonious balance of flavors. Stir-frying these elements for about 30 seconds allows their flavors to meld and infuse into the oil.
Step 3: Stir-Frying Bell Pepper with Spices
Next in the process is the addition of bell pepper to the pan. Stir-frying the bell pepper for about half a minute ensures that it retains its crispness and vibrant color. The bell pepper not only adds a crunchy texture but also contributes a slightly sweet and fruity undertone to the dish. At this stage, the ground spices – coriander powder, turmeric, and red chili powder – are introduced.
Coriander powder provides a warm and citrusy flavor, turmeric adds a golden hue and earthy notes, while red chili powder imparts the desired level of spiciness. Stir-frying the bell pepper with these spices allows them to coat the vegetables evenly, creating a flavorful base for the curry.
Step 4: Adding Tomatoes, Salt, and Sugar
The introduction of tomatoes is a crucial step in paneer tomato curry, as it forms the base of the gravy. Tomatoes bring a tangy and slightly sweet taste to the dish. Adding salt at this stage not only enhances the natural flavors of the tomatoes but also helps in their cooking process by drawing out moisture.
A touch of sugar is included to balance the acidity of the tomatoes, creating a harmonious blend of sweet and tangy notes. Cooking the tomatoes, stirring for about 2-3 minutes, ensures that they are just tender but not mushy. This careful monitoring of the tomatoes’ texture is essential for achieving the desired consistency in the final dish.
Step 5: Cooking Paneer in Tomato Gravy
Once the tomatoes reach the desired tenderness, the grilled paneer is reintroduced to the pan. Cooking the paneer in the tomato gravy for about 5 minutes allows it to absorb the flavors of the spices and the tanginess of the tomatoes. Stirring occasionally ensures that the paneer is evenly coated with the aromatic mixture, creating a cohesive and well-balanced dish.
During this stage, it is crucial to maintain a balance between cooking the paneer thoroughly and preserving its distinct texture. The goal is to have paneer covered with spices while retaining visible tomato pieces in the curry.
Step 6: Final Touch – Sprinkling Garam Masala
As a finishing touch, the heat is turned off, and a sprinkle of garam masala is added to the tomato paneer curry. Garam masala, a blend of warm spices like cinnamon, cardamom, and cloves, contributes a final layer of complexity and depth to the dish. Adding garam masala at the end preserves its volatile flavors, ensuring that they are not overpowered by the other spices during the cooking process.
Stirring the garam masala into the curry distributes its aromatic compounds evenly, elevating the overall fragrance of the dish. This final step enhances the complexity of flavors, making the paneer and tomato curry a symphony of tastes and aromas.
Conclusion:
In the art of crafting paneer in tomato gravy, each step plays a pivotal role in building layers of flavor and texture. From grilling the paneer for a smoky undertone to carefully stir-frying spices for a well-balanced taste, every action contributes to the overall success of the dish. The interplay of ingredients like cumin seeds, asafetida, ginger, bell pepper, and a medley of ground spices creates a curry that is not just a meal but a culinary experience.
This detailed exploration of the tomato paneer recipe highlights the importance of technique, timing, and ingredient selection in Indian cuisine. The result is a dish that showcases the versatility of paneer and the vibrancy of tomatoes, bringing together the best of both worlds in a savory and satisfying curry.
Whether you call it paneer tomato curry, tomato paneer curry, paneer tomato recipe, paneer and tomato curry, paneer in tomato gravy, or tomato paneer recipe, this flavorful creation is sure to become a staple in your culinary repertoire.
Note:
Paneer with Tomato is delicious and super simple this goes well with plain rice, roti, paratha, puri or naan.
3 Responses
Leave a Reply
You must be logged in to post a comment.



Excellent recipe. Thanks Aunty
Dear Manjula. I live in Canada and the tomatoes at this time of year are terrible. Could I use canned, diced tomatoes for this – if I make sure most of the liquid is evaporated? I love your recipes and would like to try this soon.
This looks like a dish that needs good quality fresh tomatoes so I would wait for summer. I’m Italian and we really don’t get good tomatoes in the winter. I have no problem substituting fresh tomatoes for canned ones in a gravy (maybe add a bit of sugar) but in a dish like this one it’s not the same thing…