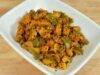
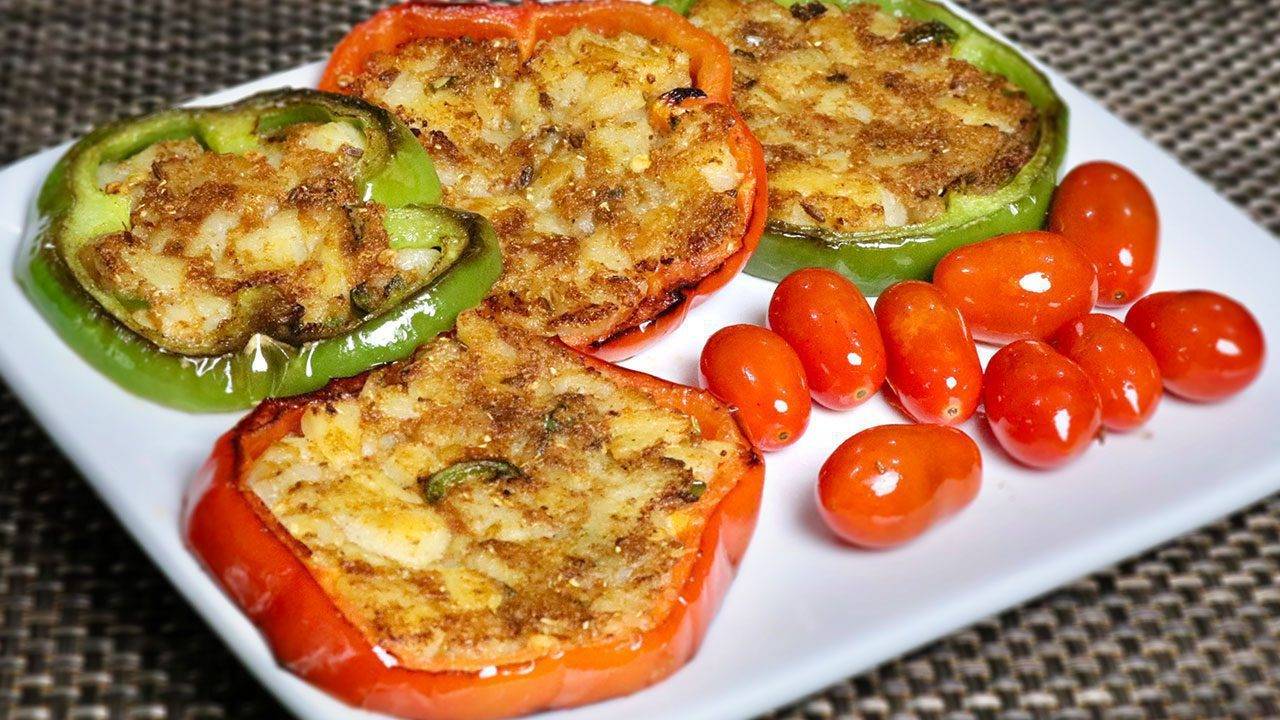
Category: Healthy Recipes

Healthy Indian Recipes: Delicious and Nutritious Options

Eating healthy doesn’t mean you have to sacrifice flavor, especially with the wide array of Indian vegetarian recipes available. Whether you are looking for vegetarian Indian recipes, Indian vegetarian dinner recipes, or traditional Indian recipes vegetarian style, this guide offers a selection of delicious and nutritious dishes. Let’s explore some healthy Indian recipes that you can enjoy for every meal.

Breakfast Recipes

Oats Upma

Oats Upma is a nutritious and light breakfast option. Made with oats and vegetables, this dish is perfect for those looking for healthy Indian recipes. It is also a great example of low carb Indian vegetarian recipes that are both nutritious and delicious.

Moong Dal Cheela

Moong Dal Cheela, or lentil pancakes, is a high protein Indian food that makes a great breakfast within vegetarian Indian recipes. It’s quick to prepare and can be enjoyed with a side of yogurt or chutney. This dish is also suitable for those seeking Indian healthy recipes.

Lunch Recipes

Quinoa Salad

Quinoa Salad is a versatile dish that can be customized with various vegetables and herbs. This salad is perfect for those looking for Indian vegetarian dinner recipes as it is high in protein and fiber, helping to manage hunger and maintain energy levels. It’s also an ideal option for a light lunch or dinner.

Palak Paneer

Palak Paneer is a popular paneer recipes made with spinach and cottage cheese. This dish is rich in iron and protein, making it a suitable option for Indian vegetarian recipes. It can be paired with whole wheat roti or brown rice for a balanced meal, making it one of the best vegetarian Indian recipes for dinner.

Dinner Recipes

Baingan Bharta

Baingan Bharta is a smoky and flavorful eggplant dish that fits perfectly within Indian vegetarian dinner recipes. This dish is made by roasting eggplants and cooking them with tomatoes, and spices. It’s a delicious and nutritious way to enjoy Indian recipes vegetarian style.

Mixed Vegetable Curry

Mixed Vegetable Curry is a hearty and nutritious dish that combines a variety of vegetables with aromatic spices. This dish is a staple in Indian vegetarian recipes and is a perfect indian dinner recipes It’s a great way to incorporate more vegetables into your diet and enjoy healthy Indian recipes.

Snack Recipes

Sprout Salad

Sprout Salad is a refreshing and nutritious snack that fits well within Indian healthy recipes. Made with sprouted legumes, fresh vegetables, and a tangy dressing, this salad is a perfect example of vegetarian Indian recipes that are healthy and delicious.

Masala Corn

Masala Corn is a quick and easy snack made with boiled corn kernels, spices, and lime juice. This snack is not only tasty but also fits perfectly into the healthy Indian recipes category. It’s a great way to enjoy a healthy and satisfying snack.

Dessert Recipes

Fruit Chaat

Fruit Chaat is a nutritious and refreshing Indian dessert made with a mix of fresh fruits, spices, and lime juice. This dessert is a delightful example of Indian healthy recipes that can be enjoyed as a dessert or a snack. It’s perfect for those looking for a sweet treat that is also healthy.

Carrot Halwa

Carrot Halwa, made with grated carrots, milk, and a sugar substitute, is a delightful dessert that can be enjoyed by those looking for healthy Indian recipes. This traditional Indian sweet is modified to reduce sugar content while retaining its delicious taste.

Enhancing Your Healthy Menu

To make your healthy menu even more delightful, consider adding dishes from related categories that complement these Indian vegetarian recipes. Adding Indian snacks like masala corn and sprout salad can provide a variety of flavors and textures. For a sweet ending, explore Indian desserts such as fruit chaat and carrot halwa, made with healthy ingredients. Incorporating healthy recipes like quinoa salad and mixed vegetable curry can offer lighter options for your meals. Hosting a large gathering? The popular party recipe category is filled with dishes that are sure to impress your guests and make your celebration memorable. Including North Indian recipes like palak paneer or baingan bharta can add a touch of authenticity to your meal.

Frequently Asked Questions (FAQs)

Q: What are some popular Indian vegetarian recipes? 

A: Some popular Indian vegetarian recipes include Oats Upma, Moong Dal Cheela, Quinoa Salad, Palak Paneer, Baingan Bharta, Mixed Vegetable Curry, Sprout Salad, Masala Corn, Fruit Chaat, and Carrot Halwa.

Q: How can I make traditional Indian food healthy? 

A: To make traditional Indian food healthy, try recipes like Oats Upma, Quinoa Salad, and Palak Paneer. These recipes are modified to include more vegetables and whole grains while retaining their authentic flavors.

Q: What are some vegetarian Indian recipes for a party? 

A: Some vegetarian Indian recipes for a party include Palak Paneer, Mixed Vegetable Curry, Sprout Salad, and Masala Corn. These dishes are flavorful and perfect for gatherings while being mindful of health.

Q: Can I prepare healthy Indian food in advance? 

A: Yes, many healthy Indian recipes can be prepared in advance and stored. Snacks like Masala Corn and Sprout Salad can be made ahead of time, while dishes like Quinoa Salad and Mixed Vegetable Curry can be prepped and refrigerated.

Q: What are some healthy options for Indian vegetarian food? 

A: Some healthy options for Indian vegetarian recipes include Quinoa Salad, Vegetable Stir Fry, Oats Upma, and Moong Dal Cheela. These dishes are high in fiber and protein, helping to maintain energy levels effectively.

Conclusion

Indian vegetarian recipes are a celebration of healthy and flavorful foods. Whether you’re looking for vegetarian Indian recipes or Indian vegetarian dinner recipes, these dishes will bring variety and nutrition to your meals. So, gather your ingredients, try out these recipes, and create delicious meals that are mindful of your health needs. Don’t forget to explore related categories for more delightful recipes from Manjula’s Kitchen!

By incorporating these dishes into your diet, you’ll be able to enjoy a wide variety of delicious and nutritious foods. Whether you’re looking for breakfast, snacks, main courses, or desserts, there’s an Indian vegetarian recipe to suit every taste. Happy cooking and healthy eating!

  • Dal Fry (Dal Tadka) Recipe

    Dal Fry (Dal Tadka)

    Dal Fry is a popular Indian lentil recipe. This recipe uses Toor dal, which is also known as Arhar or Toovar dal. The dal is seasoned with variety of spices and it tastes delicious. This is something you often find served at Indian restaurants.

    • 1 cup toor dal, arahar dal
    • 2-1/2 cup water
    • 1 tbsp salt
    • 1/4 tbsp turmeric

    Seasoning  

    • 3 tbsp clarified butter or ghee
    • 1 cup tomatoes chopped I used 3 medium size tomatoes
    • 1/2 tbsp cumin seeds (jeera)
    • 1/2 tbsp mustard seeds (rai)
    • 1/8 tbsp asafetida (hing)
    • 2 whole dry red chili
    • 2 bay leaf
    • 1 tbsp green chili finely chopped adjust to taste
    • 2 tbsp ginger finely shredded
    • 2 tbsp cilantro finely chopped (hara dhania)
    • 1/2 tbsp red pepper adjust to taste
    • 1/2 tbsp salt
    • 1 tbsp sugar
    • 1/2 tbsp mango powder (amchoor)
    • 1/4 tbsp garam masala
    1. Wash and soak toor dal in approx. 3 cups of water, for at least one hours. Dal will be double in volume after soaking. Drain the water.

    2. Put dal with 2-1/2 cups water into a pressure cooker and add salt, turmeric, Cook on medium high heat.

    3. When the pressure cooker starts to steam, turn the heat down to medium and cook for five minutes.

    4. Turn off the heat and wait until all the steam has escaped before opening the pressure cooker. Dal should be soft. If needed add more water, dal should be consistency of thick soup.

    Seasoning

    1. Heat the ghee in a saucepan. Test the heat by adding one cumin seed to the oil; if it cracks right away, ghee is ready. Add cumin seeds, and mustard seeds, asafetida, whole red chili. After the seeds crack, add bay leaves, green chili, ginger and chili powder. Stir for a few seconds.

    2. Add tomatoes, salt and sugar stir and cook until tomatoes are tender and mushy.

    3. Add cilantro, mango powder, and garam masala cook for about one minute.

    4. Pour the seasoning over  dal mix it well and cook for another minute.

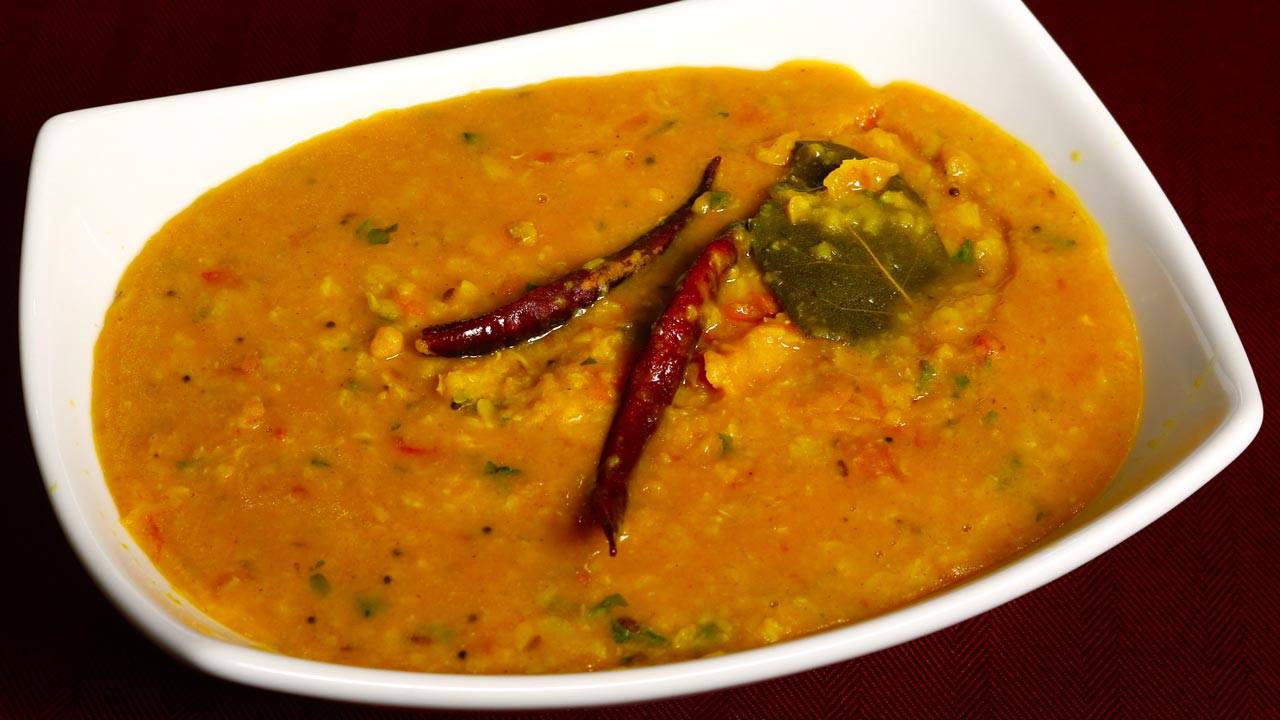
    5. Dal fry is ready, serve this as a main dish with Indian flat bread or I prefer with plain rice.

    dal
    Indian

    How to make Dal Tadka Punjabi Style: A Flavorful Punjabi Delight

    Dal Tadka, also known as Dal Fry or Tadka Dal, is a gluten free north indian dish known for its rich flavors and aromatic tempering. This dal tadka recipe offers a tantalizing blend of lentils cooked to perfection and tempered with aromatic spices, making it a favorite comfort food across the country. Whether served with rice or roti, dal tadka never fails to satisfy the taste buds with its hearty and wholesome goodness.

    Step 1: Cooking the Lentils

    To begin, thoroughly wash and rinse the lentils of your choice, such as toor dal (split pigeon peas) or masoor dal (red lentils). In a pressure cooker or large pot, add the washed lentils along with water, turmeric powder, and salt. Cook the lentils until they are soft and mushy, ensuring they are well-cooked to achieve the desired creamy consistency for the dal.

    Step 2: Preparing the Tadka

    While the lentils are cooking, prepare the tadka (tempering) for the dal. In a separate pan, heat ghee or oil over medium heat. Add mustard seeds, cumin seeds, and dried red chilies to the hot ghee, allowing them to sizzle and release their aromatic flavors.

    Step 3: Adding Aromatics and Spices

    Add minced ginger and green chilies to the pan, stirring to combine with the tadka. Next, add ground spices such as cumin powder, coriander powder, and red chili powder, stirring well to toast the spices and enhance their flavors. Adjust the amount of spices according to your taste preferences, keeping in mind the desired level of heat and spice.

    Step 4: Combining Lentils and Tadka

    Once the lentils are cooked and the tadka is prepared, carefully pour the tadka over the cooked lentils, ensuring it covers the surface evenly. Stir the dal tadka gently to combine the lentils with the aromatic tadka, allowing the flavors to meld together. Let the dal tadka simmer for a few minutes to allow the flavors to infuse, adjusting the consistency with additional water if needed.

    Step 5: Garnishing and Serving

    Before serving, garnish the dal tadka with freshly chopped cilantro leaves for a burst of freshness and color. You can also drizzle a spoonful of lemon juice over the dal tadka to add a tangy kick to the dish. Serve the dal tadka hot with steamed rice, roti, or naan bread for a satisfying and wholesome meal.

    Tips for Perfect Dal Tadka

    Lentil Consistency: Ensure that the lentils are cooked until soft and mushy for the perfect creamy texture of the dal tadka.

    Tempering Technique: Take care not to burn the spices while tempering. The tadka should be aromatic and flavorful without any burnt taste.

    Adjusting Spice Level: Customize the spice level of the dal tadka according to your taste preferences by adjusting the amount of green chilies and red chili powder used in the tadka.

    Variations of Dal Tadka

    Restaurant-Style Dal Tadka: Recreate the flavors of your favorite restaurant-style dal tadka by adding a touch of cream or butter to the dish for extra richness.

    Healthy Dal Tadka: For a healthier version of dal tadka, use minimal oil or ghee for tempering and add a variety of vegetables such as spinach, tomatoes, or carrots to the lentils for added nutrition.

    Protein-Packed Dal Tadka: Boost the protein content of the dal tadka by adding cooked chickpeas or kidney beans along with the lentils for an extra protein boost.

    Benefits of Dal Tadka

    Rich in Protein: Lentils are a excellent source of plant-based protein, essential for muscle repair and growth.

    High in Fiber: Dal tadka is rich in dietary fiber, promoting digestive health and keeping you feeling full and satisfied.

    Nutrient-Dense: Packed with essential vitamins and minerals, dal tadka provides a nourishing and balanced meal option for vegetarians and non-vegetarians alike.

    Frequently Asked Questions (FAQs)

    Can I use different types of lentils for dal tadka?

    Yes, you can use a variety of lentils such as moong dal, masoor dal, or chana dal to make dal tadka according to your preference.

    Can I make dal tadka ahead of time?

    Yes, dal tadka tastes even better when allowed to sit for a few hours or overnight, allowing the flavors to meld together. Reheat it gently before serving.

    Is dal tadka gluten-free?

    Yes, dal tadka is inherently gluten-free as it contains no wheat or gluten-containing ingredients.

    Explore more delightful Rajasthani recipes on Manjula’s Kitchen, such as Gatte Ki Sabji for another culinary adventure.Explore more appetiser recipes on Manjula’s Kitchen: Vegetable Samosas, Paneer Tikka, Crispy Spinach Pakoras, Mango Lassi, Masala Chai, Gulab Jamun, Kheer (Rice Pudding)

  • Gobi (Cauliflower) Manchurian

    Gobi (Cauliflower) Manchurian

    Gobi or cauliflower Manchurian is a popular Indo Chinese dish. This is a super delicious appetizer or main dish. Gobi manchurian satisfies both your savory and spicy cravings! It consists of fried gobi (cauliflower) simmered in a flavorful gravy made with soy sauce and red chili sauce.

    • 20 cauliflower pieces cut into medium size florets

    For Sauce

    • 2 tbsp oil
    • 1 tbsp ginger paste or finely shredded ginger (adrak)
    • 1 green chili chopped
    • 1/4 cup celery finely chopped
    • 2 tbsp red chili sauce
    • 2 tbsp soy sauce
    • 1 tbsp vinegar
    • 2 tbsp tomato paste
    • 1/2 tbsp sugar
    • 2 tbsp corn starch or arrow root powder
    • Approx. ½ cup water

    For Batter

    • 1/3 cup all purpose flour (plain flour, maida)
    • 3 tbsp corn starch or arrow root powder
    • 1/2 tbsp salt
    • 1/8 tbsp black pepper
    • Approx. ½ cup water
    1. Mix the corn starch with water and set aside.

    2. Heat the oil in sauce pan over medium high heat; add ginger, celery and green chili stir for about two minute. Add all the ingredients for sauce except corn starch, (chili sauce, soy sauce, vinegar, tomato paste, and sugar).

    3. Stir for 2 minutes add corn starch and cook for another two minutes, sauce should be thick, consistency of a dosa or pancake batter. If needed add more water, sauce gets thicker as it sits.

    4. Sauce is ready, set aside.

    5. To make batter mix flour, corn starch, salt and pepper in a bowl. Add the water slowly to make a smooth batter (batter should be consistency of pancake batter or dosa batter).

    6. Heat at least one inch of oil in a frying pan over medium high heat. Oil should be moderately hot. (If oil is not hot cauliflower will be greasy).

    7. Dip the cauliflower into the batter one at a time, making sure it is completely covered by the batter. Then drop the cauliflowers slowly into oil in the frying pan. (do not overlap them)

    8. Fry the cauliflowers in small batches, four to five minutes per batch. Fry them turning occasionally, until they are all sides golden brown. Take them out over paper towel.

    9. Repeat this process for the remaining cauliflowers.

    10. Fold fried cauliflower/ gobies into gravy and serve hot.

    Notes

    Manchurian tastes best when cauliflower has some crunch. If you have fried them earlier, refry them before dipping in the sauce as fried cauliflower becomes soft as they cool off.

    Appetizer
    Indian

    Gobi Manchurian Recipe: A Delicious Indo-Chinese Delight 

    Gobi Manchurian is a beloved Indo-Chinese dish that combines the crispiness of cauliflower with a tangy, spicy sauce. It is a delectable fusion appetizer featuring crispy cauliflower florets coated in a savory vegan curry/gravy infused with aromatic vegetables.If you’re craving this flavorful dish and want to recreate it at home, look no further than this gobi manchurian recipe. With simple ingredients and easy-to-follow steps, you’ll be able to whip up a batch of delicious cauliflower manchurian in no time.

    Preparation: 

    Begin by preparing the cauliflower florets. Make sure they are clean and dry before proceeding with the recipe. You can blanch the florets in hot water for a few minutes to soften them slightly, or you can proceed with frying them directly for a crispier texture.

    Frying the Cauliflower (cauliflower manchurian recipe):  

    In a bowl, prepare a batter using all-purpose flour, cornflour, salt, pepper, ginger, and water. Coat each cauliflower floret in the batter, ensuring they are evenly coated.

    Heat oil in a deep pan or wok over medium heat. Once the oil is hot, carefully add the battered cauliflower florets in batches. Fry them until they turn golden brown and crispy. Remove them from the oil and place them on a paper towel-lined plate to drain excess oil.

    Making the Manchurian Sauce (recipe for manchurian cauliflower): 

    In another pan, heat oil over medium heat. Add finely chopped ginger, and green chilies. Sauté them until fragrant.

    Next, add bell peppers. Cook until they turn soft and translucent.

    Now, it’s time to add the sauces. Pour in soy sauce, chili sauce, ketchup, vinegar, and a pinch of sugar. Stir well to combine all the ingredients.

    In a small bowl, prepare a slurry using cornflour and water. Add this slurry to the pan to thicken the sauce. Stir continuously to avoid lumps.

    Once the sauce reaches your desired consistency, add the fried cauliflower florets to the pan. Toss them gently in the sauce until they are well coated.

    Tips for Perfect Gobi Manchurian: 

    • Make sure the cauliflower florets are dry before coating them in the batter to prevent the batter from becoming soggy.
    • Adjust the amount of chili sauce and green chilies according to your spice preference.
    • For a healthier version, you can bake the cauliflower florets instead of frying them. Simply coat them in the batter and place them on a baking sheet lined with parchment paper. Bake in a preheated oven at 400°F (200°C) for 20-25 minutes or until crispy.

    Variations to Try: 

    • Add diced carrots, cabbage, or other vegetables of your choice to make the dish more colorful and nutritious.
    • For a vegan version, use tamari instead of soy sauce and skip the vinegar or use apple cider vinegar.
    • Garnish the gobi manchurian or cilantro for an extra burst of flavor and freshness.

    Benefits of Gobi Manchurian 

    Gobi Manchurian is not only delicious but also packed with nutrients. Cauliflower is a rich source of vitamins, minerals, and antioxidants, making it beneficial for overall health. Additionally, by controlling the ingredients used in the recipe, you can make it healthier compared to the restaurant version.

    FAQs (cauliflower manchurian): 

    Q: Can I use frozen cauliflower for this recipe?

    A: While fresh cauliflower is preferred for its crisp texture, you can use frozen cauliflower if that’s what you have on hand. Make sure to thaw and pat dry the cauliflower before using it in the recipe.

    Q: How can I make the sauce less spicy?

    A: To reduce the spice level of the sauce, you can decrease the amount of chili sauce and green chilies used in the recipe. You can also omit the green chilies altogether for a milder flavor.

    With this comprehensive gobi manchurian recipe, you’ll be able to recreate the flavors of your favorite Indo-Chinese dish right in your own kitchen. Whether you’re cooking for a special occasion or simply craving a tasty snack, this dish is sure to satisfy your cravings. Enjoy the crispy texture of the cauliflower combined with the savory and tangy flavors of the Manchurian sauce—it’s a winning combination that’s sure to become a favorite in your household.

    Other Recipes If you enjoyed this banana rice recipe, you might also like to try these other recipes from Manjula’s Kitchen:

    1.   Vegetable Pulao
    2.   Mango Lassi
    3.   Chickpea Salad
    4.   Coconut Chutney
    5.   Vegetable Pakoras
    6.   Paneer Tikka Masala
    7.   Fruit Chaat

    These recipes are perfect and are sure to satisfy your cravings. Happy cooking!

  • Mango Pickle (Aam ka Achar)

    Mango Pickle (Aam ka Achar)

    Mango pickle is a spicy and tangy gluten free condiment. Almost every Indian household has their own favorite recipes for Mango Pickle. It is a popular condiment adds the extra "oomph" to every meal.

    • 1 large green mango raw pickling mango/about 2-1/2 cup cubed mango (they are available at Indian and Asian grocery store)
    • 1 tablespoons salt
    • 1 teaspoon red chili powder, adjust to taste (lal mirch)
    • 1/4 teaspoons turmeric (haldi)
    • 1 tablespoons coriander seeds crushed(dhania)
    • 1 tablespoon fennel seeds crushed(Saunf)
    • 1 teaspoon fenugreek seeds (sabut mathi)
    • 1 teaspoon nigella seeds/kalonji
    • 2 tablespoons mustard oil or olive oil
    1. Wash and dry the mango, cut in small cubes with skin.

    2. In a glass bowl put the mango with salt and mix it well.

    3. Set aside for about 3-4 hour. Mix and by this time there will be some salt water. Squeeze the mango, and save the water, as we will use later.

    4. Spread the mango slices over dry surface and let it dry out preferably in sun light for 4-5 hours. Mango slices should be little dry but still moist. Note: Mangoes will reduce in volume.

    5. Add all the spices to salt water and keep it aside.

    6. Mix spices, water and oil to mango slices.

    7. Keep the Mango pickle in glass jar with lid on. Pickle should be ready in 4-7 days. Mango slices are nicely marinated with spices.

    Pickle
    Indian
    Pickle

  • Sorghum Dosa (Jowar)

    How to make Instant Sorghum Dosa by Manjula’s Kitchen

    Dosa is a popular south indian delicacy which looks like a crepe. It’s like a crisp and thin pancake made of rice and urad dal batter. Traditionally Dosa is served with sambar, aloo masala and coconut chutney. It is an Indian crepe made usually through rice batter, but here we have experimented and made many alternative dosa such as Oat Dosa, Besan Dosa, Rava Dosa, Sorghum Dosa. This preparation is using sorghum dosa and is a bread based breakfast recipe that is vegan. The preparation entails skillfully combining pan techniques and manual dexterity to achieve the perfect bread cooked on non-stick skillets.

    1. Mixing Dry Ingredients: Crafting the Base for Jowar Dosa

    Embark on the journey of creating an Instant Jowar Dosa by combining all the dry ingredients – sorghum flour (Jowar), rice flour, cumin seeds, asafetida, salt, and black pepper. This harmonious blend sets the foundation for a gluten-free and vegan dosa that promises a delightful culinary experience. Ensure the dry ingredients are well-integrated, setting the stage for the dosa batter.

    2. Creating the Dosa Batter: Achieving the Perfect Consistency

    Gradually add water to the dry mix, creating a thin batter with a pouring consistency akin to buttermilk. The key is to avoid any lumps, ensuring a smooth texture. Let the batter stand for approximately 30 minutes, allowing it to settle and develop optimal flavours. This patient step contributes to the success of your Jowar Dosa, enhancing its taste and texture.

    3. Adding Cilantro: Elevating the Flavor Profile of Jowar Dosa

    Before transforming the batter into dosas, introduce a burst of freshness by adding cilantro. This step not only enhances the flavor profile but also adds a visual appeal to your Jowar Dosa. Gently mix the cilantro into the batter, ensuring an even distribution of this aromatic herb.

    4. Pouring and Cooking Dosa: The Art of Creating Jowar Dosa

    Heat the skillet on medium-high, a crucial step before creating your Jowar Dosa. To test the skillet’s readiness, sprinkle a few drops of water – a sizzle should confirm its optimal temperature. Wipe the skillet with a few drops of oil, creating the perfect non-stick surface. With a ladle, pour the batter in a circular motion, starting from the centre, allowing the dosa to take shape naturally. Resist the urge to spread the batter, as Jowar Dosa is intended to have holes, resembling a swiss cheese or possessing a lacy appearance.

    5. Drizzling Oil and Flipping Dosa: Achieving the Perfect Golden Brown

    Enhance the crispiness and flavour by drizzling a teaspoon of oil around the dosa. Cook the Jowar Dosa over medium heat for about 2 minutes until it attains a golden brown hue. Using a spatula, gently flip the dosa, revealing a light colour on one side and the golden brown perfection on the other. This intricate dance of heat and ingredients results in a thin, crispy, and visually appealing Sorghum Dosa.

    6. Serving Your Gluten-Free Creation: Enjoying the Instant Jowar Dosa

    Your Instant Jowar Dosa, with its distinctive swiss cheese-like appearance, is now ready to grace your table. Savour the gluten-free and vegan goodness of this delectable creation. While reminiscent of Rava dosa in appearance, the uniqueness of Sorghum Dosa shines through. Thin, crispy, and utterly satisfying, this dosa promises a delightful culinary experience that caters to a diverse range of dietary preferences.

  • Rava Uttapam (Instant Sooji Uttapam)

    Introduction to Rava Uttapam Recipe

    Rava Uttapam is a delightful quick & easy south indian bread that makes for a wholesome breakfast or a light meal. Made from semolina (rava or sooji), this dish is not only delicious but also easy to prepare. In this rava uttapam recipe, we’ll walk through the steps to create this flavorful snack. Whether you’re a beginner or a seasoned cook, how to make rava uttapam will become a breeze with this simple yet detailed recipe.

    Ingredients Preparation for Rava Uttapam

    Before we dive into the cooking process, it’s essential to gather and prepare all the necessary ingredients. For this recipe for rava uttapam, you’ll need semolina, yogurt, water, salt, asafoetida (hing), ginger, green chilies, cilantro, and vegetables like bell peppers, tomatoes.

    Tips for Ingredients Preparation:

    • Ensure the semolina is fresh for the best texture.
    • Use thick yogurt for better consistency.
    • Chop vegetables finely for even distribution.

    Making the Batter for Rava Uttapam

    To start making rava uttapam batter, take a mixing bowl and add semolina and yogurt. Gradually pour water and whisk the mixture to form a smooth batter. The batter should have a pouring consistency, neither too thick nor too thin. Add salt, asafoetida, finely chopped ginger, green chilies, and cilantro to enhance the flavor.

    Tips for Making the Batter:

    • Let the batter rest for at least 10-15 minutes to allow semolina to absorb moisture.
    • Adjust water quantity as needed to achieve the desired consistency.

    Variations for Rava Uttapam Batter:

    • For a healthier option, you can add grated carrots, spinach, or grated zucchini to the batter.
    • Experiment with spices like cumin seeds or mustard seeds for added flavor.

    Cooking Rava Uttapam on the Griddle

    Heat a non-stick skillet or griddle on medium heat and lightly grease it with oil. Once the griddle is hot, pour a ladleful of batter onto it and spread it evenly to form a small circle. Sprinkle chopped vegetables like bell peppers, tomatoes, on top of the uttapam.

    Tips for Cooking Rava Uttapam:

    • Cook on low to medium heat to ensure even cooking without burning.
    • Cover the uttapam with a lid to cook the top layer thoroughly.
    • Drizzle oil around the edges to make them crispier.

    Variations in Toppings for Rava Uttapam:

    • You can customize the toppings according to your preference. Try adding grated cheese or paneer for a richer taste.
    • For a spicy kick, sprinkle some red chili flakes or chaat masala on top.

    Serving and Presentation of Rava Uttapam

    Once the rava uttapam is cooked to perfection and turns golden brown on both sides, transfer it to a plate. Serve hot with coconut chutney, tomato chutney, or sambar for a complete South Indian breakfast experience.

    Benefits of Rava Uttapam:

    • Rava Uttapam is a nutritious breakfast option as it is made from semolina, which is rich in carbohydrates and protein.
    • It’s light on the stomach and easy to digest, making it suitable for all age groups.
    • The addition of vegetables makes it a wholesome meal, providing essential vitamins and minerals.

    FAQs (Frequently Asked Questions) about Rava Uttapam:

            Explore more appetizer recipes on Manjula’s Kitchen: Vegetable Samosas, Paneer Tikka, Crispy Spinach PakorasMango Lassi, Masala Chai, Gulab Jamun, Kheer (Rice Pudding)

          • Kale and Spinach Smoothie

            You will also enjoy Mango Lassi , Chai, Mint Lemonade,

            ,


          • Mango Salsa (Fresh Mango Salad)

            Mango Salsa (Fresh Mango Salad)

            Who doesn't enjoy chips & salsa? This simple and colorful mango salsa is super easy to make! It’s sweet, spicy and absolutely delicious. Serve this fresh mango salsa with chips or with a plate of tacos. You can even serve this as a fresh salad which will compliment a variety of meals be it lunch breakfast or dinner !  

            • 1 ripe mango (peeled and cut into small cubes)
            • 1/4 cup red bell pepper (cut into small cubes)
            • 1/2 cup cucumber (peeled and cut into small pieces)
            • 1 Tbsp jalapeno (seeded and minced)
            • 1/4 cup fresh cilantro (finely chopped)
            • 1 Tbsp lime juice
            • 1/4 tsp cumin seed powder
            • 1/4 tsp salt (adjust to taste)
            1. In a serving bowl, combine mango, bell pepper, cucumber, cilantro and jalapeño. Drizzle with salt, cumin powder and lime juice, mix well. For best flavor, let the salsa rest for about 10 minutes.

            Notes: Mango salsa also can be served as salad and will compliment any meal. I enjoy Mango Salsa with Puries, and side of Mexican Rice.

            Side Dish
            Fusion

          • Roasted Caramelized Makhana

            Roasted Caramelize Makhana Snack

            Caramelized Makhana is the perfect snack for all ages, especially kids. My grandchildren absolutely love this recipe and my youngest even calls it kettle corn. This is not just quick and easy to make, but it is a healthy snack because it is high in protein and has many nutritional values. This recipe is the perfect tea time munchie and will be a hit with everyone who enjoys a sweet and crunchy snack.

            • 4 cup makhana (fox nuts, lotus seeds)
            • 3 Tbsp oil
            • 1 tsp salt
            • 6 Tbsp sugar
            • 2 Tbsp almonds (sliced)
            1. Use a larger frying pan then you think you need, because it makes it easy to roast otherwise when you are roasting makhana will be dropping all over. Use heavy frying pan.

            2. In a frying pan take the makhana and drizzle with the oil, (save 2 teaspoons of oil and set this oil aside we will use later) and sprinkle the salt. Using your fingers mix it well until makhanas are coated well with oil and salt.
            3. Open the heat to medium low keep stirring till they are very light gold this should take about 6-8 minutes, try one makhana to make sure they are crispy. As they cool of, they will become crunchier.
            4. Remove them from frying pan, you will notice most of the salt will remain in the frying pan, wipe the frying pan, we will use it again.
            5. Use the same pan, heat over low medium heat. Put the oil we have saved in the frying pan, and sprinkle all the sugar, wait till you see sugar has start melting, now stir the sugar and keep stirring till the sugar has melted turn off the heat quick otherwise sugar will burn.
            6. Add almonds and roasted makhana, keep stirring till all the makhanas are coated with caramelize sugar and almonds. Spread it over non-stick surface and with spatula keep separating or separate with your fingers. Carnalized Makhanas are ready.

            Notes: keep them air tight container they will stay good for month or more.

            I make them for holiday season, because they also make good homemade gift.

            Appetizer
            Indian
            High In Protien, Kid Friendly, Kurmura Makhana

            Roasted Caramelized Makhana Recipe

            Roasted Caramelized Makhana is a delectable snack perfect for winter recipes and festive occasions like Krishna Janmashtami and Navaratri, offering a gluten-free, high-protein option that satisfies both vegan and non-vegan appetizers cravings. Roasted Caramelized Makhana is a delightful treat that combines the earthy crunch of makhana (fox nuts) with the sweet allure of caramel. This Caramel Makhana Recipe transforms simple ingredients into a gourmet snack that’s perfect for any occasion.

            Step 1: Preparing the Makhana

            To begin this Caramel Roasted Makhana Recipe, start by heating a pan over medium heat. Add a tablespoon of ghee, allowing it to melt and warm up. Then, add the makhana to the pan, ensuring they are in a single layer. Roast them gently, stirring occasionally to ensure even cooking. This step helps to enhance the nutty flavor of the makhana and prepare them for the caramel coating.

            Step 2: Making the Caramel

            Now, let’s move on to the star of this Caramel Roasted Makhana Recipe: the caramel. In a separate pan, melt butter over low heat. Once the butter has melted, add in sugar and stir continuously until the sugar dissolves completely. Keep a close eye on the mixture to prevent it from burning. As the sugar melts, it will gradually turn into a golden brown caramel, infusing the butter with its rich flavor.

            Step 3: Coating the Makhana

            Once the caramel reaches a beautiful golden hue, carefully pour it over the roasted makhana. Use a spatula to gently toss the makhana, ensuring that each piece is coated evenly with the caramel. Work quickly but cautiously, as the caramel will begin to harden upon contact with the makhana.

            Step 4: Allowing to Cool

            After coating the makhana with caramel, spread them out on a parchment-lined baking sheet to cool. Allow them to sit undisturbed for at least 10-15 minutes, giving the caramel ample time to set. Once cooled, the makhana will form a delectable caramelized crust, adding an irresistible sweetness to every bite.

            Step 5: Serving and Enjoying 

            Your Caramel Roasted Makhana is now ready to be enjoyed! Serve them as a standalone snack or incorporate them into your favorite dishes for a touch of sweetness and crunch. These caramelized makhana make for a perfect accompaniment to tea or coffee, or simply enjoy them as a guilt-free indulgence anytime you crave a delicious treat.

            Tips for Perfect Caramelized Makhana:

            • Ensure that the makhana are roasted until they are crisp but not browned before adding the caramel. This helps to prevent them from becoming too crunchy or overcooked.
            • Work quickly when coating the makhana with caramel, as it can harden rapidly upon contact with the cooler makhana. Use a spatula to toss them gently and evenly coat each piece.
            • Allow the caramelized makhana to cool completely before serving to ensure that the caramel has fully set and formed a crunchy crust.

            Variations of Caramel Makhana:

            • For a savory twist, you can add a pinch of salt or your favorite spices to the caramel mixture before coating the makhana. This adds depth of flavor and balances out the sweetness of the caramel.
            • Experiment with different coatings such as melted chocolate or flavored syrups for a unique twist on this classic recipe. Drizzle the melted chocolate over the cooled makhana and allow it to set before serving.

            Benefits of Caramel Makhana:

            Makhana, or fox nuts, are not only delicious but also offer a range of health benefits. They are low in calories and fat, making them an ideal snack for those looking to maintain a healthy diet. Makhana are also rich in protein, fiber, and antioxidants, which can help support overall health and well-being. Additionally, they are gluten-free and hypoallergenic, making them suitable for individuals with dietary restrictions or food sensitivities.

            FAQs:

            Q: Can I store caramelized makhana for later use?

            A: Yes, you can store caramelized makhana in an airtight container at room temperature for up to a week. Just make sure they are completely cooled and the caramel has set before storing them.

            Q: Can I use other nuts instead of makhana for this recipe?

            A: Absolutely! While this recipe specifically calls for makhana, you can easily substitute other nuts such as almonds, cashews, or peanuts for a different flavor and texture.

            Q: Can I reheat caramelized makhana if they become soft?

            A: Yes, if the caramelized makhana become soft or lose their crunchiness, you can reheat them in a low oven (around 250°F) for a few minutes until they become crisp again. Be sure to keep an eye on them to prevent burning.

            Other Recipes on Manjula’s Kitchen

            If you’re looking to explore more Indian recipes, appetizers, beverages, and desserts, be sure to check out the following links on Manjula’s Kitchen. Here are some links to recipes on Manjula’s Kitchen official website:

            Paneer Tikka Masala Recipe

            Chana Chaat (Spicy Chickpea Salad) Recipe

            Pav Bhaji (Spicy Vegetable Hash with Buns) Recipe

            Raj Kachori (Crunchy Chaat) Recipe

            Vegetable Biryani Recipe

            These recipes should offer you a flavorful experience straight from Manjula’s Kitchen.

          • Grilled Paneer

            Grilled Paneer Recipe 

            Grilled paneer recipe is a delightful way to enjoy the rich flavors of Indian cuisine. Grilled paneer is a versatile dish that is kid friendly, quick & easy, party recipe that can be served as an appetizer, side dish, or even a main course. This recipe combines the creaminess of paneer with the smoky char of the grill, resulting in a dish that is both flavorful and satisfying. Whether you’re hosting a backyard barbecue or simply craving a taste of India, this Indian grilled paneer recipe is sure to please your palate.

            Indian Grilled Paneer: A Flavorful Delight 

            When it comes to Indian cuisine, grilled paneer holds a special place in the hearts of many food enthusiasts. The process of grilling adds a depth of flavor to the paneer, while still allowing its creamy texture to shine through. This paneer grilled recipe is perfect for those looking to add a touch of Indian flair to their meals. By marinating the paneer in a blend of spices and yogurt, you’ll create a dish that is bursting with flavor from the very first bite.

            Preparation 

            To begin, place the cubed paneer in a large bowl and set aside. In a separate bowl, whisk together the yogurt, olive oil, lemon juice,  ground cumin, ground coriander, turmeric, salt, and pepper. Pour the marinade over the paneer, making sure to coat each piece evenly. Cover the bowl and let the paneer marinate in the refrigerator for at least 30 minutes, allowing the flavors to meld together.

            Grilling the Paneer 

            Once the paneer has finished marinating, preheat your grill to medium-high heat. Thread the paneer cubes onto skewers, leaving a small amount of space between each piece. This will allow the heat to circulate evenly around the paneer, ensuring that it cooks evenly on all sides. Place the skewers on the grill and cook for 2-3 minutes per side, or until the paneer is lightly charred and heated through.

            Tips for Perfect Grilled Paneer 

            Use firm or extra-firm paneer for grilling, as softer varieties may crumble on the grill.

            Soak wooden skewers in water for at least 30 minutes before threading the paneer to prevent them from burning.

            Experiment with different marinade ingredients, such as ginger, chili powder, or garam masala, to customize the flavor of your grilled paneer.

            Variations on Grilled Paneer

            While this Indian grilled paneer recipe is delicious as is, feel free to get creative with your marinade and seasoning choices. For a spicy kick, add chopped green chilies or a dash of cayenne pepper to the marinade. You can also incorporate fresh herbs like cilantro or mint for a burst of freshness. Serve the grilled paneer with a side of mint chutney or tamarind sauce for an extra layer of flavor.

            Benefits of Grilled Paneer

            Grilled paneer is not only delicious, but it also offers several health benefits. Paneer is a good source of protein, calcium, and phosphorus, making it an excellent addition to a balanced diet. Grilling the paneer helps to retain its nutrients while adding a smoky flavor that enhances its overall taste. Additionally, paneer is low in carbohydrates, making it a suitable option for those following a low-carb or keto diet.

            Frequently Asked Questions (FAQs)

            Can I grill paneer without skewers?

            Yes, you can grill paneer directly on the grill grates or use a grill basket to prevent it from falling through.

            How long does grilled paneer last?

            Grilled paneer can be stored in the refrigerator for up to 3-4 days. Simply reheat it in the microwave or on the grill before serving.

            Can I freeze grilled paneer?

            While you can freeze grilled paneer, its texture may change slightly upon thawing. It’s best to freeze the paneer before grilling and marinating it.

            Can I make grilled paneer in the oven?

            Yes, you can bake paneer in the oven at 400°F for 15-20 minutes, or until it is lightly browned and heated through.

            Other Recipes on Manjula’s Kitchen

            If you’re looking to explore more Indian recipes, appetizers, beverages, and desserts, be sure to check out the following links on Manjula’s Kitchen. Here are some links to recipes on Manjula’s Kitchen official website: Paneer Tikka Masala, Chana Chaat (Spicy Chickpea Salad), Pav Bhaji (Spicy Vegetable Hash with Buns), Raj Kachori (Crunchy Chaat), Vegetable Biryani. These recipes should offer you a flavorful experience straight from Manjula’s Kitchen.

          • Baked Vegetable Idli

            Baked Vegetable Idli

            Baked vegetable Idli makes for a healthy and delicious appetizer or side dish. They are very eye-catching and great to present at a gathering for guests to pop into their mouth. They are the perfect addition to any menu because they are so easy to make. Idlies have a unique texture because they are soft but also slightly crisp on the bottom. Baked vegetable idli are best served with coconut chutney if served as an appetizer or with sambar if served with the main meal.

            • 1 cup coarse sooji (semolina)
            • 1/2 cup yogurt (dahi, curd)
            • 1/2 cup bell pepper (finely chopped, capsicum, I am using green and yellow for color)
            • 1 green chili (finely chopped)
            • 1 piece ginger (finely grated)
            • 2 Tbsp cilantro (chopped, hara dhania)
            • 1 cup water (as needed)
            • 1 tsp ENO (fruit salt)
            • 1 tsp salt

            For Seasoning

            • 1 Tbsp oil
            • 1/4 tsp cumin seeds (jeera)
            • 1/4 tsp mustard seeds (rai)
            1. Preheat the oven at 350 degrees (F).

            2. Seasoning: heat the oil moderately in a saucepan. Add mustard and cumin seeds, as the seeds crack turn off the heat and set aside.
            3. I am using mini cupcake tray, will make 24 idli, oil it and set aside.
            4. Mix sooji, salt, yogurt, and water (as needed) to make a pancake-like batter. Set aside for at least 30 minutes.
            5. Add the vegetables bell pepper, carrots, ginger, green chili, and cilantro. Add the seasoning and mix. The batter thickens as the semolina absorbs the water. At this point, add a little more water if it is too thick.
            6. Add Eno Fruit Salt to the batter and mix well. The mixture will begin foaming. Immediately begin pouring into the cupcake tray. Place the tray in oven.
            7. Bake the idlies for five minutes, then lay over the aluminum foil. Bake it again for 15 minutes. Idlies should be lightly brown from the sides.
            8. Cool for few minutes before removing each individual idli. They should come out easily and not stick to the tray. The idlis should be spongy, and light golden color from the sides and bottom.

            Notes: 

            First, I baked the idlies without covering, then after 5 minutes I covered the Idlies, if you don’t cover Idlies, they will be dry and will lose the softness and texture.

            you can prepare Idlies 2-3 days in advance, after they cool of refrigerate them in air tight container.

            Before serving heat the Idlies in microwave for about two minutes. Idlies will be soft. Baked vegetable idli are best served with coconut chutney if served as an appetizer or with sambar if served with the main meal.

            Side Dish
            Indian
            Kid Friendly, Rava Idli, Snack, South Indian Cuisine

            Baked Vegetable Idli Recipe: A Healthy Twist to Classic South Indian Cuisine

            Baked Vegetable Idli is a versatile dish that perfectly fits various occasions and preferences. It serves as an ideal choice for appetizers, breakfast recipes, and even as a lunch box suggestion. During festive seasons like Diwali and Navaratri, it can be a delightful addition to the menu. Its kid-friendly nature makes it a hit among children, while its ease of preparation qualifies it as a quick and easy snack option. Additionally, its nutritious blend of vegetables adds a healthy touch, making it suitable for party recipes as well.

            Introduction to Baked Vegetable Idli Recipe

            If you’re looking to add a nutritious twist to your traditional South Indian breakfast, look no further than this delightful baked vegetable idli recipe. Vegetable idli is a beloved dish in Indian cuisine, cherished for its soft texture and aromatic flavors. In this rendition, we’ll explore how to make vegetable idli even healthier by baking it instead of the traditional steaming method. Packed with the goodness of assorted vegetables and aromatic spices, these baked vegetable idlis are not only delicious but also a wholesome treat for the entire family.

            Step-by-Step Guide on How to Make Vegetable Idli

            Preparing the Batter for Baked Vegetable Idli

            To start making baked vegetable idli, begin by soaking idli rice and split urad dal separately for about 4-6 hours. Once soaked, drain the water and grind them separately to a smooth consistency. Mix both the batters together in a large bowl and add some salt. Allow the batter to ferment overnight, ensuring it doubles in volume. Fermentation is crucial for the characteristic fluffy texture of idlis.

            Incorporating Assorted Vegetables for Added Nutrition

            While the batter ferments, prepare your choice of vegetables. Carrots, peas, bell peppers, and corn work wonderfully in this recipe. Finely chop or grate the vegetables and sauté them lightly with some mustard seeds, curry leaves, and green chilies for a burst of flavor. Once the vegetables are tender, mix them into the fermented idli batter.

            Baking the Vegetable Idlis to Perfection

            Preheat your oven to 350°F (175°C) and grease an idli tray with some oil. Pour the vegetable-laden batter into the idli molds, filling them about three-fourths of the way. Place the tray in the preheated oven and bake for 20-25 minutes or until the idlis are cooked through and have a golden hue on top. Once done, remove the tray from the oven and allow the idlis to cool slightly before unmolding them.

            Serve and Enjoy the Baked Vegetable Idlis

            Once cooled, gently remove the baked vegetable idlis from the molds and serve them warm with a side of coconut chutney or sambar for an authentic South Indian experience. These idlis make for a nutritious breakfast option or a wholesome snack any time of the day. Their vibrant colors and enticing aroma are sure to make them a hit with your family and friends.

            Tips for Making Perfect Baked Vegetable Idlis

            • Ensure the batter is well-fermented for soft and fluffy idlis.
            • Don’t overmix the batter after adding vegetables to retain their crunchiness.
            • Adjust the baking time according to your oven as the temperature may vary.

            Variations of Baked Vegetable Idli Recipe

            • Cheese-Stuffed Baked Vegetable Idlis: Add a surprise element by stuffing the idlis with cheese before baking for a gooey, indulgent twist.
            • Spinach and Fenugreek Baked Idlis: Boost the nutritional value by adding finely chopped spinach and fenugreek leaves to the batter for an extra dose of vitamins and minerals.
            • Masala Baked Idlis: Infuse the idlis with the flavors of garam masala, cumin, and coriander for a spicier variation.

            Benefits of Including Baked Vegetable Idlis in Your Diet

            • Nutrient-Rich: Packed with vitamins, minerals, and fiber from assorted vegetables, baked vegetable idlis make for a wholesome and balanced meal.
            • Low in Calories: Baking eliminates the need for excess oil, making these idlis a healthier alternative to their fried counterparts.
            • Suitable for All Ages: From toddlers to seniors, everyone can enjoy these soft and easily digestible idlis as part of a well-rounded diet.

            Frequently Asked Questions (FAQs) About Baked Vegetable Idlis

            Q: Can I use any other vegetables apart from the ones mentioned in the recipe?

            A: Absolutely! Feel free to experiment with your favorite vegetables or whatever you have on hand. Just ensure they are finely chopped or grated for even distribution.

            Q: Can I make the batter in advance and store it for later use?

            A: Yes, you can prepare the batter in advance and store it in the refrigerator for up to 2-3 days. Remember to bring it to room temperature before baking the idlis.

            Q: Can I freeze the baked vegetable idlis?

            A: While it’s best to consume them fresh, you can freeze the baked idlis in an airtight container for up to a month. Reheat them in the microwave or oven before serving.

            Explore More Recipes from Manjula’s Kitchen

            • Appetizers: Try out the flavorful Spinach Cheese Balls for a delectable appetizer that’s sure to impress your guests.
            • Beverages: Quench your thirst with the refreshing Mango Lassi, a classic Indian yogurt-based drink bursting with tropical flavors.
            • Desserts: Indulge your sweet tooth with the decadent Gulab Jamun, soft and spongy milk dumplings soaked in a fragrant sugar syrup.

            With this comprehensive guide, you’re all set to whip up a batch of wholesome baked vegetable idlis that are as nutritious as they are delicious. Whether enjoyed for breakfast, as a snack, or even as part of a meal, these idlis are sure to become a favorite in your culinary repertoire.

            If you enjoyed making these masala peanuts, why not try your hand at some other mouthwatering recipes from Manjula’s Kitchen? Vegetable Pakoras, Paneer Tikka, Aloo Gobi (Potato Cauliflower), Samosa, Mango Lassi

            Explore these recipes and more for a culinary journey through the vibrant and diverse flavors of Indian cuisine.

          • Zucchini Pasta

            Zucchini Pasta: Delicious Vegan and Gluten-Free Zucchini Noodles

            Zucchini Pasta is a healthy replacement for pasta. This is a great recipe, super easy, quick and delicious. I like to serve this with homemade tomato sauce or you can serve with your own favorite sauce. Zucchini Pasta is also vegan and gluten free

            For Zucchini Pasta

            • 2 medium Zucchini
            • 1/2 cup mushrooms (sliced)
            • 1/4 tsp salt
            • 1/4 tsp dry basil

            For Tomato Sauce

            • 2 cups tomatoes (finely chopped)
            • 2 Tbsp olive oil
            • 1/4 tsp dry basil
            • 1/4 tsp dry oregano
            • 1/8 tsp black pepper
            • 1/2 tsp red chili flakes
            • 1/2 tsp salt
            • 2 tsp sugar
            • 1/2 tsp corn starch
            1. also need vegetable spiral slicer

            2. In a sauce pan add the oil basil, oregano, red chili flakes add the tomatoes cook over medium heat. Tomatoes should be soft and little mushy. Add salt sugar and corn starch and cook for another minute until most of the water from tomato has evaporated. Keep the sauce aside.
            3. spiralize your zucchini into noodles using a vegetable spiral slicer this is readily available. 
            4. Heat the oil in a sauce pan over medium heat add the mushrooms, stir-fry until mushrooms lightly browned. Add zucchini spirals sprinkle the salt and basil. Stir fry for about 2 minutes. 
            5. Serve zucchini pasta topped with tomato sauce.
            Main Course
            Fusion

          • Stuffed Bell Peppers (Stuffed Capsicum)

            Stuffed Bell Peppers

            For these mouthwatering Stuffed bell peppers, I decided to make them into rings, which makes it easier and quicker to make. Bell peppers provide a very nice vibrant color to any dish. Stuffed bell peppers are delicious and can be served as appetizers or as a side dish. I hope you enjoy this recipe as much as I enjoy!

            • 2 bell peppers (capsicum, pahadi mirch)
            • 2 1/2 potatoes (boiled, peeled and roughly mashed)
            • 1 1/2 tsp salt
            • 1 tsp cumin seeds (jeera)
            • 3 tsp coriander powder (dhania)
            • 1/2 tsp red chili powder
            • 1/2 tsp mango powder (amchoor)
            • 1/2 tsp garam masala
            • 1 Tbsp green chili (finely chopped)
            • 1 Tbsp oil (canola or vegetable)
            1. Add all the spices to mash potatoes to make filling, salt, cumin seeds, coriander powder, red chili powder, mango powder, garam masala, and green chilies.
            2. Cut tops and bottoms of bell peppers; discard seeds and membranes.
            3. Stuffed the bell peppers and slice them in half inch thick, use sharp knife. Depends the size of bell peppers how many slices you will make.
            4. Press them gently to make sure potatoes stays inside the bell pepper rings.
            5. Heat the heavy flat bottom sauce pan on medium heat and generously grease the pan.
            6. Spread the bell pepper rings into skillet, do not overlap. Cover the pan and let it cook for about 1-2 minutes.
            7. Remove the cover and turn the rings gently and press them lightly to ensure potatoes stays into the bell pepper rings. I cover the pan to make sure bell peppers are cooked, make sure they are not mushy. Cook the bell peppers from each side till they are golden brown. Stuffed bell peppers ready to serve.
            8. Stuffed bell peppers are ready, this is a very enjoyable dish, serve them as an appetizers or side dish. I like to serve them with stir-fry cherry tomatoes.

            Stuffed bell peppers are ready, this is a very enjoyable dish, serve them as an appetizers or side dish. I like to serve them with stir-fry cherry tomatoes.

            You can also use stuffed bell peppers to make sandwich, I like to use kaiser rolls with lettuce leaves, cheese, and slices of tomatoes.

            Appetizer, Side Dish
            Indian, Italian

            Stuffed Bell Peppers Recipe

            Stuffed bell peppers are a versatile option for appetizers or party recipes, suitable for a variety of dietary needs including gluten-free and vegan preferences, featuring a flavorful filling of sautéed vegetables. In this stuffed bell peppers recipe, we’ll infuse vibrant flavors into bell peppers, creating a delightful dish that’s both visually appealing and satisfying. Stuffed bell peppers offer a medley of textures and tastes, making them a versatile addition to any meal. Let’s delve into how to make stuffed bell peppers that will impress even the most discerning palates.

            Preparation and Assembly

            To start, gather the necessary ingredients for the stuffing mixture. While the original recipe focuses on corn chaat, we’ll repurpose it to create a flavorful filling for our stuffed bell peppers. Begin by finely chopping tomatoes and green chilies. Sauté them in a pan until they turn golden brown, adding spices like cumin powder, coriander powder, and red chili powder for an extra kick of flavor. Then, mix in boiled corn kernels and season with salt to taste.

            Filling the Bell Peppers

            With the stuffing ready, it’s time to prepare the bell peppers for filling. Slice the tops off the bell peppers and remove the seeds and membranes from the insides, creating a hollow cavity perfect for holding the stuffing. Be sure to choose bell peppers that are firm and vibrant in color for the best results.

            Stuffing and Baking

            Carefully spoon the prepared stuffing mixture into each bell pepper, ensuring they are evenly filled. Place the stuffed bell peppers on a baking tray and bake them in a preheated oven until the peppers are tender and the filling is heated through. This process allows the flavors to meld together, resulting in a harmonious blend of tastes with every bite.

            Presentation and Serving

            Once baked to perfection, remove the stuffed bell peppers from the oven and let them cool slightly before serving. Garnish with fresh cilantro leaves for a pop of color and a burst of freshness. These stuffed bell peppers can be enjoyed as a standalone dish or paired with your favorite sides for a complete meal.

            Variations

            Experiment with different fillings to customize your stuffed bell peppers to suit your taste preferences. Try incorporating ingredients like cooked quinoa, black beans, or diced tofu for added protein and texture. You can also top the stuffed bell peppers with cheese before baking for a cheesy twist on this classic dish.

            Tips

            • When selecting bell peppers for stuffing, choose ones that are uniform in size and shape to ensure even cooking.
            • To save time, you can prepare the stuffing mixture in advance and store it in the refrigerator until ready to use.
            • For a spicy kick, add finely chopped jalapeños or serrano peppers to the stuffing mixture.
            • If you prefer a vegetarian option, omit the corn chaat and use a combination of vegetables like carrots, peas, and potatoes for the filling.

            Benefits

            Stuffed bell peppers are not only delicious but also packed with nutrients. Bell peppers are rich in vitamins A and C, as well as antioxidants that help boost immunity and promote overall health. By filling them with a variety of wholesome ingredients, you can create a nutritious meal that’s as satisfying as it is flavorful.

            FAQs

            Q: Can I use different colored bell peppers for this recipe?

            A: Yes, feel free to mix and match different colored bell peppers for a visually stunning presentation. Each color offers a slightly different flavor profile, adding depth to the dish.

            Q: How long will the stuffed bell peppers keep in the refrigerator?

            A: Stuffed bell peppers can be stored in an airtight container in the refrigerator for up to 3 days. Simply reheat them in the oven or microwave before serving.

            Q: Can I freeze stuffed bell peppers for later?

            A: Yes, stuffed bell peppers can be frozen for future meals. Wrap them individually in plastic wrap and aluminum foil before placing them in the freezer. To reheat, thaw them overnight in the refrigerator and bake them in the oven until heated through.

            Other Recipes on Manjula’s Kitchen

            If you’re looking to explore more Indian recipes, appetizers, beverages, and desserts, be sure to check out the following links on Manjula’s Kitchen. Here are some links to recipes on Manjula’s Kitchen’s official website:

            Paneer Tikka Masala Recipe

            Chana Chaat (Spicy Chickpea Salad) Recipe

            Pav Bhaji (Spicy Vegetable Hash with Buns) Recipe

            Raj Kachori (Crunchy Chaat) Recipe

            Vegetable Biryani Recipe

            These recipes should offer you a flavorful experience straight from Manjula’s Kitchen.

          Exit mobile version