Category: Winter Recipes

Winter Vegetarian Recipes: Warm and Comforting Indian Dishes

Winter is the perfect time to enjoy warm and comforting dishes that nourish the body and soul. Indian cuisine offers a variety of winter vegetarian recipes that are both delicious and hearty. Whether you’re looking for vegetarian winter recipes, Winter Recipes Indian style, or specific Indian winter recipes, Manjula’s Kitchen provides an extensive collection of dishes to suit every palate. Let’s explore some fantastic dishes that will make your winter meals cozy and satisfying.

Classic Winter Vegetarian Recipes

Sarson Ka Saag

Sarson Ka Saag is a classic North Indian dish made with mustard greens, spinach, and fenugreek leaves. This dish is a staple in many Indian households during winter and is a perfect example of winter vegetarian recipes. The combination of leafy greens cooked with spices and served with makki ki roti (cornbread) makes this dish both flavorful and nutritious.

Methi Thepla

Methi Thepla is a spiced flatbread made with fenugreek leaves and whole wheat flour. This dish is popular in Gujarat and is an ideal choice for vegetarian winter recipes. The addition of fenugreek leaves not only enhances the flavor but also adds a nutritional boost, making it perfect for a healthy winter meal.

Hearty Indian Winter Recipes for Main Course

Rajma

Rajma is a hearty kidney bean curry cooked in a spiced tomato gravy. This dish is a staple in Winter Recipes Indian style and is enjoyed with rice or roti. The rich and comforting flavor of the kidney beans makes it a beloved dish in many Indian households.

Baingan Bharta

Baingan Bharta is a smoky and flavorful eggplant dish that is perfect for winter. The eggplants are roasted until soft, then mashed and cooked with tomatoes and mild spices. This dish is a delightful addition to your collection of Indian winter recipes and pairs well with roti or rice.

Warming Soups and Stews

Moong Dal Soup

Moong Dal Soup is a nutritious and warming lentil soup made with split yellow lentils and a blend of spices. This dish is a staple in winter vegetarian recipes and is perfect for a light yet satisfying meal. The rich and comforting flavor of the lentils makes it an ideal choice for cold winter days.

Vegetable Stew

Vegetable Stew is a comforting and hearty dish made with a variety of vegetables cooked in a spiced coconut milk broth. This dish is a favorite among vegetarian winter recipes and is perfect for a nourishing and warming meal. Serve it with steamed rice or bread for a complete meal.

Winter Vegetarian Recipes for Snacks

Pakoras

Pakoras are deep-fried fritters made with vegetables like spinach, potatoes, and cauliflower. This snack is a popular item on the Indian winter recipes list and is perfect for tea-time or as an appetizer. Serve pakoras with a side of green chutney for a delicious treat.

Methi Muthia

Methi Muthia are steamed dumplings made with fenugreek leaves and a blend of spices. This snack is a classic in Winter Recipes Indian style and is perfect for a healthy and tasty treat. Muthia can be enjoyed on their own or with a side of chutney.

Sweet Indian Winter Recipes

Gajar Ka Halwa

Gajar Ka Halwa is a traditional Indian dessert made with grated carrots, milk, sugar, and ghee. This dessert is a staple in winter vegetarian recipes and is often enjoyed during festivals and special occasions. The rich and sweet flavor of the halwa makes it a favorite among many.

Moong Dal Halwa

Moong Dal Halwa is a rich and indulgent dessert made with split yellow lentils, ghee, and sugar. This dessert is a classic in Indian winter recipes and is perfect for a sweet ending to any meal. The melt-in-your-mouth texture and sweet flavor make it a beloved winter treat.

Elevate Your Winter Menu

To elevate your winter menu, consider incorporating dishes from various categories that complement these winter vegetarian recipes. Adding Indian snacks like pakoras and methi muthia will bring a delightful variety of flavors and textures. 

For a sweet conclusion, try Indian desserts such as gajar ka halwa and moong dal halwa. Offering healthy options like moong dal soup and vegetable stew can provide lighter choices for your meals. 

Planning a large gathering? The best Indian dishes for party recipe category are brimming with dishes that will impress your guests and create unforgettable celebrations. Including North Indian recipes like rajma or baingan bharta can infuse your meal with an authentic touch.

Frequently Asked Questions (FAQs)

Q: What are some popular winter vegetarian recipes? 

A: Some popular winter vegetarian recipes include Sarson Ka Saag, Methi Thepla, Rajma, Baingan Bharta, Moong Dal Soup, Vegetable Stew, Pakoras, Methi Muthia, Gajar Ka Halwa, and Moong Dal Halwa. These dishes are flavorful, nutritious, and perfect for cold weather.

Q: How can I make traditional Indian food suitable for winter? 

A: To make traditional Indian food suitable for winter, try recipes like Sarson Ka Saag, Rajma, and Moong Dal Soup. These recipes are hearty, warming, and perfect for cold weather.

Q: What are some easy winter recipes Indian style? 

A: Some easy winter recipes Indian style include Pakoras, Methi Thepla, and Baingan Bharta. These dishes are quick to prepare and provide the necessary warmth and comfort during cold weather.

Q: Can I prepare Indian winter recipes in advance? 

A: Yes, many Indian winter recipes can be prepared in advance and stored. Dishes like Rajma and Baingan Bharta can be made ahead of time and refrigerated, while snacks like Pakoras and Methi Muthia can be prepped and frozen.

Q: What are some healthy vegetarian winter recipes? 

A: Some healthy vegetarian winter recipes include Moong Dal Soup, Vegetable Stew, Sarson Ka Saag, and Methi Thepla. These dishes are nutritious, hearty, and perfect for maintaining a healthy diet during the winter months.

Conclusion

Winter Indian vegetarian recipes are a celebration of diverse flavors and warming ingredients. Whether you’re looking for vegetarian winter recipes, Winter Recipes Indian style, or specific Indian winter recipes, these dishes will bring variety and comfort to your meals. So, gather your ingredients, try out these recipes, and enjoy the rich and diverse world of Indian winter foods. Happy cooking and happy winter!

By incorporating these dishes into your winter menu, you’ll be able to enjoy a wide variety of delicious and nutritious foods. Whether you’re looking for snacks, main courses, or desserts, there’s a winter vegetarian recipe to suit every taste. Don’t forget to check out Manjula’s Kitchen for more inspiration and culinary delights. Happy cooking and happy eating!

  • Aloo Bhindi Masala

    Aloo Bhindi Masala (Potato Okra): A Flavorful North Indian Stir-Fry | Manjula’s Kitchen

    Introduction to Aloo Bhindi Masala

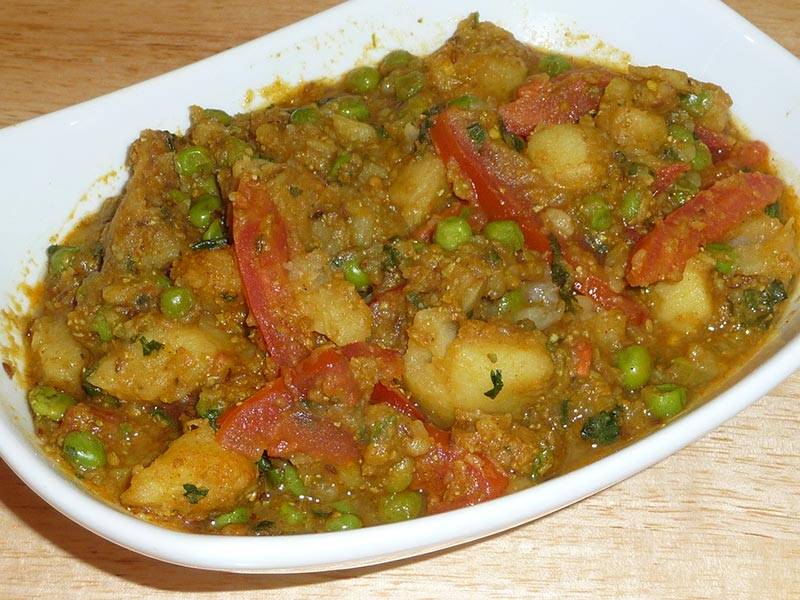
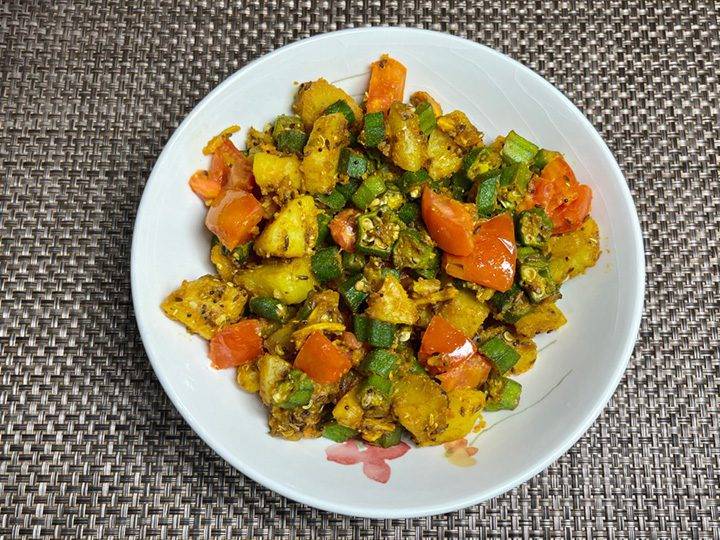
    Aloo Bhindi, a delicious combination of potatoes (aloo) and okra (bhindi), is a beloved North Indian stir-fry that’s both vegan and gluten-free. This dish is spiced to perfection, with everyday ingredients that enhance the natural flavors of the vegetables. It’s a simple, quick, and nutritious meal that’s perfect for any day of the week. With tender okra, perfectly boiled potatoes, and a blend of spices, Aloo Bhindi makes a great accompaniment to dal, rice, or roti.

    Cultural and Traditional Importance

    Aloo Bhindi is a common dish in many North Indian households. Its simplicity and ease of preparation make it a staple for busy weeknights, while its flavorful spices and colorful presentation make it special enough for family gatherings. In India, meals often feature a variety of dishes to balance textures and flavors, and Aloo Bhindi is frequently paired with lentils like Dal Tadka and breads like Roti for a wholesome and complete meal.

    Cooking Aloo Bhindi at home not only allows for fresher ingredients but also ensures that the dish is prepared exactly to your taste. With the addition of besan (gram flour) and tomatoes, this dish becomes both hearty and vibrant, appealing to everyone at the table.

    Recipe Variations from Manjula’s Kitchen

    While Aloo Bhindi Masala is a popular dish on its own, you can explore other similar stir-fry recipes or variations with different vegetables from Manjula’s Kitchen:

    • Aloo Gobi: A stir-fry made with potatoes and cauliflower, flavored with similar spices, making it a close cousin to Aloo Bhindi.
    • Bhindi Masala: A more saucy version of okra, cooked in a spiced tomato gravy, offering a different take on okra dishes.
    • Aloo Baingan: A tasty variation that combines potatoes with eggplant, cooked in a similar blend of spices.
    • Baingan Bharta: A roasted eggplant dish that pairs well with Aloo Bhindi as part of a larger spread.

    Health Benefits and Dietary Considerations

    Aloo Bhindi is not only flavorful but also packed with nutrients. Okra is rich in vitamins A and C, fiber, and antioxidants, while potatoes provide potassium and carbohydrates, making this dish a great source of energy. The use of minimal oil and the addition of spices like cumin, coriander, and turmeric add both flavor and health benefits, with turmeric known for its anti-inflammatory properties.

    This recipe is naturally gluten-free and vegan, making it suitable for a variety of dietary needs. For a lower-carb option, you can reduce the amount of potatoes or substitute them with sweet potatoes or other root vegetables. Besan (gram flour) adds a touch of protein and helps the spices adhere to the vegetables, making the dish even more satisfying.

    Serving Suggestions

    Masala Aloo Bhindi can be enjoyed as a side dish or as the main course. It pairs perfectly with Indian breads like roti, paratha, or even naan. For a more complete meal, serve it alongside Jeera Rice and a cooling yogurt dish like Raita.

    If you’re hosting a meal, Aloo Bhindi Masala makes a colorful addition to the table when paired with other Indian classics like Chole or Dal Fry. The vibrant colors and bold flavors of these dishes create a well-balanced and satisfying meal that’s sure to impress.

    Conclusion

    Aloo Bhindi Masala is a simple, flavorful, and nutritious dish that can be prepared quickly with everyday ingredients. Its combination of tender potatoes, crisp okra, and aromatic spices makes it a versatile meal option that’s both comforting and satisfying. Whether you’re serving it as part of a traditional Indian meal or enjoying it as a standalone dish, Aloo Bhindi is sure to become a favorite in your home. Try this recipe today and bring the taste of North Indian home cooking to your kitchen.

    Frequently Asked Questions (FAQs)

    1. How can I prevent okra from becoming slimy?
      • To prevent sliminess, make sure the okra is thoroughly dry before cooking. Frying the okra over low heat without covering the pan also helps to keep the texture crisp.
    2. Can I substitute potatoes with another vegetable in this recipe?
      • Yes, you can substitute potatoes with sweet potatoes, carrots, or even eggplant for a different take on the dish.
    3. What are some variations of Aloo Bhindi I can try?
      • You can try Aloo Gobi or Bhindi Masala for similar stir-fried dishes that use different vegetables or a saucy variation.
    4. How should I serve Aloo Bhindi?
      • Masala Aloo Bhindi pairs wonderfully with roti, paratha, or naan. It can also be served with rice and a cooling raita for a complete meal.
    5. Is this dish suitable for vegans and those on a gluten-free diet?
      • Yes, Aloo Bhindi is naturally vegan and gluten-free, making it a great choice for those with dietary restrictions.
  • Spinach Almond Paratha

    Spinach Almond Paratha

    Spinach Almond Paratha is a delicious unleavened Indian flatbread made on a skillet. There are many variations of parathas, most of which are made with whole wheat flour. Parathas can be plain or stuffed with various fillings.

    Spinach Almond Paratha is a healthy indian recipe and tasty option. It is crispy on the outside and soft on the inside. This paratha is made with spinach, almond flour, whole wheat flour, and some spices. It can be served for indian breakfast recipe with butter, yogurt, or pickle, or as part of a meal alongside toor dal or a gravy-based dish.

    Almond Spinach Paratha has a beautiful green color and is a nutritious alternative, especially great for incorporating spinach into your diet.

    When making indian parathas, it's important to know how to roll and fold them. While rolling the dough, apply oil or ghee and fold it to create layers. This technique results in parathas that are crisp on the outside and have a soft texture inside.

    Another advantage of parathas is that they keep well, making them perfect for lunch boxes or for picnics.

    • 1 cup whole wheat flour, atta
    • ½ cup almond flour – badam ka powder
    • 1½ cup chopped spinach, Palak
    • 1 tbspn oil
    • 1 tsp cumin seeds, jeera
    • ½ tsp salt
    • ¼ tsp black pepper, kali mirch
    • tsp asafetida, hing
    • ½ cup chilled water
    • ½ tsp red chili flake (if you like hot and spicy)
    • ¼ cup whole wheat flour (for rolling paratha)
    • 2 tbsp oil (for cooking parathas)
    1. Mix all the ingredients together in a bowl, except water: flour, almond flour, chopped spinach, salt, black pepper, cumin seeds, asafetida, and oil. Add water as needed to make a firm dough (as it sits dough will get soft). Grease your palm and knead the dough until all the ingredients are combined. Let the dough sit aside for about 15 minutes.

    2. Knead the dough on a lightly greased surface until it becomes soft. Divide the dough into four equal parts and form them into balls. Roll each dough ball into a 3-inch circle. Spread about 2 drops of oil on each circle and fold them into triangles. Repeat this process for all four triangles.

    3. Meanwhile, heat a heavy skillet on medium heat until moderately hot. To test if the skillet is ready, sprinkle a few drops of water on it. When the water sizzles right away, the skillet is ready.

    4. Take one dough ball and lightly press it on both sides on a surface dusted with dry flour. Using a rolling pin, roll the dough into a 7–8-inch circle. If the dough starts sticking, dust it with more flour.

    5. Place the paratha on the skillet. When you see the color change and the paratha puffs up in different places, turn the paratha over. After a few seconds, spread 1/2 teaspoon of oil onto the paratha. Turn the paratha over again and spread another 1/2 teaspoon of oil. Using your spatula, lightly press the entire surface of the paratha to help it cook all the way through.

    6. After a few seconds, flip the paratha and press with the spatula, ensuring it is golden-brown on both sides. Repeat this process for the remaining parathas.

    7. For the best taste serve paratha hot, taste great with hot cup of Chai. Enjoy!

    When making parathas, it’s important to know how to roll and fold them. While rolling the dough, apply oil or ghee and fold it to create layers. This technique results in parathas that are crisp on the outside and have a soft texture inside.
    Spinach Almond paratha taste great when cooked with ghee, (clarified butter).
    Serving suggestions:
    For breakfast serve the Spinach Almond Paratha with yogurt and pickle, or as part of a meal alongside dal or a gravy-based dish.

    Breakfast, lunch
    Indian
    Paratha, Stuffed Paratha

    Introduction

    Spinach Almond Paratha is a nutritious and flavorful Indian flatbread that combines the goodness of spinach and the crunch of almonds. This spinach almond paratha recipe is perfect for a healthy indian recipes breakfast, lunch, or indian dinner recipes. The addition of spinach not only enhances the nutritional value but also adds a vibrant green color, while the almonds provide a delightful crunch and a boost of healthy fats and proteins.

    The Essence of Spinach Almond Paratha

    The essence of spinach almond paratha lies in its blend of fresh spinach and finely chopped almonds. The spinach is mixed into the dough, making each bite packed with nutrients and flavor. The almonds add a unique texture and richness, making this paratha a wholesome and satisfying meal.

    Origin and Popularity

    Parathas are a staple in Indian cuisine, particularly in North India. They are enjoyed in various forms, stuffed with different fillings or mixed with ingredients like spinach and almonds. This healthy paratha recipe is a modern twist on the traditional paratha, incorporating superfoods to make it even more nutritious and delicious.

    Why You’ll Love This Recipe

    • Nutritious and Delicious: Packed with vitamins, minerals, and healthy fats from spinach and almonds.
    • Easy to Make: Simple ingredients and straightforward steps make this recipe accessible to everyone.
    • Versatile: Can be enjoyed as a main dish, side dish, or even as a snack.
    • Perfect for Any Meal: Ideal for breakfast, lunch, or dinner.

    How to Make Spinach Almond Paratha: Here’s a step-by-step guide on how to make spinach almond paratha:

    1. Prepare the Ingredients:
      • Fresh spinach, washed and finely chopped.
      • Almonds, finely chopped or ground.
      • Whole wheat flour, water, and salt for the dough.
      • Optional spices: cumin powder, garam masala, and green chilies for extra flavor.
    2. Make the Dough:
      • In a large mixing bowl, combine whole wheat flour, chopped spinach, and almonds.
      • Add salt and any optional spices.
      • Gradually add water and knead the mixture into a soft dough.
      • Cover the dough and let it rest for 15-20 minutes.
    3. Roll Out the Parathas:
      • Divide the dough into equal-sized balls.
      • Roll each ball into a flat circle using a rolling pin, dusting with flour as needed to prevent sticking.
    4. Cook the Parathas:
      • Heat a tawa or skillet over medium heat.
      • Place a rolled-out paratha on the hot tawa and cook until bubbles start to form.
      • Flip the paratha and cook the other side until golden brown spots appear.
      • Apply a small amount of oil or ghee on both sides and cook until crispy and fully cooked.
    5. Serve Hot:
      • Serve the spinach almond parathas hot with yogurt, pickles, or your favorite curry.

    Variations of Parathas

    Exploring Manjula’s Kitchen reveals a treasure trove of other delicious paratha recipes that you might enjoy. Here are some related parathas that you might find interesting:

    1. Aloo Paratha: A classic stuffed paratha with a spiced potato filling.
    2. Paneer Paratha: Paratha stuffed with a flavorful paneer (Indian cottage cheese) filling.
    3. Methi Paratha: A healthy paratha made with fresh fenugreek leaves.
    4. Gobhi Paratha: Paratha stuffed with a spiced cauliflower filling.
    5. Palak Paratha: Another spinach-based paratha, perfect for a nutritious meal.

    Serving Suggestions

    Spinach almond paratha can be enjoyed in various ways:

    • With Yogurt: Serve with plain or flavored yogurt for a cooling side.
    • With Pickles: Pair with Indian pickles for a tangy contrast.
    • With Raita: Serve with a refreshing cucumber or mint raita.
    • As a Wrap: Use the paratha as a base for wraps, adding vegetables or paneer.
    • With Curries: Enjoy with your favorite vegetarian curry.

    Tips and Tricks

    To perfect your spinach almond paratha recipe, consider these helpful tips:

    Use Fresh Ingredients: Fresh spinach and high-quality almonds enhance the flavor.

    Knead Well: Ensure the dough is well-kneaded for a soft and pliable texture.

    Rest the Dough: Letting the dough rest helps it become more elastic and easier to roll out.

    Cook on Medium Heat: Cooking on medium heat ensures the paratha is cooked through without burning.

    Customize Spices: Adjust the spices to suit your taste preferences.

    FAQs

    Can I Use Frozen Spinach?

    Yes, you can use frozen spinach. Thaw and drain it well before adding to the dough.

    How Long Does Spinach Almond Paratha Last?

    Parathas are best enjoyed fresh but can be stored in the refrigerator for up to 2 days. Reheat on a tawa before serving.

    Can I Freeze the Dough?

    Yes, you can freeze the dough for up to a month. Thaw it in the refrigerator before using.

    Is This Recipe Vegan?

    To make this recipe vegan, use oil instead of ghee for cooking the parathas.

    Can I Add Other Ingredients?

    Feel free to add other ingredients like grated carrots, beetroot, or different nuts for variety.

  • Shakar Para

    Shakkar Para

    Shakkar Paras are delightful, sweet snacks perfect for holidays and loved by kids. The addition of cinnamon not only enhances the flavor but also gives a cookie-like texture. They are ideal for all holidays and even for travel, as they have a long shelf life. Shakkar Paras have always been a staple in our pantry. The addition of cinnamon to this popular snack has made it even more appealing to kids. These sweet snacks are very enjoyable for all ages.

    This is an easy recipe to make because I always have the ingredients available. You just need 4 ingredients: all-purpose flour, sooji (semolina), sugar, and oil. I have flavored it this time with cinnamon, you can replace cinnamon with cardamom. They are so delicious you can not stop eating. This is also a vegan recipe.

    • 2 cups all-purpose flour (maida)
    • 2 tbsp fine semolina flour (sooji)
    • 3 tbsp oil
    • 1/2 cup sugar
    • 1 pinch salt
    • 2 drops lemon juice
    • 1/2 tsp cinnamon powder
    • 1/3 cup chilled water (use as needed)
    1. In a bowl, combine all dry ingredients: all-purpose flour, semolina, salt, sugar, and cinnamon powder, and mix them well.

    2. Add oil and lemon juice to the dry mix. Gradually incorporate chilled water until the dough comes together. The dough should not be soft and do not knead the dough. Chilled water adds the crispness to Shakkar Paras.

    3. Cover the dough and let it rest for at least fifteen minutes. Lightly knead the dough; it will soften due to the sugar.

    4. Divide the dough into two parts and shape each into a flat ball.

    5. Sprinkle a little all-purpose flour on the rolling surface. Roll each ball into about 9-inch circles with the thickness of salted crackers.

    6. Prick the rolled dough with a fork on both sides to prevent puffing during frying.

    7. Cut the rolled dough into 1/2-inch-wide and 3-inch-long pieces or your desired shape.

    8. Heat oil in a frying pan. Test readiness by placing a small piece of dough; it should sizzle and rise slowly.

    9. Fry the Shakkar Paras until both sides are light golden-brown (approximately 6-7 minutes).

    10. Allow them to cool to room temperature for crispiness.

    11. Store the Shakkar Paras in an airtight container; they can be kept for several weeks.

    Using chilled water to make the dough makes it flakiness.

    Adding lemon juice prevents excessive oil absorption and adds crispness. Use only 2-3 drops of lemon juice.

    Enjoy these delicious, cinnamon-flavored Shakkar Paras as a delightful snack or treat for holidays and travel! They are crisp and flaky, and I know my grandkids love them. If you enjoy the recipe, share it with friends, and don’t forget to subscribe to my YouTube channel. I look forward to reading your comments. Enjoy!

    Appetizer
    Indian
    shakar para

    Introduction to Shakar Para

    Shakar Para, a crispy and mildly sweet Indian snack, is a cherished treat, especially during festive occasions like Diwali. This delightful snack, also known as shakkar para, is easy to prepare and is loved by both adults and children alike. The recipe’s simplicity and the perfect blend of sweetness make it a favorite across Indian households.

    Cultural and Traditional Importance

    In many parts of India, Shakar Para holds a special place during festive celebrations. It is traditionally prepared in large batches, ensuring that everyone has a generous share of this delicious snack. The crispiness of shakarpara symbolizes prosperity and happiness, making it a staple during joyous occasions. This snack is not just limited to festivals; it’s also enjoyed as a daily tea-time companion, adding a touch of sweetness to everyday life.

    Recipe Variations

    While Shakar Para is delightful in its original form, there are various other Indian snacks that can complement or substitute this recipe:

    • Namak Para: A savory twist to Shakar Para, made with a blend of spices and salt. This snack provides a perfect balance when served alongside the sweet shakkar para.
    • Besan Ki Burfi: A sweet treat that shares the same festive significance as Shakar Para. Its rich texture and flavor profile offer a delightful contrast to the crispy shakarpara.
    • Mathri: Another crispy snack that can be enjoyed with shakarpara. This flaky biscuit-like snack pairs well with the sweetness of Shakar Para, making it an ideal combination for snack platters.
    • Kaju Katli: A popular Indian sweet made from cashews, perfect for those who prefer a richer taste. Kaju Katli can be served alongside Shakar Para to create a diverse spread of traditional Indian sweets.

    Health Benefits and Dietary Considerations

    Although Shakar Para is a sweet snack, it’s a much healthier option compared to store-bought sweets, as it can be made at home with control over the ingredients used. The recipe is entirely vegetarian, making it suitable for those following a vegetarian diet. Additionally, by opting for whole wheat flour and using jaggery instead of refined sugar, one can make a slightly healthier version of shakarpara.

    Serving Suggestions

    Shakar Para can be served in numerous ways. Traditionally, it’s enjoyed on its own as a snack, but it can also be served alongside a cup of masala chai, enhancing the tea-time experience. For a more elaborate spread, Shakar Para can be served alongside other Indian snacks like Mathri or Namak Para. It can also be gifted in decorative jars during festivals, making it a thoughtful and delicious present.

    Conclusion

    Shakar Para is more than just a snack; it’s a symbol of festivity, joy, and the richness of Indian culinary traditions. Whether you’re celebrating a festival or just craving a sweet treat, shakarpara is the perfect recipe to add to your repertoire. Try this authentic shakarpara recipe from Manjula’s Kitchen and experience the simple yet profound pleasure that this sweet snack brings.

    Frequently Asked Questions (FAQs)

    What is the origin of Shakar Para?

    Shakar Para is believed to have originated in the northern regions of India, where it is commonly prepared during festivals like Diwali.

    Can Shakar Para be made healthier?

    Yes, by using whole wheat flour and jaggery instead of refined sugar, Shakar Para can be made slightly healthier.

    How long does Shakar Para last?

    When stored in an airtight container, Shakar Para can stay fresh for up to 2 weeks.

    Can Shakar Para be made vegan?

    Yes, Shakar Para can be made vegan by using vegetable oil instead of ghee.

    What are some variations of Shakar Para?

    Variations include Namak Para, Mathri, and Besan Ki Burfi, each offering a unique taste experience.

  • Chai (Masala Tea)

    Chai (Masala Tea)

    Chai is black tea brewed beverage with spices and milk. A cup of chai gives a wonderful sense of warmth and has a soothing effect. The mere aroma of chai makes you to want one; it is hard to resist. There are endless recipes, and every household has its favorite spice mix and its a drink which goes with many snack be it mathri to namak para.

    Makes spice mix for 24 cups

    • 24 green cardamoms (hari ilachi)
    • 18 black pepper (kali mirch)
    • 1 tsp anis seeds
    • 1/2 tsp ginger powder
    • 1/4 tsp cinnamon powder

    Tea for 2 Cups of Chai

    • 1-1/2 cup water
    • 1/2 cup milk
    • 2 tsp tea leaves (I prefer Brooke Bond Red Label or Lipton Yellow Label)
    • 2 tsp sugar
    • 1/2 tsp chai spice mix
    1. Mix all the spices and grind to a powder. I prefer to use a coffee grinder, the one I keep just for spices. Store the chai spice mix in airtight container.

    2. Boil the water and milk with 1/4 teaspoon spice mix. When the water boils, reduce the heat to low and add the tea leaves and sugar. Cover the pan and let it simmer two to three minutes.
    3. Strain the mixture and serve hot.  Adjust the sugar to your taste.

     Notes

    I use 10 oz tea cups or mugs.

    Use 1/8 teaspoon of spice mix for 1 cup of tea.

    You will also enjoy Chai Latte


    Drinks
    Indian

    Introduction

    Chai masala tea is a quintessential Indian beverage known for its rich flavors and aromatic spices. This traditional drink combines black tea with a blend of spices, creating a soothing and invigorating experience. In this article, we’ll explore the origins, health benefits, and preparation techniques for the perfect cup of chai masala tea.

    What is Chai Masala Tea?

    Chai masala tea, often simply called masala chai, is a spiced tea made by brewing black tea with a mixture of aromatic spices and herbs. Common spices include cardamom, cinnamon, cloves, and ginger, each contributing to the tea’s distinctive taste.

    The Origins of Chai Masala Tea

    The history of chai masala tea dates back thousands of years in India. Initially used for medicinal purposes, it evolved into a popular daily beverage enjoyed across the country and beyond.

    Health Benefits of Chai Masala Tea

    1. Boosts Immunity: The spices in chai masala tea, such as ginger and cloves, are known for their immune-boosting properties.
    2. Aids Digestion: Spices like cardamom and ginger can help with digestion and soothe the stomach.
    3. Reduces Inflammation: Ingredients like ginger and cinnamon have anti-inflammatory properties that can help reduce inflammation in the body.
    4. Improves Heart Health: Black tea, a key component of chai masala tea, has been linked to improved heart health due to its antioxidants.

    Preparing the Perfect Chai Masala Tea

    To make chai masala tea, you will need black tea, a blend of spices, milk, and sweetener. Here’s a simple method:

    1. Boil Water and Spices: Start by boiling water with your preferred spices (e.g., cardamom, cloves, cinnamon, and ginger).
    2. Add Tea Leaves: Add black tea leaves to the boiling water and let it simmer.
    3. Add Milk and Sweetener: Pour in milk and sweetener (sugar or honey) and bring the mixture to a boil again.
    4. Strain and Serve: Strain the tea into cups and enjoy hot.

    Customizing Your Chai Masala Tea

    One of the beauties of chai masala tea is its versatility. You can adjust the spice levels to your taste or add other flavors like vanilla or star anise to create your unique blend.

    Chai Masala Tea in Modern Culture

    While chai masala tea remains a staple in Indian households, it has also gained popularity worldwide. Cafés and tea shops around the globe offer their versions of this delightful drink, introducing it to new audiences.

    Serving Suggestions for Chai Masala Tea

    Chai masala tea is often enjoyed with snacks such as biscuits, pakoras, or samosas. It’s perfect for a cozy afternoon tea or as a comforting beverage on a chilly day.

    Tips for Making the Best Chai Masala Tea

    • Use fresh, high-quality spices for the best flavor.
    • Adjust the sweetness to suit your preference.
    • Experiment with different milk options, like almond or oat milk, for a unique twist.

    Incorporating Chai Masala Tea into Your Routine

    Including chai masala tea in your daily routine can offer not only a delicious drink but also numerous health benefits. Enjoy it as a morning energizer or an afternoon pick-me-up.

    FAQs

    What is the best type of tea for chai masala tea? Use robust black tea such as Assam or Darjeeling for a strong, flavorful base.

    Can I make chai masala tea without milk? Yes, you can make it without milk for a lighter version, known as “black chai.”

    How can I store chai masala spice mix? Store the spice mix in an airtight container in a cool, dry place for up to six months.

    Is chai masala tea caffeinated? Yes, chai masala tea contains caffeine from the black tea leaves.

    Can I add other spices to my chai masala tea? Absolutely! Feel free to experiment with spices like nutmeg or star anise to create your blend.

    What is the best sweetener for chai masala tea? Common sweeteners include sugar, honey, and jaggery. Choose according to your taste preference.

    Conclusion

    Chai masala tea is more than just a beverage; it’s a comforting ritual that offers a myriad of flavors and health benefits. Whether you’re a seasoned tea enthusiast or new to this aromatic drink, making chai masala tea at home can be a delightful and rewarding experience.

    Other Recipes from Manjula’s Kitchen: Aloo ParathaGobi Paratha, Paneer Paratha, Methi Thepla 

  • Butternut Squash Pasta

    Butternut Squash Pasta

    Creamy Butternut squash sauce with spiral pasta is a fusion appetizer dish which is light, savory with beautiful spring colors. Garnishing with beetroot adds a gourmet touch.

    • Approx. 2-1/2 cups uncooked spiral pasta
    • Approx. 3 cups butternut squash peeled and cut in about ½ inch pieces
    • 2 tbsp oil
    • 1-1/2 tbsp salt adjust to taste
    • 1 tbsp all-purpose flour (Maida)
    • 1 cups milk
    • 1/2 cup cream
    • 1 tbsp fennel seeds crushed (Saunf)
    • 1/4 tbsp black pepper
    • 1/4 cup butternut squash shredded for garnishing
    • 1/4 cup beetroot boiled and shredded for garnishing
    1. In a large pot boil the water with 1 teaspoon of salt and 1 tablespoon of oil. After water comes to the boil add the pasta. Cook the pasta until it is tender, this will take about 8-10 minutes. Drain the water and set pasta aside.

    2. Cook the squash in about 1-1/2 cups of water until squash becomes very soft; puree the squash to creamy texture.

    3. In a saucepan add 1 tablespoon of oil and all-purpose flour over medium heat and stir for a minute. While stirring slowly add cream making sure there are no lumps. After it comes to a boil, add milk and butternut squash puree.

    4. Add salt, black pepper and fennel seeds; boil for 3-4 minutes over medium heat. Sauce should be creamy and pourable consistency.

    5. Before serving pour the sauce over pasta and mix.

    6. Garnish the individual pasta servings with shredded squash and top it with few slices of beetroot.

    Notes

    I cook the beetroot in microwave, wrap it with wet paper towel and cook for about 4-5 minutes.

    fusion
    Indian

    Butternut Squash Pasta: Savory Recipes and Flavorful Combinations

    Butternut Squash Pasta is a delightful dish that brings together the creamy, slightly sweet flavor of butternut squash with the comforting texture of pasta. Whether you’re looking for a hearty meal or a unique twist on traditional pasta dishes, this recipe is sure to please your taste buds. Butternut Squash Pasta is not only delicious but also packed with nutrients, making it a wholesome choice for any meal.

    The Essence of Butternut Squash Pasta

    The key ingredient, butternut squash, is known for its vibrant color and rich, creamy texture. When cooked and pureed, it forms a luscious sauce that clings perfectly to the pasta. This dish is versatile and can be easily customized with various herbs, spices, and additional ingredients to suit your palate.

    Origin and Popularity

    Butternut squash is a popular ingredient in many cuisines around the world, especially in fall and winter when it’s in season. Its use in pasta dishes has gained popularity due to its ability to create a creamy sauce without the need for heavy cream or cheese, making it a healthier option that doesn’t compromise on flavor.

    Why You’ll Love This Recipe

    • Nutritious: Butternut squash is rich in vitamins A and C, fiber, and antioxidants.
    • Creamy Texture: The pureed squash provides a creamy base that is both satisfying and healthy.
    • Versatile: This recipe can be adapted with various herbs, spices, and proteins.
    • Easy to Make: With simple steps and readily available ingredients, it’s a perfect dish for any home cook.

    Variations of Pasta Recipe

    Exploring Manjula’s Kitchen reveals a treasure trove of other delicious recipes that you can try. Here are some related recipes that you might enjoy:

    1. Tomato Basil Pasta: This classic dish features a rich tomato sauce with fresh basil, providing a tangy and aromatic complement to the pasta.
    2. Vegetable Pasta: Fresh vegetables and whole grain pasta with savoury tomato sauce makes a very colourful and delicious pasta dish. This is a simple pasta dinner. Serve with a side of salad and bread.
    3. Creamy Spinach Pasta: This is a delicious pasta dish with fresh spinach and rich white sauce. It is my version of fettuccini alfredo. Creamy spinach pasta looks and tastes great. It’s a nice vegetarian appetizer.
    4. Zucchini Pasta: Zucchini Pasta is a healthy replacement for pasta. This is a great recipe, super easy, quick and delicious..

    Serving Suggestions

    Butternut Squash Pasta can be enjoyed in various ways:

    • With a Side Salad: Pair it with a fresh green salad for a balanced meal.
    • As a Main Course: Enjoy it on its own as a hearty main course.

    Tips and Tricks

    To enhance your Butternut Squash Pasta, consider the following tips:

    • Roast the Squash: Roasting the butternut squash enhances its natural sweetness and adds depth of flavor to the sauce.
    • Use Fresh Herbs: Fresh herbs like sage or thyme can add a wonderful aromatic touch to the dish.
    • Add Protein: Incorporate grilled chicken, shrimp, or chickpeas to make the dish more filling.

    FAQs Frequently Asked Questions

    Is Butternut Squash Pasta Vegan? 

    Yes, this recipe can be made vegan by using plant-based milk and omitting any cheese.

    Can I Make It Ahead of Time? 

    Yes, you can prepare the sauce ahead of time and store it in the refrigerator. Reheat and mix with freshly cooked pasta before serving.

    What Can I Serve with This Pasta? 

    This pasta pairs well with a variety of sides, such as a green salad, roasted vegetables, or garlic bread.

    How Long Does It Take to Make? 

    From start to finish, this recipe can be prepared in about 45 minutes, making it a great option for a weeknight dinner.

  • Cereal Chivda (Snack)

    Cereal Chivda (Snack)

    Cereal Chivda is a great substitute for original chivda. This is a quick and easy recipe to make. Mix of different cereals, mildly spiced makes an enjoyable crunchy snack.

    • 4 cups rice crispy cereal
    • 1/2 cup  corn flakes
    • 1/2 cup  fine potato sticks
    • 1 tbsp tablespoon raisins
    • 1/2  cup roasted peanuts
    • 1/2 cup  roasted chana dal
    • 3 tbsp oil
    • 1/2 tbsp mustard seeds (rai)
    • Pinch of asafetida (hing)
    • 1 green chili chopped adjust to taste
    • About 10 curry leaves
    • 1/2  tbsp fennel seeds (saunf)
    • 1/4 tbsp turmeric (haldi)
    • 1/4  spoon red chili powder adjust to taste
    • 1/2 tbsp salt adjust to taste
    • 1/4 tbsp mango powder (amchoor)
    1. Heat the oil in a wide saucepan over medium high heat. After oil is moderately hot add mustard seeds.

    2. As mustard seeds crack add asafetida, green chili, and curry leaves. As precaution cover the pan immediately for few seconds because as you add curry leaves to oil it will splatter.

    3. Lower the heat to medium low, stir-fry for about 30 seconds; add raisins, peanuts and chana dal, stir-fry for one minute.

    4. Add fennel seeds, chili powder, turmeric, and salt mix it well.

    5. Add rice crispy cereal and corn flakes (crush the corn flakes before adding to the mix) stir the mixture gently, add potato sticks mix it well quick and turn off the heat. Chivda is ready.

    6. Let the cereal chivda cool of to room temperature before serving.

    7. Cereal chivda can be kept for several days in airtight container.

    Snack
    Indian

    A Delightful Crunch: Exploring the Versatility of Cereal Chivda

    Cereal Chivda is a delightful, crispy snack that combines the crunch of cereals with the flavors of traditional Indian spices. This cereal chivda recipe is perfect for those looking for a diet-friendly snack that doesn’t compromise on taste. Whether you’re enjoying it with your afternoon tea or packing it for a quick snack on the go, this homemade chivda cereal snack is sure to satisfy your cravings.

    The Essence of Cereal Chivda

    Cereal Chivda is a modern twist on the traditional Indian chivda, a savory snack mix. By incorporating cereals, this snack becomes lighter and perfect for those watching their calorie intake. The blend of spices, nuts, and dried fruits adds layers of flavor and texture, making it a versatile snack that can be enjoyed any time of the day.

    Origin and Popularity

    Chivda has been a popular snack in Indian households for generations. Traditionally made with flattened rice (poha), it has evolved to include a variety of ingredients, such as cereals, to cater to modern dietary preferences. This diet chivda with cereal is a testament to its adaptability, offering a healthier option without losing its deliciousness.

    Why You’ll Love This Recipe

    • Healthy Snack: Made with wholesome cereals, nuts, and spices, this chivda is both nutritious and delicious.
    • Easy to Make: Simple steps and readily available ingredients make this recipe easy to follow.
    • Flavorful: A perfect balance of spices and textures ensures every bite is packed with flavor.
    • Versatile: Can be enjoyed on its own or paired with other dishes.

    How to Make Cereal Chivda

    Here’s a step-by-step guide on making cereal chivda:

    1. Prepare the Ingredients: Gather your choice of cereals (cornflakes, puffed rice, or any diet-friendly cereal), nuts (peanuts, cashews), curry leaves, and spices (turmeric, mustard seeds, green chilies, and salt).
    2. Roast the Nuts: In a large pan, dry roast the peanuts and cashews until they are golden brown. Remove and set aside.
    3. Toast the Cereals: In the same pan, add the cereals and toast them lightly until they become crispy. Remove and set aside.
    4. Prepare the Spice Mix: Heat a small amount of oil in the pan. Add mustard seeds and allow them to splutter. Then add curry leaves, finely chopped green chilies, and turmeric powder. Sauté until the curry leaves are crispy.
    5. Combine and Mix: Add the roasted nuts and toasted cereals back into the pan. Sprinkle salt and mix everything well, ensuring the cereals and nuts are evenly coated with the spice mix.
    6. Cool and Store: Let the mixture cool completely before transferring it to an airtight container. This ensures the chivda remains crispy.

    Variations of the Recipe

    Exploring Manjula’s Kitchen reveals a treasure trove of other delicious snack recipes that you might enjoy. Here are some related variations that you might find interesting:

    1. Spicy Chivda: Spicy chivda crunchy savory snack is quick and easy to make. Chivda, also known as poha, is flattened rice that is flavored with spices.
    2. Masala Peanuts: Spicy and crunchy peanuts that make for a perfect snack.
    3. Spicy Sev: Thin, crispy strands made from chickpea flour and spices, perfect for munching.
    4. Roasted Chickpeas: A healthy and crunchy snack made with chickpeas tossed in spices and roasted until crispy.
    5. Methi Mathri: Crispy, savory crackers made with fenugreek leaves and spices.

    Serving Suggestions

    Cereal chivda can be enjoyed in various ways:

    • As a Snack: Enjoy it as a standalone snack during tea time or as a healthy mid-day treat.
    • With Yogurt: Pair it with a bowl of yogurt for a delicious and satisfying snack.
    • As a Topping: Use it as a crunchy topping for salads or soups.
    • For Travel: Pack it as a travel-friendly snack for road trips or flights.

    Tips and Tricks

    To perfect your chivda cereal recipe, consider these helpful tips:

    • Use Fresh Ingredients: Fresh nuts and cereals will enhance the flavor and crunchiness of your chivda.
    • Adjust Spices: Tailor the amount of green chilies and turmeric to your spice preference.
    • Store Properly: Ensure the chivda is completely cool before storing to maintain its crispiness.

    FAQs

    Is Cereal Chivda Vegan? 

    Yes, this recipe is vegan as it uses plant-based ingredients.

    Can I Make It Ahead of Time? 

    Yes, this chivda can be made ahead of time and stored in an airtight container for up to two weeks.

    What Can I Serve with This Chivda? 

    This chivda pairs well with yogurt, can be used as a topping for salads, or enjoyed on its own as a snack.

    How Long Does It Take to Make? 

    The preparation and cooking time for this chivda is about 30 minutes.

  • Mango Cheese Cake

    Mango Cheese Cake (Egg Less)

    Fresh ripe mangoes are used to make this light and refreshing cheesecake. It makes for an amazing presentation and tastes just as exotic as it looks. The egg-less recipe is delightfully delicious dessert and can be enjoyed by just about everyone. Its a quick and easy recipe

    • 16 graham cracker squares, crushed (approx. 1 cup of crumbs)
    • ¼ cup sugar
    • 1/3 cup melted unsalted butter
    • 12 oz cream cheese at room temperature
    • 2 tbsp cornstarch
    • 3/4 cup sugar
    • 1 large ripe mango
    • 8 thin mango slices
    • 2 strawberries cut into 4 pieces each
    • Few mint leaves
    1. Crust

    2. Preheat oven to 350 degree F.

    3. Add broken graham crackers, sugar and butter to a food processor. Mix well until looks nicely crumbled, takes approx. 30 seconds.

    4. Place graham cracker mix into a 9” pie plate, spread evenly and press down firmly.

    5. Bake at 350 degrees for 6 minutes, on the medium rack.

    6. Filling

    7. Prepare mango by peeling and chopping into chunks.

    8. Add mango chunks, cream cheese, sugar, and cornstarch to the food processor. Mix for 20 seconds, until it is smooth in texture. Do not mix for too long.

    9. Pour the mixture over the pie crust and bake for 35 minutes at 350 degrees F. The surface should look dry and cooked.

    10. Let the cheesecake cool and then refrigerate for at least 2 hours before serving.

    11. Garnish the cheesecake with mango slices, strawberries and mint leaves.

    Dessert
    Indian
    2 Minutes Dessert

  • Chum Chum

    Chum Chum – Bengali Dessert

    Chum Chum is a popular Bengali (East Indian) sweet dessert that is made with Paneer, (home-made cheese). It is a versatile dish that can be served in many different variations. Here I will show you 3 different ways to serve Chum Chum, either with Pistachios, or with Coconuts or with Malai (cream).

    • 4 cups whole milk, paneer
    • 2 cups sugar
    • 5 cups water
    • 1/8 tsp cardamom powder

    Ingredients for different For Different Garnishing

    • 1 tbs pistachio
    • 1 tbs coconut powder
    • 2 tbsp cream
    1. Prepare paneer according to recipe “How to Make Paneer”. To test if sufficient water has been removed out of the paneer, take a little piece of paneer in your palm and rub with your fingers. You should be able to make a firm but smooth ball, after 15-20 seconds of rubbing.

    2. Place the drained paneer on a dry, clean surface and knead it for 3 to 4 minutes until it rolls into smooth soft dough. If the paneer is too crumbly, add a teaspoon of water.
    3. Divide the paneer dough into 8 equal parts and roll each one into a smooth oval shaped ball.
    4. For the syrup: In a wide saucepan, bring 5 cups of water to a boil. Add sugar and stir to dissolve completely. Use a large pan as the Chum Chums will double in volume while cooking in the syrup.
    5. Add the paneer balls to the syrup and bring it back to a boil. Then turn down the heat to medium and cover the pot. Cook for 10 minutes.
    6. Open the pot cover, turn the chum chums over and cook for another 15 minutes. Check to see if the chum chums appear firm but sponge-like (with little holes on the surface). Turn off the heat and let sit for 10 more minutes.

    7. Remove the chum chums from the syrup. Serve chill!

    8. Serving With Pistachios: Cover every Chum Chum with a few pieces of sliced pistachios

    9. Serving with Coconut Powder: Roll the chum chums in dry coconut

    10. Serving with Malai (cream): Boil the milk over medium heat until it reduces to ½ its volume. Stir the milk continuously so it doesn’t burn on the bottom of the pot. Add sugar, and cardamom powder. Stir for 2 minutes, and then turn off the heat. While milk is still warm pour 1 tablespoon over every Chum Chum and top with a few pieces of pistachios.

    Dessert
    Indian
    Bengali Dessert, Paneer Dessert

    How to make Chum Chum Recipe: Chum Chum Sweet

    Chum Chum is a popular Indian sweet delicacy that originates from the state of West Bengal. This soft and spongy dessert is made from paneer (Indian cottage cheese) and soaked in a sugar syrup flavored with saffron and cardamom. 

    Chum Chum is known for its delicate texture, subtle sweetness, and vibrant colors, making it a delightful treat for special occasions and celebrations. 

    Chum Chum are like a luxurious and bigger version of rasgulla although made with richer ingredients such as pistachio and other dry fruits along with garnishing done using cream. 

    Other Dessert Variations:

    1. Ras Malai: Rasmalai is a Bengali dessert consisting of soft paneer balls immersed in chilled creamy milk. Like Rasgullas, Rasmalai is also made with homemade cheese known as “paneer” or “chana”. Instead of being soaked in sugar syrup like Rasgullas, Rasmalai is soaked in sweet, flavored milk.
    1. Kala Jamun: Kala Jamun is a delicious dessert very similar to Gulab Jamun. Kala jamun is an exotic sweet dish served on special occasions. Kala Jamuns have a very unique texture as they are chewy outside and grainy inside.
    1. Bengali Rasgulla: Bengali Rasgullas are homemade paneer (Cottage cheese) sweet dish, round paneer balls soaked in sugar syrup. This is a delicacy from the state of Bengal, these are very light and delicious, you can never go wrong with Bangali Rasgulla.
    1. Jalebi: Jalebi is a warm, crispy, delicious treat. It can best be described as funnel cake. In many places jalebi is still served as a breakfast treat like pancakes. It is a treat to have jalebi and kachori for a hearty breakfast.

    Tips for Making Perfect Chum Chum:

    Use Fresh Paneer: Use fresh and homemade paneer for the best texture and flavor in your Chum Chum. Homemade paneer is softer and creamier than store-bought varieties and yields a more delicate and spongy dessert.

    Knead the Paneer Well: Knead the paneer dough thoroughly to ensure a smooth and uniform texture. Proper kneading helps to remove excess moisture from the paneer and creates a soft and pliable dough that’s easy to shape into rolls.

    Soak in Sugar Syrup: Allow the paneer rolls to soak in the sugar syrup for at least 4-6 hours or overnight for maximum flavor absorption. The longer the Chum Chum sits in the syrup, the softer and more flavorful it will become.

    Garnish Creatively: Get creative with your garnishes and decorations. Sprinkle chopped nuts, edible silver leaf (varak), or dried rose petals on top of your Chum Chum for an elegant and festive presentation.

    FAQs about Chum Chum:

    Can I make Chum Chum without paneer? 

    While paneer is the traditional main ingredient in Chum Chum, you can experiment with alternative fillings such as khoya (reduced milk solids) or ricotta cheese for a different texture and flavor profile.

    How long does Chum Chum stay fresh? 

    Chum Chum can be stored in the refrigerator for up to 3-4 days in an airtight container. However, it’s best enjoyed fresh within the first day or two for optimal taste and texture.

    Can I freeze Chum Chum? 

    While Chum Chum can be frozen, its texture may change slightly upon thawing. If freezing, wrap the Chum Chum tightly in plastic wrap or foil and store them in a freezer-safe container for up to 1-2 months. Thaw the Chum Chum in the refrigerator before serving.

    Is Chum Chum gluten-free? 

    Yes, Chum Chum is gluten-free as it does not contain any wheat or gluten-containing ingredients. However, be cautious of cross-contamination if you have a severe gluten allergy or celiac disease.

    How did Chum Chum got its name?

    The name chum chum comes from Bengal, where it originated as a sweet treat. The name mimics the sound “nom nom,” which is fitting because the sweet is soft and fluffy, and you might munch on it like that.

    Chum Chum is a delightful and versatile Indian dessert that’s perfect for celebrating special occasions or indulging in a sweet treat. With its soft and spongy texture, subtle sweetness, and endless variations, Chum Chum is sure to captivate your taste buds and leave you craving for more. 

    Whether enjoyed as a festive dessert or as a comforting indulgence, Chum Chum is a beloved sweet delicacy that’s cherished by people of all ages.

  • Aloo Mattar

    Aloo Mattar

    Aloo Mattar is a popular north Indian dish. Potatoes and peas with spicy gravy makes a great main dish.

    • 3 medium boiled potatoes
    • 3/4 cup green peas I am using frozen
    • 2 tbsp oil
    • 1 tsp cumin seeds (jeera)
    • 1/8 tsp asafetida (hing)
    • 1 tsp ginger paste
    • 1 green chili finely chopped
    • 2 tbsp coriander powder (dhania)
    • 1 tsp fennel seed powder
    • 1/4 tsp turmeric (haldi)
    • 1 tsp paprika (dagi mirch)
    • 1 tsp salt
    • 1 tsp mango powder (amchoor)
    • 1/2 tsp garam masala
    • 2 medium tomatoes sliced
    • 2 tbsp chopped cilantro (hara dhania)
    1. Peel the potatoes cut them in byte size pieces.

    2. In a small bowl mix ginger, green chili, coriander, fennel seed, turmeric, and paprika with ¼ cup of water.
    3. Heat the oil in a saucepan. Test the heat by adding one cumin seed to the oil. If the cumin seed cracks right away, the oil is ready. Add the cumin seeds, and asafetida, after cumin seeds crack add the spice mix cook until spices start leaving the oil this should take about one minute.
    4. Next add green peas and half a cup of water and let it cook until they are tender.
    5. Add potatoes and salt mix it well, while mixing mash few pieces of potatoes that will give thickness to gravy.
    6. Add about 1-1/4 cups of water after it comes to boil lower the heat to medium and let it cook for about five minutes.
    7. Add mango powder, garam masala, chopped cilantro, and slice of tomatoes mix it gently after gravy comes to boil turn off the heat and cover the pot. Tomatoes will cook with the steam.
    8. Aloo matter is ready to serve.

    Serving Suggestions

    Aloo matter can be served with Dal Puri, Urad Dal Kachori, Kuttu Puri and side of Salted Mint Lassi.

    Enjoy it!

    Main Course
    Indian
    Everyday Meal, Gluten Free, Potato With Peas, Vegan

  • Khasta Mathri

    Khasta Mathri – Indian Savory Crackers

    Khasta Mathri is a popular, classic savory snack. You can serve these Mathries with pickle at tea time or you can enjoy as is! For all the upcoming holidays, Mathries make a good snack to have around to serve to all guests. They also make for a simple but special homemade gift.

    • 1 cup all-purpose flour (maida or plain flour)
    • 2 Tbsp sooji (semolina flour)
    • 1/2 tsp salt
    • 1/4 tsp black pepper (crushed)
    • 1/4 tsp cumin seeds (jeera)
    • 2 Tbsp oil (canola or vegetable oil)
    • 1/2 cup chilled water
    • 2 drops lemon juice
    • oil to fry
    1. Mix the flour, sooji, salt, black pepper, cumin seeds, lemon drops and oil. Note lemon should be just 2-3 drops, we are not adding this to flavor, lemon is added to give the crispness, also Mathries will absorbed less oil.

    2. Add the chilled water slowly, mixing with your fingers as you pour. Do not knead the dough. The dough should be soft.
    3. Cover the dough and let it sit for at least fifteen minutes. Divide the dough into about 20 equal parts, I decided to make 14.

    4. Take each part of the dough and make a flat ball shape. Roll them into 2-inch circles. Prick each mathri with a fork about 6-8 places, both sides each, to prevent puffing the mathri when frying.
    5. Heat the oil in a frying pan on low medium heat. The frying pan should have at least 1 inch of oil. To check if the oil is ready, put a small piece of dough in the oil. The dough should make the oil sizzle and come up slowly.
    6. Fry mathri in batches, making sure to place just enough mathri to cover the frying oil. Fry them until both sides are a light golden-brown. This should take about 5-7 minutes. Take them out over paper towel, which will absorb the extra oil

    Suggestions

    Serve the Khasta Mathri with cranberry pickle, or Chatpata Aloo

    Khasta Mathris can be stored for a couple of months in airtight containers.

    If the mathris are cooked on high heat, they will be soft.

    Appetizer
    Indian
    Mathri, Salted Crackers, Tea Time Snack

    Khasta Mathri Recipe: How to make Khasta Mathri

    Khasta Mathri is a popular Indian savory snack enjoyed across India, particularly during festivals, tea-time, or as a crunchy accompaniment to meals. 

    These golden-brown, flaky crackers are known for their irresistible crispiness and rich flavour, making them a favorite among snack lovers of all ages. 

    Made from a simple dough of all-purpose flour, ghee (clarified butter), and spices, Khasta Mathri is deep-fried to perfection, resulting in a crunchy texture and aromatic taste.

    Khasta Mathri for Festive Season

    Crunchy Texture: Khasta Mathri’s signature feature is the crunchy and flaky texture, which provides a delightful snacking experience with every bite. The layers of dough create a light and airy interior, while the deep-frying process gives the crackers a golden-brown exterior that’s irresistibly crispy.

    Rich Flavor: Despite its simple ingredients, Khasta Mathri is packed with flavor, thanks to the addition of aromatic spices such as ajwain (carom seeds), black pepper, and cumin seeds. These spices lend a warm and fragrant aroma to the crackers, enhancing their overall taste and appeal.

    Long Shelf Life: Khasta Mathri has a long shelf life and can be stored in an airtight container for several weeks without losing its crispiness or flavor. This makes Khasta Mathri an ideal snack for travel, picnics, and gatherings, as it can be prepared in advance and enjoyed on-the-go.

    Versatile Snack: Khasta Mathri is a versatile snack that can be enjoyed on its own or paired with various accompaniments. Serve Khasta Mathri with a cup of hot tea or chai for a classic tea-time snack, or pair it with chutney, pickle, or yogurt for added flavor and contrast.

    Other Variations of Mathri:

    • Namkeen Mathri: Mathri (Salted Crackers) are similar to salted crisp crackers and are a very popular afternoon snack. Traditionally, mathris are served with spicy pickles.
    • Aachari Mathri: Achari Mathries, is a traditional staple snack in North India. They are usually served with spicy pickles, but in this recipe we have added mango pickle spices in the dough instead to add a tangy flavor to the mathri itself.
    • Masala Mathri: Enhance the flavor of Mathri by adding a blend of spices and herbs such as garam masala, turmeric, and coriander powder to the dough. Masala Mathri has a complex and aromatic taste that’s sure to impress your taste buds.

    Tips for Making Perfect Khasta Mathri:

    Rest the Dough: Allow the Khasta Mathri dough to rest for at least 15 minutes before rolling and shaping to relax the gluten and improve the texture of the crackers. Resting the dough allows the flavors to meld together, resulting in a more flavorful Khasta Mathri.

    Roll Evenly: Roll out the Khasta Mathri dough into thin, even discs to ensure uniform cooking and crispiness. Use a rolling pin and a dusting of flour to prevent sticking and achieve the desired thickness.

    Fry at the Right Temperature: Fry the Khasta Mathri in hot oil at the correct temperature to ensure that they cook evenly and become golden brown and crispy. Avoid overcrowding the frying pan or kadai to maintain the temperature of the oil.

    FAQs about Khasta Mathri:

    How do I store Khasta Mathri? 

    Store Khasta Mathri in an airtight container at room temperature for up to 2-3 weeks. Line the container with parchment paper or tissue paper to absorb any excess moisture and maintain the crispiness of the crackers.

    Can I freeze Khasta Mathri dough? 

    Yes, you can freeze Khasta Mathri dough for future use. Shape the dough into a ball, wrap it tightly in plastic wrap or aluminium foil, and store it in an airtight container or freezer bag. Thaw the dough in the refrigerator overnight before rolling and shaping.

    What can I serve with Khasta Mathri? 

    Khasta Mathri pairs well with a variety of accompaniments such as chutney, pickle, yogurt, or tea. Serve Khasta Mathri alongside your favorite dipping sauces or enjoy them on their own as a crunchy and flavorful snack.

    Khasta Mathri is a delicious and versatile snack that’s perfect for any occasion. Whether enjoyed as a tea-time treat, party snack, or crunchy accompaniment to meals, Khasta Mathri offers a delightful combination of crispy texture and bold flavors. With its customizable variations, long shelf life, and simple preparation, Khasta Mathri is sure to become a favorite in your snack preparation.

Exit mobile version