Tag: Gluten Free Appetizers

Gluten-Free Appetizers: Delicious Starters for Any Occasion
Gluten-free recipes have gained significant popularity, not only for those with celiac disease or gluten sensitivity but also for individuals looking to adopt a healthier lifestyle. 

Hosting a party or gathering with gluten-free options can seem challenging, but with the right recipes, it can be both easy and enjoyable. Here’s a comprehensive guide to some of the best gluten free appetizers that are sure to impress your guests. 

From easy gluten free appetizers to the best gluten free appetizers, you’ll find something for everyone.
Why Choose Gluten-Free Appetizers?

Health Benefits: Gluten-free diets can help alleviate symptoms for those with gluten intolerance or celiac disease, improving their quality of life.
Inclusivity: Providing gluten-free options ensures that all guests, regardless of dietary restrictions, can enjoy the appetizers without worry.
Variety: Gluten-free appetizers often incorporate a wide range of ingredients, offering diverse flavors and textures that appeal to everyone.

Popular Gluten-Free Appetizers
1. Veggie Platter with Hummus
A veggie platter with hummus is a fresh and colorful appetizer that’s easy to prepare. It’s perfect for dipping and provides a healthy, gluten-free option for guests.
2. Stuffed Bell Peppers
Stuffed bell peppers filled with quinoa, black beans, and vegetables make for hearty and satisfying gluten free appetizers. They are nutritious and flavorful, making them a popular choice.
3. Guacamole with Plantain Chips
Guacamole with plantain chips offers a crunchy and creamy combination. It’s a fantastic option for a crowd and easy to prepare in large quantities.
4. Caprese Skewers
Caprese skewers with cherry tomatoes, mozzarella, and basil are not only gluten-free but also incredibly easy to assemble. They are visually appealing and delicious.
Easy Gluten-Free Appetizers
1. Rice Paper Rolls
Rice paper rolls filled with vegetables and tofu are light and refreshing. Serve them with a gluten-free dipping sauce for an easy and healthy appetizer.
2. Sweet Potato Bites
Sweet potato bites topped with avocado and a sprinkle of chili flakes are quick to prepare and delicious. They are a perfect combination of sweet and savory.
3. Cheese and Fruit Platter
A cheese and fruit platter is a no-fuss option that offers a variety of flavors and textures. It’s an easy gluten-free appetizer that everyone will enjoy.
4. Zucchini Fries
Zucchini fries baked until crispy and served with a gluten-free dipping sauce are a hit at any gathering. They are a healthier alternative to traditional fries.
5. Mini Quiches
Mini quiches made with a gluten-free crust and filled with spinach and cheese are a savory delight. They are easy to make and perfect for serving at parties.

Tips for Serving Gluten-Free Appetizers

Clear Labeling: Clearly label gluten-free appetizers to prevent cross-contamination and help guests easily identify safe options.
Separate Serving Utensils: Use separate serving utensils for gluten-free dishes to avoid cross-contamination.
Variety: Offer a variety of gluten-free appetizers to cater to different tastes and dietary needs.
Fresh Ingredients: Use fresh and naturally gluten-free ingredients like vegetables, fruits, and lean proteins.
Gluten-Free Dips: Ensure that any dips or sauces served with appetizers are also gluten-free.

FAQs
Q: What are good snacks for gluten-free? 
A: Good snacks for gluten-free include rice cakes with avocado, popcorn, cheese sticks, gluten-free granola bars, and fruit with nut butter.
Q: What are gluten-free snacks for platters? 
A: Gluten-free snacks for platters can include fresh fruits, vegetables with hummus, gluten-free crackers with cheese, nuts, and dried fruits.
Q: What are gluten-free snacks for platters? 
A: Gluten-free snacks for platters can include fresh fruits, vegetables with hummus, gluten-free crackers with cheese, nuts, and dried fruits.
Q: What are good snacks for gluten-free? 
A: Good snacks for gluten-free include rice cakes with avocado, popcorn, cheese sticks, gluten-free granola bars, and fruit with nut butter.
Conclusion
Offering a selection of gluten free appetizers at your next event ensures that all guests can enjoy delicious and safe options. From easy gluten free appetizers to the best gluten free appetizers, these recipes provide a range of flavors and textures that everyone will love. Keep these tips and recipes in mind, and you’ll be well on your way to hosting a successful gluten-free gathering. 

Enjoy experimenting with these gluten free appetizers recipes and discover new favorites for your menu. Explore more recipes on Manjula’s Kitchen and discover the joy of cooking nutritious and delicious food.

  • Mixed Dal Dosa

    Introduction to Mixed Dal Dosa

    Mixed Dal Dosa is a wholesome, protein-rich flatbread that’s not only easy to make but also doesn’t require the traditional fermentation process. Made from a blend of various lentils, this dosa is packed with plant-based protein, making it a great meal option for anyone looking to boost their protein intake. Lentils like moong dal, urad dal, and red lentils are soaked, ground into a smooth batter, and spiced to create a savory and crispy dosa. The best part? This dosa is both vegan and gluten-free, catering to various dietary preferences while still delivering great taste and texture.

    Cultural and Traditional Importance

    Dosas are a staple in South Indian cuisine, traditionally made from fermented rice and lentil batter. However, the Mixed Dal Dosa offers a quicker alternative without the need for fermentation, making it an ideal choice for those who are short on time. Lentils are a common ingredient in Indian cooking, celebrated for their versatility and nutritional value. By using a variety of dals, this dosa provides a range of nutrients, especially plant-based proteins, making it a go-to dish for breakfast, lunch, dinner, or even as a snack.

    The beauty of Mixed Dal Dosa lies in its simplicity and adaptability. It’s a great way to incorporate different types of lentils into your diet, each contributing its unique flavor and health benefits. Traditionally served with chutneys and sambar, this dosa has found a place in modern kitchens due to its quick preparation and nutritious profile.

    Recipe Variations from Manjula’s Kitchen

    While Mixed Dal Dosa is delicious and nutritious on its own, there are several other similar dosa and pancake recipes available on Manjula’s Kitchen that you can explore for variety:

    • Moong Dal Dosa: Another high-protein dosa made primarily from moong dal, offering a lighter alternative.
    • Besan Chilla: A savory pancake made with gram flour (besan), perfect for a quick, protein-packed breakfast.
    • Rava Dosa: A crisp and delicate dosa made with semolina, for those who prefer a thin and crunchy dosa.
    • Oat Dosa: Similar to Mixed Dal Dosa, Instant Oat dosa is an easy recipe that is perfect for busy families.

    Health Benefits and Dietary Considerations

    The Mixed Dal Dosa is packed with nutrients, especially protein, making it a great option for those following a vegetarian or vegan diet. Lentils are an excellent source of protein, fiber, vitamins, and minerals, contributing to overall digestive health and maintaining energy levels throughout the day. By using a variety of dals, you’re also ensuring that you get a broader range of nutrients in every dosa.

    Additionally, this recipe is gluten-free, making it suitable for those with gluten sensitivities or anyone on a gluten-free diet. If you’re strictly gluten-free, it’s important to note that asafetida (hing) often contains gluten, so be sure to use a gluten-free version or skip it altogether.

    Serving Suggestions

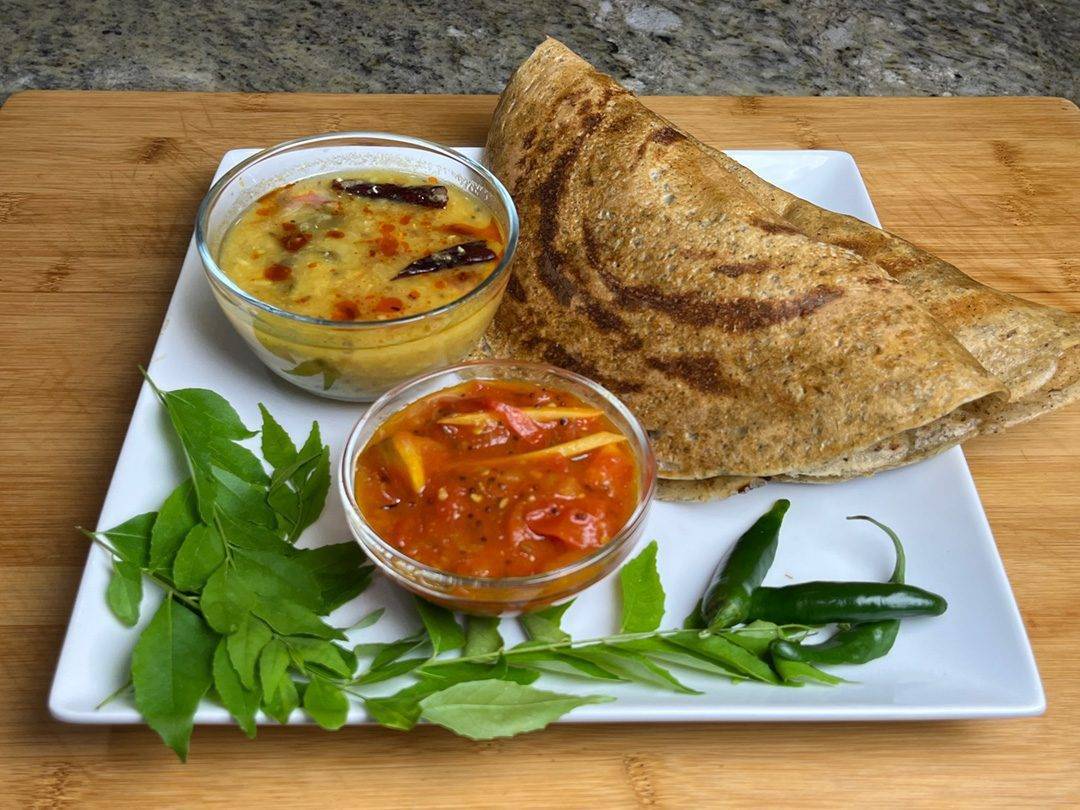
    Mixed Dal Dosa can be served with a variety of chutneys to complement its savory flavors. Here are a few chutney options from Manjula’s Kitchen that pair well with the dosa:

    • Tomato Chutney: A tangy and slightly sweet chutney that adds a fresh burst of flavor.
    • Cilantro Chutney: A classic chutney with refreshing cilantro and a hint of spice.
    • Peanut Chutney: A creamy and nutty chutney that pairs wonderfully with the crispy dosa.

    For a complete meal, serve Mixed Dal Dosa with Sambar or a comforting soup. Another creative twist is to use the dosa as a wrap, filling it with vegetables, paneer, or salad to create a delicious and nutritious frankie or kathi roll. The dosas can also be prepared in advance and reheated on a skillet, making them an excellent option for meal prep.

    Conclusion

    Mixed Dal Dosa is a simple yet highly nutritious meal that can be enjoyed at any time of the day. Its high protein content, along with being vegan and gluten-free, makes it a versatile option for a variety of dietary needs. Whether you’re serving it with chutney for breakfast or transforming it into a wrap for lunch, this high protein dosa will quickly become a favorite in your household. Explore the other dosa recipes on Manjula’s Kitchen to discover even more delicious ways to enjoy Indian flatbreads.

    Frequently Asked Questions (FAQs)

    What makes Mixed Dal Dosa high in protein?

    The use of multiple lentils like moong dal, urad dal, and red lentils makes Mixed Dal Dosa rich in plant-based protein, making it an excellent option for those seeking a high-protein meal.

    Can I make the dosa ahead of time?

    Yes, you can make the dosas in advance and reheat them on a skillet to restore their crispness. They also work well as wraps for on-the-go meals.

    What are some serving options for Mixed Dal Dosa?

    Serve Mixed Dal Dosa with chutneys like tomato chutney, cilantro chutney, or peanut chutney. You can also pair it with sambar or use it as a wrap filled with vegetables or paneer.

    Is Mixed Dal Dosa gluten-free?

    Yes, this dosa is naturally gluten-free. However, be cautious with asafetida (hing) as it may contain gluten unless specifically labeled gluten-free.

    Can I adjust the spiciness of the dosa?

    Absolutely! You can adjust the spice level by adding or omitting green chili and black pepper based on your preference.

  • Sweet and Sour Potatoes

    Sweet and Sour Potatoes: A Flavorful Fusion | Manjula’s Kitchen

    If you’re looking to experience a delightful balance of sweet, spicy, and tangy flavors, the Sweet and Sour Potatoes recipe is just what you need. This dish, featuring tender potato slices cooked in a rich tomato-based gravy, offers an explosion of flavors in every bite. 

    The combination of sweet, sour, and spicy elements creates a unique taste profile that makes this dish stand out in the vast array of Indian cuisine. It’s a dish that not only satisfies the taste buds but also appeals to the senses with its vibrant colors and inviting aroma.

    Cultural and Traditional Importance 

    While Sweet and Sour Potatoes may not be a traditional dish deeply rooted in Indian festivals, it showcases the creativity and adaptability of Indian home cooking. The use of Ukrainian potatoes, known for their ability to hold shape while absorbing the flavorful gravy, highlights the influence of global ingredients in modern Indian cooking. 

    This dish perfectly embodies the fusion of traditional Indian spices with a global twist, making it a popular choice for those seeking something different yet familiar. Its unique flavor profile resonates with those who enjoy experimenting with food while staying true to the essence of Indian culinary traditions.

    In Indian households, the art of balancing flavors is a cherished skill, and Sweet and Sour Potatoes is a testament to that art. The sweet and tangy notes, combined with the warmth of spices, create a dish that is both comforting and exhilarating. It’s a dish that can easily become a staple in your home, whether you’re looking to impress guests with something new or simply wanting to enjoy a comforting meal with your family.

    Recipe Variations 

    Though Sweet and Sour Potatoes are unique, there are other recipes on Manjula’s Kitchen that share a similar balance of flavors and can complement this dish:

    Aloo Tamatar: A classic potato-tomato curry that offers a more traditional take on the combination of potatoes and tangy tomato gravy.

    Aloo Baingan: This dish adds eggplant to the mix, providing a different texture and taste, while still maintaining the tangy notes from the tomatoes.

    Paneer in Tomato Gravy: For those who enjoy the richness of paneer, this recipe offers a creamy tomato-based gravy that pairs wonderfully with the tender potatoes.

    Aloo Chaat: A street food favorite, this dish provides a tangy and spicy flavor profile that complements the sweet and sour notes of the potatoes.

    Health Benefits and Dietary Considerations 

    The Sweet and Sour Potatoes dish is not only a treat for your taste buds but also caters to various dietary preferences. It is both vegan and gluten-free, making it accessible to those with specific dietary needs. The use of Ukrainian potatoes or baby potatoes adds a good source of dietary fiber, while the tomato gravy provides vitamins and antioxidants. 

    This dish is a great choice for anyone looking to enjoy a flavorful meal without compromising on health. Additionally, the absence of dairy makes it suitable for those who are lactose intolerant or following a plant-based diet.

    The incorporation of spices such as cumin, mustard seeds, and turmeric also adds to the health benefits of this dish. These spices are known for their digestive properties and anti-inflammatory effects, making the Sweet and Sour Potatoes not only delicious but also nourishing.

    Serving Suggestions 

    Sweet and Sour Potatoes can be enjoyed in a variety of ways. It is often served as a side dish with Indian breads like puri or paratha, but it can also be the star of the meal when served over a bed of steamed rice. For a complete meal, pair it with Jeera Rice or Rotis. The vibrant colors and bold flavors make it a perfect dish to serve at a dinner party, ensuring that it will be a crowd-pleaser.

    You can also serve Sweet and Sour Potatoes as part of a larger spread, featuring other complementary dishes such as Palak Paneer or Dal Tadka. The combination of these dishes creates a well-rounded and satisfying meal that showcases the diversity of Indian cuisine.

    Conclusion 

    The Sweet and Sour Potatoes recipe is a wonderful example of how different flavors can come together to create something truly special. Its balance of sweetness, spiciness, and tanginess makes it a dish that is both comforting and exciting, perfect for any occasion. 

    Whether you’re serving it as a main course or a side dish, this recipe is sure to impress. Don’t hesitate to give it a try and experience the delightful fusion of flavors that this dish has to offer. The next time you’re in the mood for something new and flavorful, remember that Sweet and Sour Potatoes are just a few simple steps away.

    Frequently Asked Questions (FAQs)

    Can I use regular potatoes instead of Ukrainian potatoes?

    Yes, regular potatoes can be used, but small baby potatoes are preferred as they hold their shape better in the gravy.

    Is this dish suitable for a gluten-free diet?

    Yes, Sweet and Sour Potatoes are naturally gluten-free, making them an excellent choice for those avoiding gluten.

    Can I adjust the level of sweetness in the dish?

    Absolutely, you can adjust the sugar according to your taste. Add it gradually until you reach your desired level of sweetness.

    What can I serve with Sweet and Sour Potatoes?

    This dish pairs well with Jeera Rice, puri, or paratha. For a more elaborate meal, consider serving it alongside other Indian favorites like Palak Paneer or Dal Tadka.

    How do I store leftovers?

    Store any leftovers in an airtight container in the refrigerator for up to 3 days. Reheat gently before serving to preserve the flavors and texture.

  • Sweet & Sour Bell Pepper

    Sweet and Sour Bell Pepper

    Sweet and sour bell pepper is colorful, sweet, sour, and nutty—all the flavors blend into one delicious taste. It tastes great when served as a side dish with paratha, roti or rice.

    I make this quite often upon request of my family because it can be used for making sandwiches or rolled up in any Indian flatbread or tortillas. For making sandwiches, add cheese to make a complete meal. This recipe is also versatile, keeping everything the same, you can change the bell pepper with potatoes or any squash.

    • 3 cups bite-cubed bell pepper, (I am using green, yellow, and red bell peppers to make it colorful.)
    • 1/4 cup peanuts coarsely powder
    • 2 tbsp besan
    • 2 tbsp oil
    • 1/2 tsp cumin seeds (jeera)
    • 2 tsp coriander powder (dhania)
    • 1 tsp salt
    • ¼ tsp red chili powder
    • 1 tsp mango powder (amchoor)
    • 2 tsp lemon juice
    • 3 tbsp brown sugar or jaggery
    • 2 tsp sesame seeds
    1. Cut the bell peppers into bite-size cubes and remove all the seeds.

    2. Heat the oil in a saucepan. Test the heat by adding one cumin seed to the oil. If the cumin seed cracks right away, the oil is ready. Add the cumin seeds. After the cumin seeds crack, add peanuts, besan, and 1 teaspoon of sesame seeds. Stir for about half a minute until the besan (gram flour) is golden-brown.

    3. Reduce the heat to medium-low, add the bell peppers and stir. Add coriander powder, red chili powder, and salt, then stir. Add about ¼ cup of water and cover the pan. Cook over low-medium heat for 6 to 8 minutes. Open and stir to check if the bell peppers are tender but still have some crispness to it.

    4. Add the mango powder and brown sugar. Stir and taste to adjust salt and lemon juice according to your taste.

    5. Turn the heat to low and cook for about 2 minutes, stirring gently.

    6. Before serving, garnish with the saved sesame seeds. Enjoy

    Easy Bell Pepper Recipe: How to make Sweet & Sour Bell Pepper 

    Bell peppers are versatile vegetables that add vibrant color and flavor to dishes. While commonly used in savory recipes, they also shine in sweet and sour preparations. 

    Sweet and sour bell peppers offer a delightful appetizer with an added combination of tangy sweetness, making them a favorite among food enthusiasts. 

    Tips for Easy Bell Pepper Recipe:

    Selecting Bell Peppers: For bell pepper recipes, Choose bell peppers that are firm, glossy, and free from wrinkles or blemishes. Look for peppers with vibrant colors, such as red, yellow, or orange, as they tend to be sweeter than green bell peppers.

    Preparing Bell Peppers: Wash the bell peppers thoroughly under running water and pat them dry with a paper towel. Remove the stem, seeds, and white membrane from the inside of the peppers before slicing them into uniform strips or cubes.

    Balancing Sweetness and Sourness: Achieving the perfect balance of sweetness and sourness is key to a delicious sweet and sour bell pepper dish. Adjust the amount of brown sugar or jaggery and lemon juice according to your taste preferences, keeping in mind that the sweetness should complement the tanginess without overpowering it.

    Cooking Techniques: Sweet and sour bell peppers can be cooked using various methods, including stir-frying, sautéing, or roasting. Stir-frying is a quick and convenient method that retains the peppers’ crisp texture, while roasting enhances their natural sweetness and adds depth of flavor.

    Suggestions for Spicy Bell Pepper Recipe:

    Side Dish: Sweet and sour bell peppers make a flavorful side dish that pairs well with a variety of main courses, such as grilled tofu. Serve them alongside steamed rice or noodles for a complete meal.

    Topping: Use sweet and sour bell peppers as a topping for pizza, sandwiches, or burgers to add a burst of flavor and color. They can also be layered onto wraps or quesadillas for a tasty twist.

    Dip or Relish: Turn sweet and sour bell peppers into a dip or relish by blending them with herbs, spices, and a touch of olive oil. Serve it with crunchy crackers, tortilla chips, or crusty bread for a delicious appetizer or snack.

    Variations to Sweet & Sour Bell Pepper:

    Spicy Kick: Add diced jalapeños or red chili flakes to the sweet and sour bell pepper mixture for a spicy kick. The heat from the peppers will complement the sweet and tangy flavors, creating a delicious contrast.

    Herb Infusion: Enhance the flavor of sweet and sour bell peppers by infusing them with fresh herbs such as basil, thyme, or cilantro. Simply add the herbs to the cooking process or sprinkle them over the dish before serving for a burst of freshness.

    Protein Addition: Incorporate tofu into the sweet and sour bell pepper dish to make it more hearty and satisfying. Cook the protein separately and then combine it with the peppers during the final stages of cooking.

    Frequently Asked Questions (FAQs):

    Q: How long can I store leftover sweet and sour bell peppers?

    A: Leftover sweet and sour bell peppers can be stored in an airtight container in the refrigerator for up to 3-4 days. Reheat them gently on the stovetop or in the microwave before serving.

    Q: Can I make sweet and sour bell peppers ahead of time?

    A: Yes, you can prepare sweet and sour bell peppers ahead of time and reheat them when ready to serve. However, keep in mind that the texture may slightly change upon reheating.

    Q: Is this dish vegan/vegetarian-friendly?

    A: Of course this dish is absolutely vegan/vegetarian-friendly for it doesn’t incorporate any non veg ingredients.

    Q: How spicy is this dish?

    A: Sweet and Sour Bell Pepper is typically not spicy, but you can adjust the heat level by adding chili flakes or fresh chili peppers if desired.

    Q: Can I make this dish ahead of time?

    Yes, you can make the sauce ahead of time and store it in the refrigerator for up to a week. When ready to serve, simply reheat the sauce and stir in freshly cooked bell peppers.

    Q: What can I serve with Sweet and Sour Bell Pepper?

    This dish pairs well with steamed rice or noodles. You can also serve it alongside other Asian-inspired dishes like stir-fried vegetables or tofu.

    Q: How long will leftovers last?

    Leftovers can be stored in an airtight container in the refrigerator for up to 3-4 days. Reheat gently on the stove or in the microwave before serving.

    Q: Can I freeze Sweet and Sour Bell Pepper?

    While you can freeze this dish, the texture of the bell peppers may change slightly upon thawing. It’s best enjoyed fresh, but if you do freeze it, store it in an airtight container for up to 2-3 months.

    Q: How can I make this dish gluten-free?

    Use tamari or a gluten-free soy sauce instead of regular soy sauce, and ensure all other ingredients are gluten-free as well.

  • Palak Paneer Pakora

    Palak Paneer Pakora

    Spinach and Paneer Pakoras are crispy and delicious. I also enjoy using these pakoras to make chaat. These two spicy, delicious popular street food items—Pakoras and Chaat—are loved by all. When it rains, most Indians think about Pakoras served with a hot cup of chai; what a treat. These spinach and paneer pakoras are crispy and mouthwatering. You can serve them as pakoras, or I enjoy serving them also as chaat (chaat is a snack served with yogurt and spicy chutney).

    But Pakoras are enjoyed year-round. I've used baby spinach for this recipe, trimming all the stems. I have done different spinach pakora recipes over time; (Crispy Spinach Pakoras, Spinach Chaat, Spinach Potato Pakora, Palak Pakora), this is also a good way to have spinach, especially for those who don’t enjoy spinach. I also used cubed paneer, which makes this recipe different.

    The good thing is you can make these pakoras in advance because they stay crisp for two days. You should not refrigerate them. To make these spinach and paneer pakoras, you don’t need to make Besan batter to dip the pakoras for frying. Mix all the ingredients slowly drop a spoonful into medium-hot oil and fry them until they are light brown.

    Serve them with your choice of homemade chutney, like cilantro chutney, mint chutney, or tamarind sweet and sour chutney. These Spinach and Paneer Pakoras are very easy to make and can satisfy cravings for pakoras and spicy chaat.

    • 2 cups packed baby spinach leaves (after removing stems)
    • 1-1/2 cups cubed paneer (Vegans replace paneer with firm tofu cubes)
    • 1 cup gram flour (use as needed)
    • 1 tsp salt
    • 1 tsp cumin seeds
    • 1 tbsp coriander powder
    • 1/8 tsp asafetida
    1. In a bowl, add the spinach, cubed paneer, salt, cumin seeds, coriander, asafetida, and about 3/4 cup of besan. Mix well; don’t crumble the paneer, but some of it will break.

    2. Add water slowly; the batter should be lumpy. If the spinach leaves and paneer are not covered with besan, add more besan and water as needed to make a lumpy batter.

    3. Heat the oil in a frying pan over medium-high heat. The frying pan should have at least 1 inch of oil. To check if the oil is ready, put one drop of batter in the oil. The batter should come up but not change color right away.

    4. Slowly drop spoonful into the medium-hot oil and fry them until they are light brown. Turn them a few times. If fried in hot oil, pakoras will brown quickly but remain uncooked inside and will not be crispy.

    Appetizer, Snack, snacks
    Indian
    palak paneer pakora, palak paneer pakora recipe, paneer palak pakora, paneer spinach pakora, spinach paneer pakora

    How to make Palak Paneer Pakora 

    Palak Paneer Pakora, also known as paneer palak pakora or spinach paneer pakora, is a delectable and crispy appetizer that perfectly marries the flavors of spinach and paneer. These savory delights are not only a popular street food item but also a beloved snack enjoyed by many. Whether served as pakoras or transformed into a tantalizing palak paneer pakora chaat, this dish never fails to delight the taste buds.

    Palak paneer pakora is a versatile dish that can be enjoyed year-round, but it holds a special place in the hearts of many Indians, especially during rainy days when paired with a steaming cup of chai—a true indulgence. This recipe offers a unique twist by incorporating cubed paneer, adding a rich and creamy texture to the crispy pakoras.

    Using baby spinach ensures tender leaves, and by trimming away the stems, we ensure a smoother texture. The batter for these palak paneer pakoras is simple yet flavorful, eliminating the need for a separate besan dipping mixture. A blend of besan, salt, cumin seeds, coriander powder, and a hint of asafetida coats the spinach and paneer, creating a lumpy batter that adds to the crunchiness.

    To prepare these delightful spinach paneer pakoras, begin by mixing the spinach, cubed paneer, spices, and besan in a bowl. Slowly add water until the mixture forms a lumpy batter, ensuring that the spinach leaves and paneer are well coated.

    Heat oil in a frying pan and carefully drop spoonful of the batter into the hot oil. Fry the pakoras until they turn light brown, ensuring they are crispy on the outside and cooked through. It’s crucial to fry them in medium-hot oil to achieve the perfect balance of crispiness and tenderness.

    These paneer palak pakoras can be served with your choice of homemade chutneys, such as cilantro chutney, mint chutney, or tamarind sweet and sour chutney, enhancing their flavor profile. They can also be enjoyed as a standalone snack or transformed into a delightful chaat by adding yogurt and spicy chutney.

    One of the advantages of this recipe is that these paneer palak pakoras can be prepared in advance, as they retain their crispness for up to two days. However, it’s essential not to refrigerate them, as this can affect their texture.

    In summary, palak paneer pakoras are a delightful fusion of spinach and paneer, offering a burst of flavors and textures in every bite. Whether enjoyed as a snacks served as chaat, or paired with a comforting cup of chai, these crispy treats are sure to satisfy your cravings for spicy delights. So why not treat yourself and your loved ones to the irresistible goodness of paneer spinach pakoras today?

    And remember, if you enjoy this recipe, don’t hesitate to share it with your friends, subscribe to the YouTube channel for more culinary delights, and leave your comments and suggestions. Your feedback is always appreciated. Thank you for joining me on this flavorful journey!

    Variations:

    1. Aloo Palak Pakora: Add finely chopped boiled potatoes to the batter for an extra burst of flavor and texture.
    2. Palak Pakora: Skip the paneer and make classic spinach pakoras by using only baby spinach leaves in the batter.
    3. Broccoli Pakora: Replace spinach with blanched broccoli florets for a unique twist on this traditional recipe.
    4. Aloo Bread Pakora: Sandwich a mixture of mashed potatoes and spices between two slices of bread, dip in batter, and fry until golden brown.
    5. Cabbage Pakora: Shred cabbage finely and mix it with the batter for crunchy and delicious cabbage pakoras.

    Health Benefits:

    • Spinach: Packed with vitamins A, C, and K, as well as iron and calcium, spinach is a nutritional powerhouse known for its antioxidant properties.
    • Paneer: Rich in protein and calcium, paneer provides essential nutrients for bone health and muscle development.
    • Besan (Gram Flour): A gluten-free alternative to wheat flour, besan is high in protein and fiber, making it a healthy choice for pakora batter that makes it diabetic friendly.
    • Cumin Seeds: Known for their digestive benefits, cumin seeds add a distinctive flavor and aroma to the pakoras.
    • Coriander Powder: Rich in antioxidants and essential nutrients, coriander powder lends a fragrant and citrusy flavor to the dish.
    • Asafetida: Used in traditional medicine for its digestive properties, asafetida adds a subtle umami flavor to the pakoras.

    Incorporate these variations and enjoy the health benefits of spinach and other nutritious ingredients while indulging in the crispy goodness of pakoras. Whether you’re looking for a quick snack or planning a party menu, these versatile pakoras are sure to be a hit with friends and family. So why not get creative in the kitchen and explore the endless possibilities of pakora recipes?

    FAQs: Frequently Asked Questions

    Q: Can I use frozen spinach for this recipe?

    A: No, you can not substitute frozen spinach for fresh baby spinach

    Q: Can I make this recipe vegan?

    A: Absolutely! You can replace paneer with firm tofu cubes to make vegan spinach paneer pakoras.

    Q: Can I refrigerate the leftover pakoras?

    A: It’s best not to refrigerate them, as they may lose their crispiness. However, you can store them in an airtight container at room temperature for up to two days.

  • Finger Sandwiches


    Finger Sandwiches

    These mouthwatering finger sandwiches are great for any picnic or party. The flavored cream cheese spread with different herbs give a unique taste, and has a nice crunch with every bite. The recipes are for four different sandwiches: Tomato, Cabbage, Cucumber and Pineapple. You can prepare one or all four of these varieties, as they are quite easy to make.

    • 8 slice white bread firm
    • 5 oz cream cheese at room temperature
    • 3 tsp ginger paste
    • 1/2 tsp salt
    • 1 green chili, minced
    • 1/2 tsp hari cilantro chutney
    • 2 tbsp cilantro finely chopped (hara dhania)
    • 1 tbsp mint finely chopped (podhina)
    • 1/8 tsp black pepper
    • 1/3 cup cabbage finely chopped (band gobhi)
    • 8 slices cucumber, thinly sliced
    • 8 slices tomato, thinly sliced
    • 1/4 cup crushed pineapple
    • 2 pickled peperoncini, finely diced
    1. Trim sides of each slice of bread. Set aside.

    2. Divide the cream cheese into four equal parts.

    Tomato Sandwich

    1. To one part of the cream cheese add black pepper, 1 teaspoon ginger, mint leaves and a pinch of salt. Mix well.
    2. Spread cream cheese mixture onto 2 slices of bread. Place tomato slices and top with the other slice of bread to make the sandwich. Cut into 4 pieces, garnish with a dab of spread and put small piece of tomato.

    Cabbage Sandwich

    1. To one part of the cream cheese add cabbage, 1 tablespoon of cilantro, 1 teaspoon ginger, half of the green chili (adjust to taste) and a pinch of salt. Mix well.

    2. Spread mixture onto one slice of bread and top with another slice to make sandwich. Cut into 4 pieces and garnish with a dab of the spread.

    Cucumber Sandwich

    1. To one part of the cream cheese add Hari Cilantro Chutney. Mix well.
    2. Spread cream cheese mixture onto 2 slices of bread. Place cucumber slices and top with the other slice of bread to make the sandwich. Cut into 4 pieces, garnish with a dab of spread and a sliver of cucumber.

    Pineapple Sandwich

    1. To one part of the cream cheese add pineapple, black pepper, 1 teaspoon ginger, pepperchini (adjust to taste), and a pinch of salt. Mix well.
    2. Spread mixture onto one slice of bread and top with another slice to make the sandwich. Cut into 4 pieces and garnish with a dab of the spread.

    Tips: 

    You can easily prepare these finger sandwiches with yogurt if you prefer.

    How to remove the water from yogurt, also known hung yogurt:

    Place a muslin or cheesecloth over a strainer and pour yogurt to drain the water.Gently squeeze the yogurt to remove excess water, making sure not to let the yogurt drain through. Place a bowl underneath the strainer and place in a refrigerator for at least 6 hours to drain more water. Yogurt will become thick in consistency, just like cream cheese.

    Appetizer
    Indian

  • Raj Kachori

    Raj Kachori

    Raj Kachori is a spicy chaat bowl filled with delicious condiments. It has refreshing flavors and makes for a unique food experience. Guests will have fun filling their own Kachories according to their taste palette. Served as a snack or appetizer, Raj Kachories make a beautiful presentation and are thoroughly enjoyed by just about everyone.

    Kachori Dough

    • 1 cup all-purpose flour (plain flour, maida)
    • 1 tbsp oil
    • 1/2 tsp salt
    • 1/2 cup approx. lukewarm water

    Kachori Filling

    • 1/3 cup besan (gram flour)
    • 1/8 tsp asafetide (hing)
    • 1/2 tsp salt
    • 1/2 tsp chili flakes
    • 1/2 tsp mango powder (amchoor)
    • 1 tbsp oil

    Condiments to be served With Kachories

    • 1 cup moong sprouts
    • 1 cup boiled and peeled potato cut into small pieces
    • 1 cup whipped yogurt (dahi, curd)
    • 1/4 cup hari cilantro chutney
    • 1/4 cup tamarind chutney
    • 2 tbsp cilantri finely chopped (hara dhania)
    • 2 green chilies finely chopped
    • 1/4 cup fine save available in Indian grocery store (optional)

    Making Dough

    1. In a mixing bowl add all-purpose flour, salt, and oil; add water slowly while mixing and kneading to make firm, yet pliable dough. Cover and set the dough aside for at least 10 minutes.

    Filling

    1. Mix Kachori filling ingredients together, i.e. gram flour, asafetida, salt, chili flakes, mango powder and oil. Set it aside.

    Making Kachori

    1. Knead dough for a minute and divide into 12 equal parts.

    2. Roll dough ball into a 2-inch diameter circle and place 1 teaspoon of filling in the center. Seal by pulling the edges together to make a ball. Prepare all 12 kachoris and let sit for 3 to 4 minutes.

    3. Place a filled kachori with the seam side up, onto a clean surface. Using a rolling pin roll into a circle, approximately 3 inches in diameter.
    4. Heat approx. 1 ½ inches of oil in a frying pan over medium heat. To check if the oil is ready, put a little piece of dough into the oil and it should immediately rise to the surface without having changed its color.

    5. Slowly drop kachoris into the frying pan making sure they don’t overlap with one another. As kachoris puff up, slowly turn them over and fry them on all sides. Turn kachoris 3-4 times until they are golden brown in color, which will take about 7KacKachorishories should be crisp. If the kachoris are fried over high heat they will be too soft.

    Prepare Moong Sprouts

    Add ¼ teaspoon of salt and 2-3 tablespoons of water to the moong sprouts. Cover and cook over medium heat for 3-4 minutes till sprouts are tender. Set aside.

    Serving Kachories

    Gently make an inch sized hole in the center of the kachori.

    Fill with 1 tablespoon of sprouts, 1 tablespoon of potatoes, 2 tablespoons of yogurt and a drizzle with both of the 2 chutneys.

    As an option, add a little cilantro, green chili and 1 tablespoon of fine Sev. These add a little more texture and flavor to the Kachori.

    Tip:

    These Raj Kachories can be prepared in advance and stored up to 2 weeks in an air tight container, making it more convenient to serve. It is even easier if you have the Hari Cilantro and Tamarind chutneys previously stored.

    Appetizer
    Indian
    Appetizer, Party Food, Street Food, Tea Time Snack

    How To Make Raj Kachori Recipe – Manjula’s Kitchen 

    Raj Kachori Indian appetizer, a popular Indian snack, is a delightful combination of crispy shells filled with flavorful ingredients. Follow this step-by-step guide to create your own Raj Kachori at home, offering a burst of textures and tastes in every bite.

    Making the Dough: 

    Begin by preparing the dough for the kachori. In a mixing bowl, combine all-purpose flour (maida), salt, and oil. Gradually add water while kneading to achieve a firm and pliable consistency. Cover the dough and set it aside for at least 10 minutes to allow it to rest and develop the right texture.

    Preparing the Filling: 

    The filling is a crucial component that adds a distinct taste to Raj Kachori. Mix gram flour, asafetida, salt, chili flakes, mango powder, and oil in a bowl. This flavorful mixture will be the heart of your kachori, providing a savory and aromatic essence.

    Shaping and Filling the Kachori: 

    After the dough has rested, knead it briefly and divide it into 12 equal parts. Roll each portion into a 2-inch diameter circle. Spoon 1 teaspoon of the prepared filling into the center of each circle and seal the edges to form a ball. Let these filled kachories sit for a few minutes. Roll each ball into a 3-inch diameter circle, ensuring an even distribution of the filling.

    Frying the Kachoris: 

    Heat about 1 ½ inches of oil in a frying pan over medium heat. To check if the oil is ready, drop a small piece of dough into it; it should rise immediately without changing its color. Carefully place the filled kachoris in the pan, ensuring they do not overlap. As the kachoris puff up, turn them over slowly, frying on all sides until they achieve a golden-brown color. This process should take approximately 7 minutes, and it’s crucial to maintain medium heat to ensure the kachoris turn out crispy rather than overly soft.

    Preparing Moong Sprouts: 

    For an additional layer of flavor and nutrition, cook moong sprouts with a pinch of salt and a few tablespoons of water over medium heat for 3-4 minutes until they become tender. Set aside these sprouts as they will be used as a topping for your kachori.

    Serving the Kachoris: 

    Once the kachoris are cooked to perfection, it’s time to assemble and serve them. Gently create a small hole in the center of each kachori. Fill the hole with a tablespoon of each of the moong sprouts, mashed potatoes, and yogurt. Drizzle the kachoris with both hari cilantro and tamarind chutneys for a burst of tangy and spicy flavors. For those seeking an extra layer of texture and flavor, consider adding fresh cilantro, green chilies, and a tablespoon of fine Sev as optional toppings.

    Tips for Storage: 

    For convenience, Raj Kachoris can be prepared in advance and stored in an airtight container for up to two weeks. This makes it easy to serve these delightful treats whenever the craving strikes. With this simple yet comprehensive recipe on how to make raj Kachori, create authentic Raj Kachori in your kitchen. Enjoy the delectable experience of this iconic Indian street food without the need to visit a chaat vendor.

  • Potato Paneer Tots


    Potato Paneer Tots

    Potato Paneer Tots are a great blend of potatoes, paneer and jalapeno pepper. They are appetizers which are crunchy outside and soft outside. Great tea time snack

    • 2 medium potatoes
    • 1 cup crumbled paneer
    • 1 tsp salt
    • 1 jalapeno pepper finely chopped
    • 1/4 tsp black pepper

    For Batter

    • 3 tbsp all purpose flour (maida, plain flour)
    • 5 tbsp water use as needed

    Need oil To Fry

    1. Mix flour and water together and make a thin, smooth batter and keep aside.

    2. Peel the skin off the potatoes and shred them in a grater or food processor.
    3. In a pan boil the water. After it comes to boil put the shredded potatoes in the water and let it boil for two to three minutes until they are just tender. Note: don’t over cook the potatoes they will become mushy, should be able to feel the shredded potatoes
    4. Once cooked, drain the water and pour some cold water over the potatoes. Gently squeeze the excess water out of the potatoes, again making sure to not make the shredded potatoes mushy.
    5. Next mix shredded potatoes, mashed paneer, and jalapeno pepper, and salt together.
    6. Divide the potato mixture in about 24 equal parts and form them into bullet shape. Keep aside.
    7. Heat the oil in a frying pan on medium high heat. The frying pan should have at least 1 inch of oil. To check if the oil is ready, put one small piece of mix in the oil, it should sizzle and come up right away.
    8. Dip the potato balls in the batter one at a time and slowly drop into the frying pan. Turn them occasionally. Fry tots until golden-brown all around.
    9. Remove them with a slotted spoon and drain on a paper towel.
    10. Serve them hot with your choice of tomato ketchup or coriander (hari) chutney or tamarind (imli) chutney. They also taste great as is.
    Appetizer
    Indian
    Appetizer, Party Food, Tea Time Snack

  • Masala French Fries

    Masala French Fries

    Masala French Fries are an exciting twist on french fries, and they are great to serve with cocktails or as an appetizer.

    • 2 medium russet potatoes
    • 2 tbsp corn starch
    • 1 tsp salt
    • 1/2 tsp dry mint
    • 1/4 tsp black pepper
    • 1/4 tsp red chili powder
    • 1/8 tsp citric acid (tatre)

    Oil to fry

    1. Peel the potatoes wash and cut into French fries.

    2. Mix the salt with potato and let it sit for about ten minutes. Drain the salt water well and lightly pat dry.

    3. Mix cornstarch, salt, mint powder, citric acid, red and black pepper together. Sprinkle the spice mix over potatoes and mix well so all the fries are covered with spices.

    4. Heat the oil in frying pan on medium high heat. The frying pan should have at least 1 inch of oil. To check if the oil is ready, just put potato strip in frying pan. Potato should sizzle.

    5. Fry the fries till they become gold in color all around, turn the fries a few times while frying.
    6. Remove fries from oil and place on paper towel.  Serve hot and enjoy!

    Variations

    Replace dry mint with dry fenugreek leaves.

    Feel free to experiment.

    Tips

    You can make the fries few hours before serving. Heat the fries in oven at 350 degrees for seven to ten minutes before serving.

    Appetizer
    Indian
    Kid Friendly, Tea Time Snack

    How to make Masala French Fries

    Masala French Fries are a delicious variation of the classic French fries, where the crispy potato sticks are tossed in a blend of aromatic spices. This fusion of flavors adds an extra kick to the beloved snack, taking it to a whole new level of deliciousness. Whether you’re a fan of spicy foods or just looking to switch up your French fry game, Masala French Fries are a must-try appetizers!

    Tips for Making Perfect Masala French Fries:

    Choose the Right Potatoes: Opt for starchy potatoes like Russets or Yukon Golds, as they fry up crispier than waxy potatoes. Cut them into uniform sticks to ensure even cooking.
    Soak the Potatoes: Soaking the potato sticks in cold water for about 30 minutes helps remove excess starch, resulting in crispier fries. After soaking, pat them dry thoroughly with paper towels before frying.
    Double Fry Method: For extra crispy fries, use the double fry method. Fry the potato sticks at a lower temperature (around 325°F) until they are cooked through but not yet browned. Remove them from the oil, increase the temperature to 375°F, and fry again until golden brown and crispy.
    Seasoning Technique: Toss the hot fries in the masala seasoning immediately after frying to ensure that the spices adhere to the surface. Adjust the amount of seasoning according to your taste preferences for the perfect flavor balance.
    Serve Immediately: Masala French Fries are best enjoyed hot and fresh out of the fryer. Serve them immediately with your favorite dipping sauce or chutney for maximum enjoyment.

    Suggestions for Serving Masala French Fries:

    Dipping Sauces: Pair Masala French Fries with a variety of dipping sauces such as ketchup, mayo, or spicy sriracha mayo for a burst of flavor.
    Accompaniments: Serve Masala French Fries alongside burgers, sandwiches, or grilled meats for a tasty and satisfying meal.
    Garnishes: Sprinkle chopped cilantro, grated cheese, or a squeeze of lime juice over the fries for an extra pop of flavor and visual appeal.

    Benefits of Enjoying Masala French Fries:

    Satisfying Snack: Masala French Fries are a delicious and satisfying snack that satisfies cravings for something crispy, savory, and spicy.
    Versatile: Masala French Fries can be customized with different spice blends to suit your taste preferences. Experiment with various seasonings to create your own unique flavor profile.
    Quick & Easy: With just a few simple ingredients and basic cooking techniques, Masala French Fries can be whipped up at home in no time, making them a convenient and budget-friendly snack option.

    Variations of Masala French Fries:

    Cheesy Masala Fries: Sprinkle grated cheese over hot fries and masala seasoning, then broil in the oven until the cheese is melted and bubbly for an indulgent twist.

    Tandoori Masala Fries: Toss hot fries in a blend of tandoori masala spices for a bold and flavorful variation inspired by Indian cuisine.

    Barbecue Masala Fries: Drizzle hot fries with barbecue sauce and sprinkle with masala seasoning for a tangy and smoky flavor combination that’s sure to please.

    Crispy French Fries: Incase you aren’t into masala and spicy versions of French fries then you can go for a crispy and simple French fries.

    FAQs (Frequently Asked Questions) about Masala French Fries:

    Q: Can I bake Masala French Fries instead of frying them?

    A: Yes, you can bake Masala French Fries in the oven for a healthier alternative. Simply toss the potato sticks in oil and masala seasoning, then spread them out in a single layer on a baking sheet. Bake at 425°F for 25-30 minutes, flipping halfway through, until crispy and golden brown.

    Q: Can I make Masala French Fries ahead of time?

    A: While Masala French Fries are best enjoyed fresh, you can prepare the seasoning mix in advance and store it in an airtight container until ready to use. Fry the potatoes just before serving for the crispiest results.

    Q: What are some creative ways to use leftover Masala French Fries?

    A: Turn leftover Masala French Fries into a tasty breakfast hash by topping them with diced veggies, and a sprinkle of cheese. Alternatively, chop them up and add them to salads, or wraps for an extra crunch.

    In conclusion, Masala French Fries are a delicious and flavorful twist on the classic French fries, perfect for snacking, entertaining, or indulging in a satisfying meal. With the right ingredients, techniques, and a dash of creativity, you can easily whip up a batch of homemade Masala French Fries that will impress your taste buds and leave you craving more. So, gather your potatoes, spices, and fryer, and get ready to enjoy the irresistible goodness of Masala French Fries!

  • Vegetable Pakoras

    Vegetable Pakora

    Pakoras are an all-time favorite snack in India. They are perfect for a rainy day, and delicious paired with a cup of hot spicy Indian chai. Pakoras are made with a variety of vegetables dipped in a spicy besan (gram flour) batter and deep-fried. This recipe uses potatoes, cauliflower and zucchini.

    • 1 small potato, sliced thin
    • 8 cauliflower sliced
    • 1/2 zucchini, sliced thin
    • 1 cup besan (gram flour)
    • 3 tbsp rice flour (optional)
    • 1 tbsp coriander coarsely ground (dhania)
    • 1 tso cunin seeds (jeera)
    • 2 green chilies chopped
    • 2 tbsp cilantro chopped (hara dhania)
    • 1 tsp salt
    • 3/4 cup water, use as needed
    1. Mix all the dry ingredients together: besan, rice flour, coriander powder, cumin seeds, and salt. Tip: rice flour adds to the crispness.

    2. Add the water slowly to make a smooth batter (batter should be consistency of pancake batter or dosa batter).
    3. Add the green chilies and cilantro. Mix well.
    4. Heat at least one inch of oil in a frying pan over medium high heat. To test, put one drop of batter in the oil. The batter should form a small ball on the surface of the pan, but not change color right away.
    5. Dip the vegetable slices into the batter one at a time, making sure each slice is completely covered by the batter. Then drop the slices slowly into oil in the frying pan.
    6. Fry the pakoras in small batches, three to four minutes per batch. Fry the pakoras, turning occasionally, until both sides are golden brown. Repeat this process for the remaining batches.

    Tips:  If oil is too hot the pakoras will not be crisp; if the oil is not hot enough, the pakoras will be very greasy, make sure when you are putting the pakora in oil, oil should sizzle and pakora slowly float. 

    Variations:  You can use almost any vegetable when making these pakoras, such as eggplant,  cabbage, bell pepper, and different kinds of chilies! Feel free to experiment!

    Serving Suggestions:  The vegetable pakoras are best dipped in a cilantro chutney, tamarind chutney, or sprinkled with chat masala.

    Pakoras taste best when they are served hot.

    You can make the pakoras one day in advance. Do not refrigerate. When ready to eat, place on a cookie sheet and heat in a 300°F oven.

    Leftover pakoras make good sandwiches.

    Appetizer
    Indian

    Crispy and Flavorful Vegetable Pakora

    Vegetable Pakora are crispy and flavorful Indian fritters made with a variety of vegetables coated in a spiced chickpea flour batter. This vegetable pakora recipe is perfect indian appetizers or even a side dish. These pakoras are quick to make and can be enjoyed with your favorite chutneys or sauces.

    The Essence of Vegetable Pakora

    The essence of vegetable pakora lies in their crispiness and the blend of spices used in the batter. A variety of vegetables can be used, making them a versatile and customizable indian snack. The chickpea flour (besan) batter is seasoned with spices such as cumin, coriander, and turmeric, adding to the rich flavor of these Indian vegetable fritters.

    Origin and Popularity

    Pakoras are a popular snack in Indian cuisine, enjoyed across the country in various forms. They are especially loved during the monsoon season, often paired with a cup of hot tea. These vegetable pakoras are a delightful way to enjoy a variety of vegetables, making them a favorite among both adults and children.

    Why You’ll Love This Recipe

    • Crispy and Delicious: The perfect combination of a crispy exterior and flavorful interior.
    • Easy to Make: Simple ingredients and quick preparation.
    • Versatile: Use your favorite vegetables to customize the pakoras.
    • Perfect for Any Occasion: Great as a snack, appetizer, or side dish.

    Variations of Vegetable Dry Recipes

    Exploring Manjula’s Kitchen reveals a treasure trove of other delicious vegetable dry recipes that you might enjoy. Here are some related dishes that you might find interesting:

    Variations of Recipes from Manjula’s Kitchen reveal a treasure trove of other delicious recipes that you might enjoy. Here are some related recipes that you might find interesting:

    1. Methi Thepla: Spiced flatbreads made with fenugreek leaves, ideal for breakfast or as a snack. Recipe: 
    2. Aloo Paratha: Stuffed whole wheat flatbreads filled with a spiced potato mixture, perfect for breakfast or lunch. Recipe: 
    3. Punjabi Kadhi: A tangy yogurt-based curry with gram flour dumplings, seasoned with aromatic spices. Recipe: 
    4. Vegetable Curry: Vegetable curry in color and taste compliment any meal. This is a simple recipe but delicious and filled with flavors. Good way to incorporate a variety of vegetables in your meal.
    5. Besan Puda: Savory gram flour pancakes spiced with herbs and spices, perfect for a nutritious breakfast. Recipe: 

    Explore more delicious recipes on Manjula’s Kitchen

    Serving Suggestions

    Vegetable pakora can be enjoyed in various ways:

    • With Chutneys: Serve with mint chutney, tamarind chutney, or yogurt for a burst of flavor.
    • As a Snack: Perfect for tea-time or as an evening snack.
    • As an Appetizer: Great for parties and gatherings.
    • With Indian Meals: Pair with rice, dal, or any curry for a complete meal.

    Tips and Tricks

    To perfect your vegetable pakora recipe, consider these helpful tips:

    • Use Fresh Vegetables: Fresh vegetables provide the best texture and flavor.
    • Consistent Batter: Ensure the batter is thick enough to coat the vegetables without being too runny.
    • Hot Oil: Fry the pakoras in hot oil to ensure they are crispy and golden brown.
    • Drain Excess Oil: Place the fried pakoras on paper towels to drain any excess oil.

    FAQs

    Can I Bake Pakoras Instead of Frying? 

    Yes, you can bake pakoras in a preheated oven at 375°F (190°C) for about 20-25 minutes, flipping halfway through.

    How Long Do Vegetable Pakoras Last? 

    Vegetable pakoras are best enjoyed fresh, but you can store them in an airtight container in the refrigerator for up to 2 days. Reheat in the oven or on a skillet before serving.

    Is Vegetable Pakora Gluten-Free? 

    Yes, this recipe is naturally gluten-free as it is made with chickpea flour.

    Can I Add Other Vegetables? 

    Yes, you can add any of your favorite vegetables like bell peppers, spinach, or eggplant to the batter.

    What Can I Serve with Vegetable Pakora? 

    Vegetable pakoras pair well with various chutneys, yogurt, or even as a side to a main meal like rice and curry.

  • Khatta Meetha Chivda

    khatta Meetha chivda

    Khatta Meetha chivda is a popular tea time snack. This delicious sweet and salty snack can be enjoyed by all ages. Chivda is a flat rice, also known as poha.

    • 2 cup chivda (or poha available in different thickness, thick, medium, thin or nylon poha, I am using medium)
    • 1/2 cup peanuts
    • 1/2 cup sugar
    • 1/4 tsp turmeric
    • 1/2 tsp salt
    • 1/8 tsp citric acid
    • 1/4 tsp red chili powder
    • About 18 curry leaves
    • Also need oil to fry
    1. Grind sugar, salt, citric acid and red chili powder together making sugar in to powder. And all the ingredients will be mixed evenly. Set aside.
    2. Wash and pet dry curry leaves and let it air dry for at least 10 minutes or more.
    3. In a frying pan take about 1” of oil and heat on medium heat. Oil should be moderately hot. Put about 1/4 cup of chivda in an oil, chivda should come up right away, (otherwise oil is not hot enough) as soon chivda comes up over oil, lower the heat to low and stir fry chivda till it doubles in size but remains white in color. Take out fried chivda in a strainer to drain out excess oil. Repeat the process and fry the remaining chivda.
    4. In the same oil fry peanuts over low heat till they are light brown.
    5. Fry the curry leaves until they are crisp.
    6. Take another frying pan large enough to hold all the ingredients, put I teaspoon of oil in the pan over low heat. put turmeric stir and put chivda, keep mixing till it is mixed well and chivda will be light yellow turn off the heat and let the chivda come to room temperature.
    7. Add peanuts, sugar mix, and crush the curry leaves over. Mix it gently until all the ingredients are incorporated well.

    You can store the Khatta Meetha Chivda, in a air tight container for a month. Store it in an air-tight container and enjoy this scrumptious snack for up to 2 months…!!

    Snack
    Indian

  • Potato Soup

    Potato Soup (Aloo Ki Kadhi)

    Potato soup is very comforting and delicious. At my home this was known as Aloo Ki Kadhi. This soup was served with Puri which is an Indian whole wheat fried bread. Potato Soup is mildly flavored and easy to make.

    • 1/2 potato (boiled, peeled and mashed)
    • 1/2 cup yogurt
    • 1 cup potatoes (boiled peeled and cut into small pieces)
    • 2 Tbsp oil (canola or vegetable oil)
    • 1 tsp cumin seeds (jeera)
    • 1 Tbsp all-purpose flour (maida or plain flour)
    • 1/4 tsp fenugreek seeds (dana mathi)
    • 1/4 tsp black pepper (kali mirch)
    • 1 bay leave (tajpat)
    • 1 dry red chili broken into 2 pieces
    • 2 tsp ginger paste
    • 1 tsp salt
    • 1/4 tsp garam masala
    • 2 Tbsp finely chopped cilantro (hara dhania)
    1. Mix mashed potatoes, yogurt, ginger juice, and black pepper well add about 1 cup of water and make a smooth batter. Set aside.
    2. Heat the oil in a saucepan over medium high heat. Oil should be moderately hot, when you add the cumin seeds they should crack right of way. Add cumin seeds as they crack add fenugreek seeds, and all-purpose flour, stir for 1-2 minutes until all-purpose flour become very light brown.
    3. Add red chili and bay leave, brake in 2 pieces, stir and add yogurt mix and mix it well. Turn the heat to low medium.
    4. Add potatoes and about 2 cups of water and let it cook for about 5 minutes. Stir occasionally. Add salt, garam masala and cilantro, lower the heat to low and let it cook for 2 more minutes.
    5. Adjust the thickness of the soup to your taste.
    6. Potato soup is ready. Enjoy!

    This is best served with Puri (puffed fried bread).

    Soup
    Indian

Exit mobile version