Indian street food is a delightful culinary adventure, filled with vibrant flavors and exciting textures. From crispy indian snacks to tangy chaats, these recipes bring the essence of Indian streets into your kitchen. Let’s explore over 50 Indian street food recipes that are easy to make at home, with a special focus on vegetarian options.
Pani Puri
Pani Puri, also known as Golgappa, is a beloved street food across India. This dish consists of crispy puris filled with spicy, tangy water, tamarind chutney, and a mixture of potatoes and chickpeas. It’s an excellent example of vegetarian Indian street food recipes that offer a burst of flavors in every bite.
Pav Bhaji
Another classic, Pav Bhaji, is a spicy mashed vegetable curry served with buttered pav (bread rolls). This dish is a staple in Indian street food recipes and can be easily made at home. The bhaji is cooked with a blend of spices, giving it a rich and flavorful profile.
Enhancing Your Street Food Menu
To create an authentic street food experience, consider adding a variety of dishes from related categories. Chaat Recipes like Bhel Puri and Sev Puri offer a delightful mix of tangy, sweet, and spicy flavors. For a sweet finish, try Indian Desserts Recipes like Jalebi or Rabri, which complement the savory snacks perfectly. Incorporating Healthy Recipes such as sprouted moong chaat or fruit chaats can provide a nutritious twist to your street food spread.
More Easy Indian Street Food Recipes
Dahi Bhalla
Dahi Bhalla is a refreshing and flavorful dish made with lentil dumplings soaked in yogurt and topped with various chutneys and spices. This dish exemplifies easy Indian street food recipes that are both delicious and light. It’s perfect for a hot summer day or as a starter for any meal.
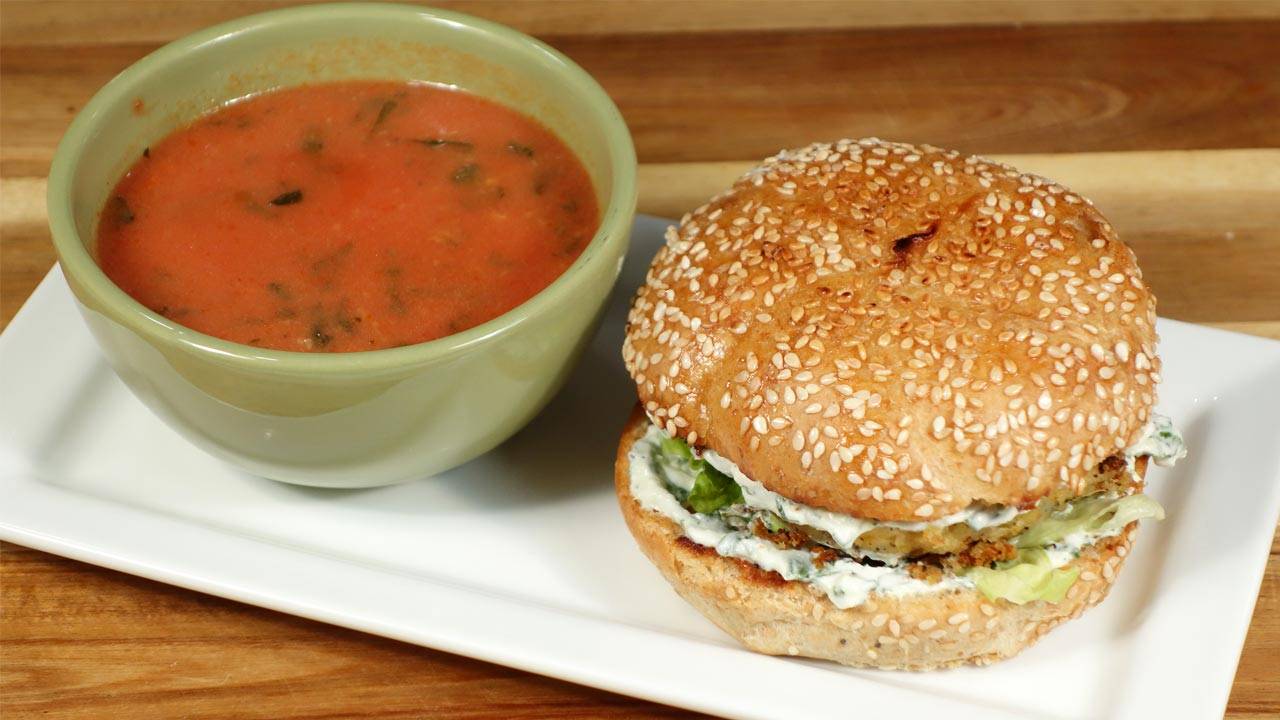
Vada Pav
Vada Pav is often referred to as the Indian burger. It consists of a spicy potato fritter (vada) sandwiched between a bun (pav) with chutneys. This iconic street food from Mumbai is a must-try and falls under street food recipes Indian that are easy to replicate at home.
Sweet and Spicy Endings
Jalebi
Jalebi is a spiral-shaped sweet made from fermented batter, deep-fried, and soaked in sugar syrup. It’s crispy on the outside and juicy on the inside, making it a favorite in Indian street food recipes. Enjoy it warm for the best experience.
Kulfi
For a creamy, cold dessert, Kulfi is the way to go. This traditional Indian ice cream is flavored with cardamom, saffron, and pistachios, offering a rich and indulgent end to your street food meal.
Frequently Asked Questions (FAQs)
Q: What are some popular Indian street food recipes?
A: Some popular Indian street food recipes include Pani Puri, Pav Bhaji, Dahi Bhalla, Vada Pav, Jalebi, and Kulfi. These dishes are full of flavor and bring the essence of Indian streets into your home.
Q: How can I make vegetarian Indian street food recipes at home?
A: To make vegetarian Indian street food recipes at home, use fresh vegetables, a variety of spices, and traditional cooking techniques. Dishes like Pani Puri, Pav Bhaji, and Dahi Bhalla are excellent healthy vegetarian recipes.
Q: What are some easy Indian street food recipes for beginners?
A: Some easy Indian street food recipes for beginners include Vada Pav, Dahi Bhalla, and Jalebi. These recipes are straightforward and don’t require advanced cooking skills, making them perfect for those new to Indian street food.
Q: Can I prepare Indian street food recipes in advance?
A: Yes, many Indian street food recipes can be prepared in advance. For example, you can make the puris for Pani Puri, the bhaji for Pav Bhaji, and the batter for Jalebi ahead of time. Store them properly and assemble when ready to serve.
Q: What are some sweet dishes that pair well with Indian street food?
A: Some sweet dishes that pair well with Indian street food include Jalebi, Rabri, and Kulfi. These desserts provide a sweet contrast to the savory and spicy flavors of the main dishes.
Conclusion
Exploring the world of Indian street food recipes is an exciting journey filled with bold flavors and vibrant aromas. Whether you’re looking for vegetarian Indian street food recipes, specific easy Indian street food recipes, or simply want to recreate the street food magic at home, these dishes will bring joy to your table. So, gather your ingredients, try out these recipes, and enjoy the rich and diverse world of Indian street food. Happy cooking and happy eating!
By incorporating these recipes into your menu, you’ll be able to enjoy a wide variety of delicious and nutritious foods. Whether you’re preparing snacks, main courses, or desserts, there’s a street food recipe Indian to suit every taste. Don’t forget to find vegetarian recipes out Manjula’s Kitchen for more inspiration and culinary delights. Happy cooking and happy eating!
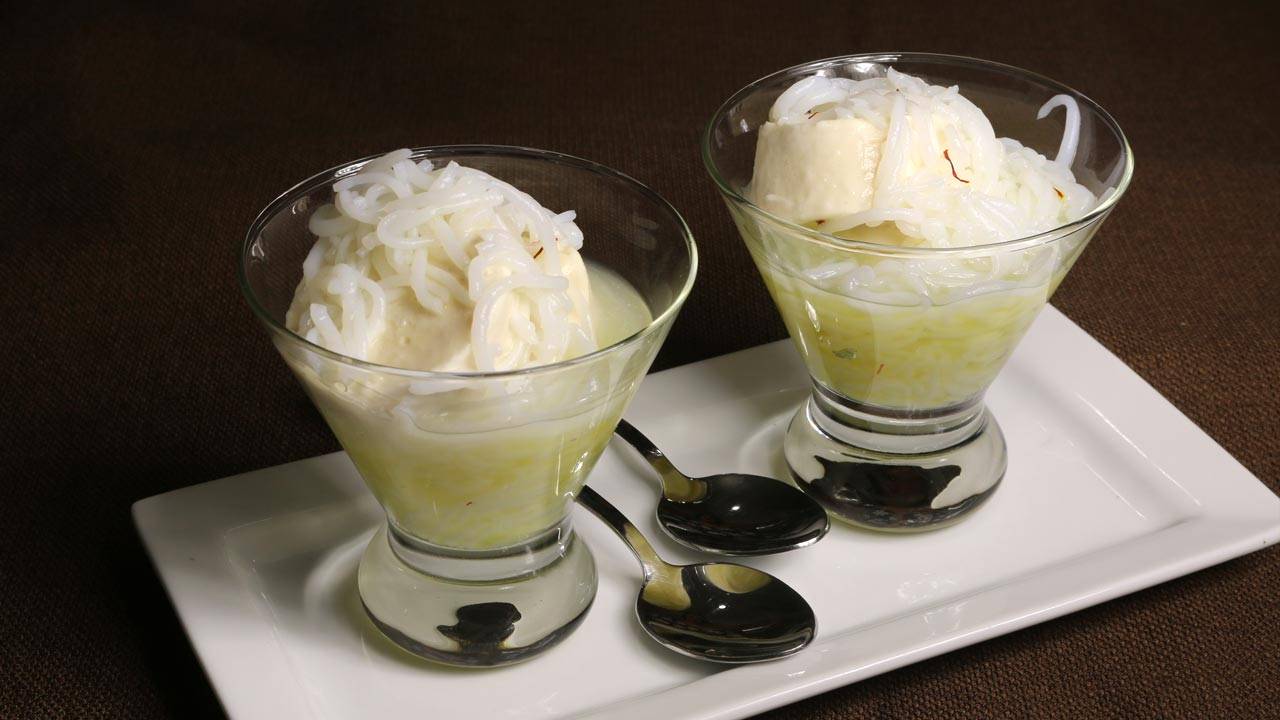
Falooda Kulfi is a refreshing dessert. "Falooda" looks like rice noodles and they are made with cornstarch or arrowroot. "Kulfi" is an Indian ice cream. This is a delicacy with street vendors all over India. One has to experience this delightful dessert to appreciate it. You can also serve Falooda with any ice cream of your choice. Try this recipe to enjoy as one of my favorite summertime treats!
1/2 cup corn starch or arrowroot
2 cup water
1/2 cup sugar
1/4 cup water
12 strings of saffron
1/2 cup kulfi for each serving, check my web site for kulfi recipe
Wide bowl of ice cold water with some ice
For syrup boil sugar, water and saffron together, as it comes to boil turn of the heat and stir the syrup making sure sugar has dissolved. Syrup needs to be chilled before serving, keep it in refrigerator.
Add water to corn starch slowly making sure there is no lumps, batter will look like consistency of milk.
Over low medium heat in a frying pan add the batter and cook stirring continuously till corn starch become translution and consistency of thick batter or soft lumpy dough. This will take about 10-12 minutes. Turn off the heat and remove from stove.
Let the mix cool off little bit and pour the hot mixture into sev maker using fine sev attachment. Press the sev maker over ice cold water, and let the sev string drop into the bowl.
Leave the falooda in ice cold water at least for 2 hours before using.
Falooda will stay good for about a week in refrigerator, but make sure falooda stays in chilled water.
Serving the Falooda Kulfi
Use individual serving bowl, first layer the bowel with falooda, drizzle about 1 tablespoon of syrup. Put the kulfi then over the kulfi put some more faluda and finish off drizzling 1 tablespoon of syrup. Falooda kulfi is ready to serve! This just taste great.
How to make Dal Bati: A Flavorful Rajasthani Specialty
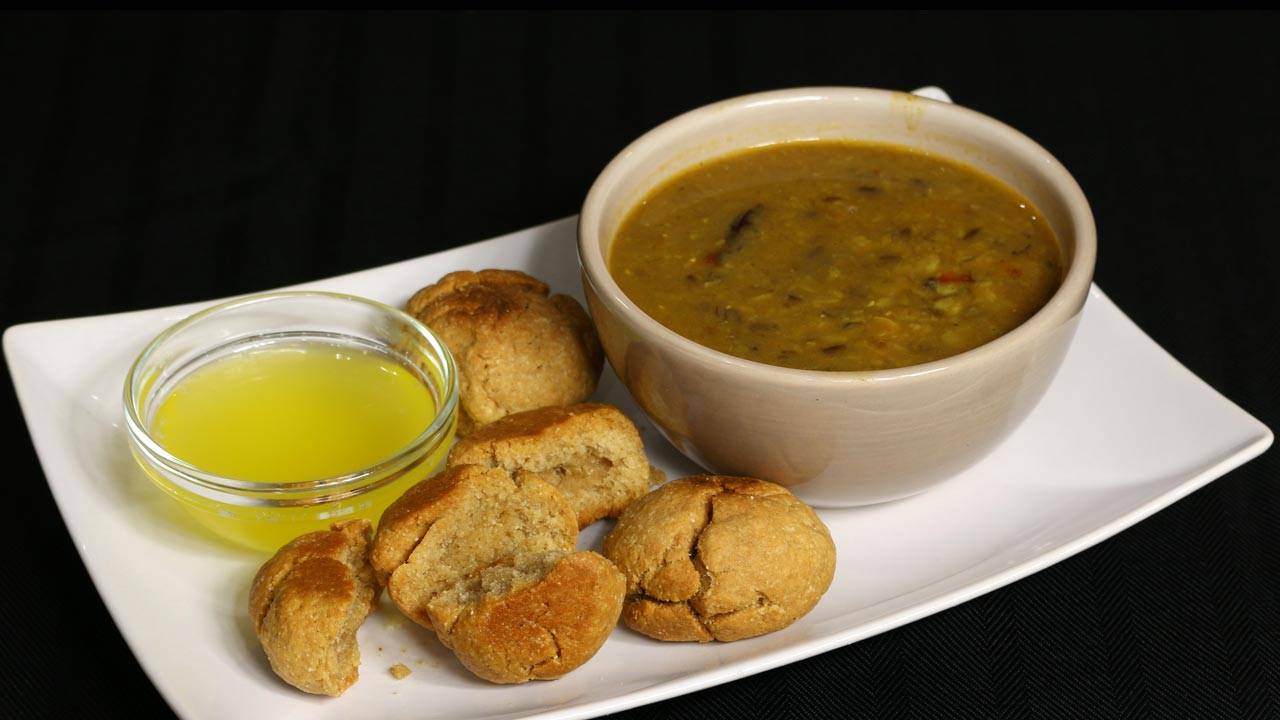
Dal Bati is a quintessential Rajasthani dish that consists of two main components: dal (lentils) and bati (baked wheat flour balls). This dal bati recipe is a beloved vegan culinary delight in Rajasthan, known for its hearty flavors and wholesome ingredients. Served with a side of churma (sweetened crushed wheat) or form of bread, dal bati is a complete meal that offers a perfect balance of savory and sweet flavors, making it a favorite among food enthusiasts.
To prepare the dal, begin by combining all the lentils and thoroughly washing them, changing the water a few times to remove any impurities. Once cleaned, transfer the lentils to a pressure cooker and add four cups of water along with salt, turmeric, coriander powder, and ginger. Place the pressure cooker on medium-high heat and allow it to come to pressure. Once pressurized, reduce the heat to medium and let the dal cook for approximately eight minutes.
After cooking, turn off the heat and allow the pressure to release naturally before opening the cooker. The dal should have a soft and mushy consistency, resembling pourable batter. If needed, adjust the consistency by adding hot water, keeping in mind that the dal will thicken over time. Once cooked, stir in the garam masala and amchoor to enhance the flavors.
For the seasoning, heat ghee in a small saucepan until moderately hot. Add cumin seeds and let them crackle, then add asafetida, red chilies, and red chili powder. Stir the spices for a few seconds, being careful not to burn them. If necessary, add a teaspoon of water to prevent burning. Once the spices are fragrant and well combined, pour the seasoned ghee over the dal mixture.
Stir well to incorporate the flavors and allow the dal to simmer for two to three minutes, allowing the spices to infuse into the dish. Moving on to the preparation of the bati, preheat the oven to 350 degrees Fahrenheit. In a mixing bowl, combine all the dry ingredients including flour, sooji (semolina), salt, and baking soda. Add ghee to the dry ingredients and mix thoroughly with fingers until the mixture resembles coarse crumbs. Gradually add milk as needed to form a firm dough, and knead the dough well to ensure even distribution of ingredients. Let the dough rest for about 10 minutes to allow the gluten to relax.
Divide the dough into eight equal portions and shape each portion into rough balls. The dough balls may have cracks, which is normal and aids in even cooking. Arrange the batis on a cookie sheet, leaving about an inch of space between each one, and place the sheet on the middle rack of the preheated oven. Bake the batis for 25 minutes, then turn them over and bake for an additional 30 minutes or until they are golden brown all around. To ensure they are cooked through, break one bati open from the side.
To serve, break the bati into two pieces and drizzle about a teaspoon of hot melted ghee over each piece. Serve the batis alongside a bowl of hot dal for a comforting and flavorful meal. If the batis were baked earlier and have cooled, reheat them in the oven for about 10 minutes before serving to ensure they are warm and crisp.
Tips for Perfect Dal Bati
Consistency of Bati Dough: Ensure that the bati dough is firm and smooth, as it will help in shaping the batis and prevent them from crumbling during baking.
Baking Temperature and Time: Bake the batis at a moderate temperature until they are golden brown and crispy on the outside, ensuring they are evenly cooked throughout.
Tempering Technique for Dal: Take care while tempering the dal to ensure the spices are well-infused and aromatic, enhancing the flavor of the dish.
Variations of Dal Bati
Stuffed Batis: Add a flavorful stuffing of spiced mashed potatoes or paneer (Indian cottage cheese) inside the batis for an extra burst of flavor and texture.
Sweet Churma: Customize the churma by adding jaggery or gur instead of powdered sugar for a richer and more traditional sweetness.
Benefits of Dal Bati
High in Protein and Fiber: Dal bati is a nutritious meal that provides a good amount of protein and fiber from the lentils and whole wheat flour, promoting satiety and aiding in digestion.
Rich in Essential Nutrients: Packed with essential vitamins, minerals, and antioxidants, dal bati offers a nourishing and wholesome meal option for individuals of all ages.
Frequently Asked Questions (FAQs)
Can I make dal bati without an oven?
Yes, you can cook the batis on a stovetop over an open flame or in a traditional tandoor for authentic flavor and texture.
Can I use different types of lentils for the dal?
Yes, you can use a variety of lentils such as masoor dal, moong dal, or chana dal to prepare the dal according to your preference.
Is Dal Baati a vegetarian dish?
Yes, Dal Baati is a vegetarian dish that’s popular among vegetarians and non-vegetarians alike for its rich flavors and wholesome ingredients.
Explore more delightful Rajasthani recipes on Manjula’s Kitchen, such as Gatte Ki Sabji for another culinary adventure.
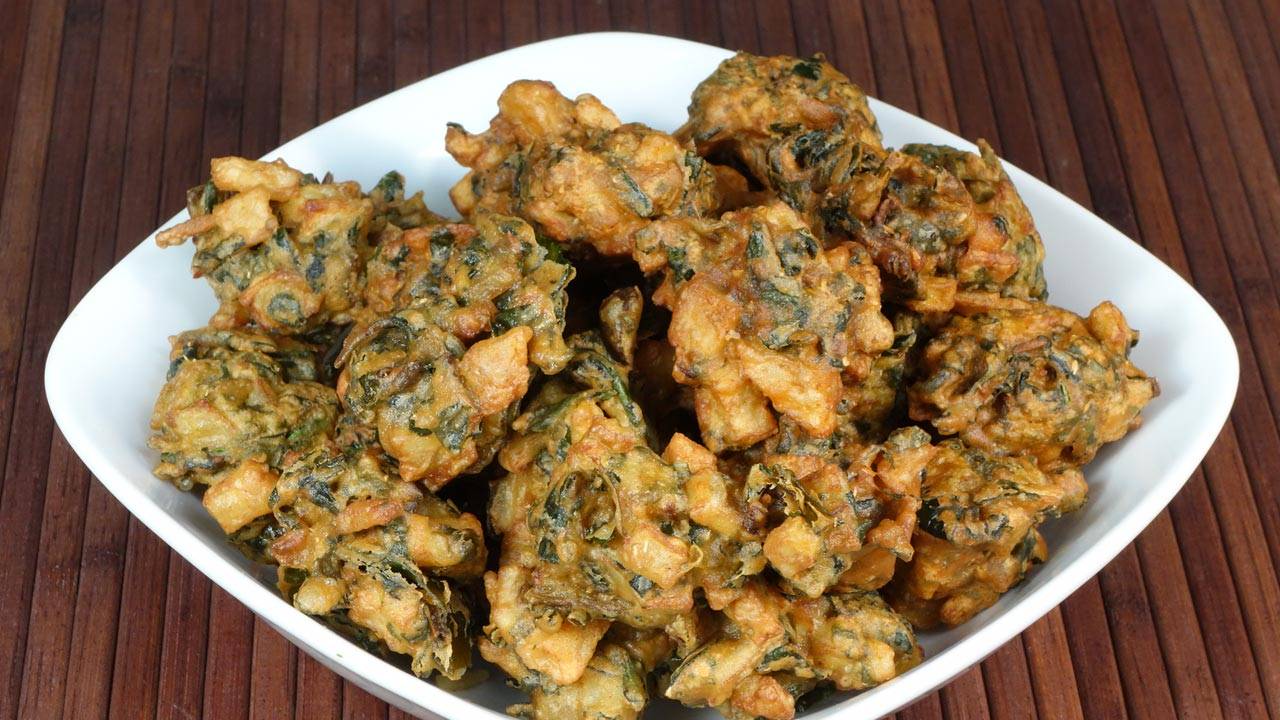
Spinach Potato Pakoras are great as an appetizer, a tasty compliment for your afternoon tea and a spicy delicious snack anytime. They are made with spinach, potatoes, besan and spices and then fried till crispy golden.
2 large potatoes peeled and cubed in small pieces, (will make 2 cups of cubed potatoes)
2 cup packed spinach roughly chopped
2 green chilies finely chopped, adjust to taste
1 cup besan (gram flour, available in Indian grocery stores)
2 tbsp rice flour
1/2 tbsp red pepper, adjust to taste
2 tbsp coriander crushed (dhania)
1 tbsp mango powder (amchoor, available in Indian grocery stores)
1 tbsp cumin seeds (jeera)
2 tbsp salt
¼ tbsp asafetida (hing)
Approx. 2 tbsp of water adjust as needed
Also need oil to fry
Combine all the dry ingredients, besan, rice flour, coriander, cumin seeds, red pepper, salt, mango powder, and asafetida in a bowl. Mix it well.
Add potatoes, spinach, and green chilies into dry mix, mix it well and add water as needed to make soft and sticky dough. When you are ready to fry pakoras mix the veggies with dry ingredients, otherwise spinach and potatoes will leave the water because of salt.
Heat at least one inch of oil in a frying pan over medium high heat. To test, put one drop of batter in the oil. The batter should come up and not change color instantly.
Place about one tablespoon of mix holding with your fingers into the oil. Do not over lap the pakoras.
Fry the pakoras in small batches; this will take three to four minutes per batch. Fry the pakoras, turning occasionally, until both sides are golden brown.
Repeat this process for the remaining batches.
The crispy, delicious pakoras are now ready to serve.
Tips
If the oil is too hot the pakoras will not be crisp; if the oil is not hot enough, the pakoras will be greasy.
Appetizer
Indian
pakora, palak pakora
How to Make Aloo Palak Pakora: A Step-by-Step Guide
Aloo Palak Pakora is a delightful gluten freevegansnack that combines the goodness of spinach (palak) with the earthy flavor of potatoes (aloo), all encased in a crispy, golden-brown batter. This popular appetizer is perfect for rainy days or as a tea-time snack. In this comprehensive guide, we will walk you through the process of making delicious Aloo Palak Pakoras step-by-step.
Preparation and Ingredients for Aloo Palak Pakora
Before diving into the cooking process, it’s essential to gather all the necessary ingredients. For this recipe, you will need fresh spinach leaves, potatoes, chickpea flour (besan), rice flour, cornstarch, green chilies, ginger, cumin seeds, carom seeds (ajwain), salt, and oil for frying. Ensure that the spinach leaves and potatoes are thoroughly washed and dried before use.
Tips for Perfect Aloo Palak Pakoras
To achieve the ideal texture and flavor for your Aloo Palak Pakoras, here are some useful tips:
Use Fresh Ingredients: Fresh spinach and potatoes are key to a vibrant and flavorful dish.
Maintain the Oil Temperature: Keep the oil at a consistent temperature while frying to ensure even cooking and crispy pakoras.
Adjust Spice Levels: Customize the spiciness of the pakoras according to your preference by adding or reducing the amount of green chilies.
Experiment with Seasonings: Feel free to add your favorite spices or herbs to the batter for extra flavor.
Serve Immediately: Aloo Palak Pakoras are best enjoyed hot and crispy, so serve them immediately after frying for the ultimate taste experience.
Variations of Aloo Palak Pakoras
While the classic Aloo Palak Pakora recipe is delicious on its own, you can also experiment with various ingredients and flavors to create unique variations:
Cheese-Stuffed Pakoras: Add a savory twist to your pakoras by stuffing them with cheese before frying.
Paneer Palak Pakoras: Replace potatoes with paneer (Indian cottage cheese) for a rich and creamy texture.
Spicy Mint Chutney: Serve your Aloo Palak Pakoras with a zesty mint chutney for an extra kick of flavor.
Mixed Vegetable Pakoras: Incorporate a variety of vegetables like cauliflower, and bell peppers for a colorful assortment of pakoras.
Gluten-Free Option: Substitute chickpea flour with gluten-free flour for a gluten-free version of this recipe.
Benefits of Aloo Palak Pakoras
Aloo Palak Pakoras not only satisfy your taste buds but also offer several health benefits: (H2)
Rich in Nutrients: Spinach is packed with vitamins, minerals, and antioxidants, while potatoes provide a good source of carbohydrates and potassium.
Boosts Immunity: The combination of spinach and potatoes helps strengthen the immune system and protect against infections.
Digestive Aid: The spices used in the pakora batter, such as cumin and ginger, aid digestion and promote gut health.
Energy Boost: Aloo Palak Pakoras are a satisfying and energizing snack, making them perfect for a quick bite or appetizer.
Easy to Make: With simple ingredients and easy preparation steps, Aloo Palak Pakoras are a convenient snack option for any occasion.
FAQs about Aloo Palak Pakoras
Q: Can I make Aloo Palak Pakoras ahead of time?
A: While Aloo Palak Pakoras are best enjoyed fresh, you can prepare the batter in advance and fry them just before serving to maintain their crispiness.
Q: Can I bake Aloo Palak Pakoras instead of frying them?
A: While frying yields the crispiest results, you can try baking the pakoras in a preheated oven at 400°F (200°C) for approximately 20-25 minutes or until golden brown.
Q: Can I freeze leftover Aloo Palak Pakoras?
A: Yes, you can freeze the leftover pakoras in an airtight container for up to one month. Reheat them in the oven or air fryer until heated through before serving.
Q: Can I use frozen spinach for this recipe?
A: While fresh spinach is preferred for its vibrant flavor and texture, you can use thawed frozen spinach as a substitute if fresh spinach is not available.
Q: What can I serve with Aloo Palak Pakoras?
A: Aloo Palak Pakoras pair well with mint chutney, tamarind chutney, or ketchup. They also make a delicious accompaniment to hot chai or masala tea.
Aloo Palak Pakoras are a delightful and versatile snack that can be enjoyed on any occasion. Whether you’re hosting a party or simply craving a savory treat, these crispy pakoras are sure to impress. With the guidance provided in this step-by-step recipe, you can easily recreate the authentic flavors of Aloo Palak Pakoras in your own kitchen. So gather your ingredients, heat up the oil, and get ready to indulge in the irresistible crunchiness of these delectable snacks. Explore more recipes on Manjula’s Kitchen: Vegetable Samosas, Paneer Tikka, Crispy Spinach Pakoras, Mango Lassi, Masala Chai, Gulab Jamun, Kheer (Rice Pudding)
Spicy Bread Pakora is a popular vegan Indian street foodsnack loved for its crispy exterior and flavorful filling. This spicy bread pakora recipe offers a tantalizing twist to the traditional version, making it a perfect choice for those who enjoy a bit of heat in their appetizers. If you’re wondering how to make spicy bread pakora, look no further! Follow along for a step-by-step guide to creating this delicious treat.
Step 1: Prepare the Filling
To start making spicy bread pakora, prepare the filling mixture. Combine mashed potatoes, finely chopped green chilies, chopped cilantro, grated ginger, garam masala, amchur (dry mango) powder, and salt in a bowl. Mix well to ensure all the ingredients are evenly incorporated. This flavorful filling adds a delightful kick to the bread pakora. If you prefer a milder version, you can adjust the amount of green chilies according to your taste preferences.
Tip: For a variation in filling, you can add crumbled paneer or shredded cheese to the potato mixture for added richness and texture. Check out Manjula’s recipe for Paneer Pakora for inspiration.
Step 2: Prepare the Batter
Next, it’s time to prepare the batter for coating the bread slices. In a separate bowl, combine chickpea flour (besan), rice flour, salt, ajwain (carom seeds), turmeric powder, cumin seeds, and red chili powder. Gradually add water to the dry ingredients while whisking to form a smooth, lump-free batter. The consistency should be thick enough to coat the bread slices evenly. This flavorful batter is what gives spicy bread pakora its signature crunchy coating.
Variation: For a gluten-free option, you can substitute rice flour with cornflour or a gluten-free flour blend. Manjula offers a recipe for Gluten-Free Rice Flour Pakoras that you might find useful.
Step 3: Assemble the Bread Pakoras
Now, it’s time to assemble the spicy bread pakoras. Take a slice of bread and spread a generous amount of the prepared potato filling mixture on one side. Place another slice of bread on top to form a sandwich. Carefully cut the sandwich into desired shapes, such as triangles or rectangles. Dip each sandwich piece into the prepared batter, ensuring it is coated evenly on all sides.
Tip: To enhance the flavor and aroma, you can add a pinch of chaat masala to the batter before dipping the bread slices. Manjula shares her recipe for Chaat Masala, which you can make at home with a blend of aromatic spices.
Step 4: Fry the Pakoras
Heat oil in a deep frying pan over medium heat. Once the oil is hot, carefully place the coated bread pakoras into the oil, making sure not to overcrowd the pan. Fry the pakoras until they turn golden brown and crispy on all sides, flipping them occasionally for even cooking. Once done, remove the pakoras from the oil and drain excess oil on paper towels.
Benefit: While spicy bread pakoras are undoubtedly indulgent and delicious, they are best enjoyed in moderation as a treat due to their deep-fried nature. Pair them with a fresh salad or chutney for a balanced snack.
Step 5: Serve and Enjoy!
Once fried to perfection, serve the spicy bread pakoras hot and crispy alongside your favorite chutney or dipping sauce. They make for a delightful appetizer or tea-time snack, perfect for sharing with friends and family. The combination of crunchy exterior and flavorful filling is sure to tantalize your taste buds and leave you craving for more.
By incorporating these tips and variations, you can elevate the classic bread pakora into a spicy and irresistible snack that’s bound to impress your guests. Check out more appetizer recipes on Manjula’s Kitchen for further culinary inspiration, such as her Vegetable Pakoras or Samosas. Cheers to delicious snacking!
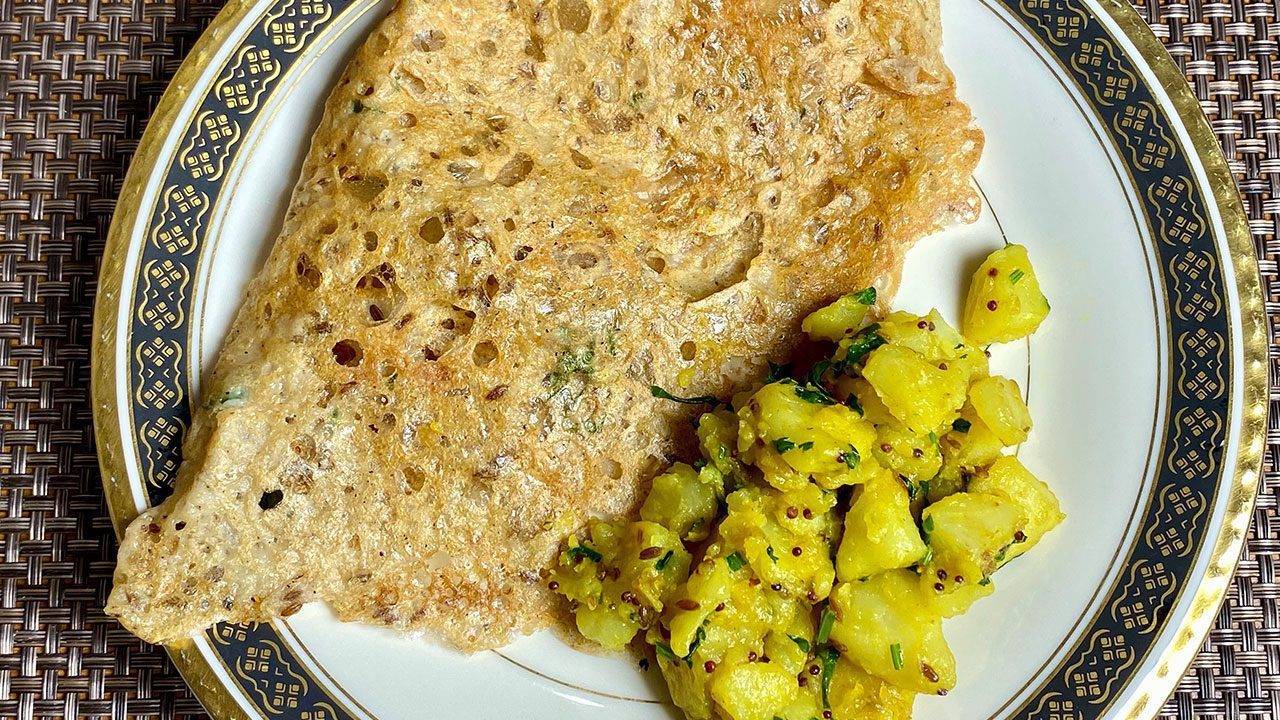
How to make Instant Sorghum Dosa by Manjula’s Kitchen
Dosa is a popular south indian delicacy which looks like a crepe. It’s like a crisp and thin pancake made of rice and urad dal batter. Traditionally Dosa is served with sambar, aloo masala and coconut chutney. It is an Indian crepe made usually through rice batter, but here we have experimented and made many alternative dosa such as Oat Dosa, Besan Dosa, Rava Dosa, Sorghum Dosa. This preparation is using sorghum dosa and is a bread based breakfast recipe that is vegan. The preparation entails skillfully combining pan techniques and manual dexterity to achieve the perfect bread cooked on non-stick skillets.
1. Mixing Dry Ingredients: Crafting the Base for Jowar Dosa
Embark on the journey of creating an Instant Jowar Dosa by combining all the dry ingredients – sorghum flour (Jowar), rice flour, cumin seeds, asafetida, salt, and black pepper. This harmonious blend sets the foundation for a gluten-free and vegan dosa that promises a delightful culinary experience. Ensure the dry ingredients are well-integrated, setting the stage for the dosa batter.
2. Creating the Dosa Batter: Achieving the Perfect Consistency
Gradually add water to the dry mix, creating a thin batter with a pouring consistency akin to buttermilk. The key is to avoid any lumps, ensuring a smooth texture. Let the batter stand for approximately 30 minutes, allowing it to settle and develop optimal flavours. This patient step contributes to the success of your Jowar Dosa, enhancing its taste and texture.
3. Adding Cilantro: Elevating the Flavor Profile of Jowar Dosa
Before transforming the batter into dosas, introduce a burst of freshness by adding cilantro. This step not only enhances the flavor profile but also adds a visual appeal to your Jowar Dosa. Gently mix the cilantro into the batter, ensuring an even distribution of this aromatic herb.
4. Pouring and Cooking Dosa: The Art of Creating Jowar Dosa
Heat the skillet on medium-high, a crucial step before creating your Jowar Dosa. To test the skillet’s readiness, sprinkle a few drops of water – a sizzle should confirm its optimal temperature. Wipe the skillet with a few drops of oil, creating the perfect non-stick surface. With a ladle, pour the batter in a circular motion, starting from the centre, allowing the dosa to take shape naturally. Resist the urge to spread the batter, as Jowar Dosa is intended to have holes, resembling a swiss cheese or possessing a lacy appearance.
5. Drizzling Oil and Flipping Dosa: Achieving the Perfect Golden Brown
Enhance the crispiness and flavour by drizzling a teaspoon of oil around the dosa. Cook the Jowar Dosa over medium heat for about 2 minutes until it attains a golden brown hue. Using a spatula, gently flip the dosa, revealing a light colour on one side and the golden brown perfection on the other. This intricate dance of heat and ingredients results in a thin, crispy, and visually appealing Sorghum Dosa.
6. Serving Your Gluten-Free Creation: Enjoying the Instant Jowar Dosa
Your Instant Jowar Dosa, with its distinctive swiss cheese-like appearance, is now ready to grace your table. Savour the gluten-free and vegan goodness of this delectable creation. While reminiscent of Rava dosa in appearance, the uniqueness of Sorghum Dosa shines through. Thin, crispy, and utterly satisfying, this dosa promises a delightful culinary experience that caters to a diverse range of dietary preferences.
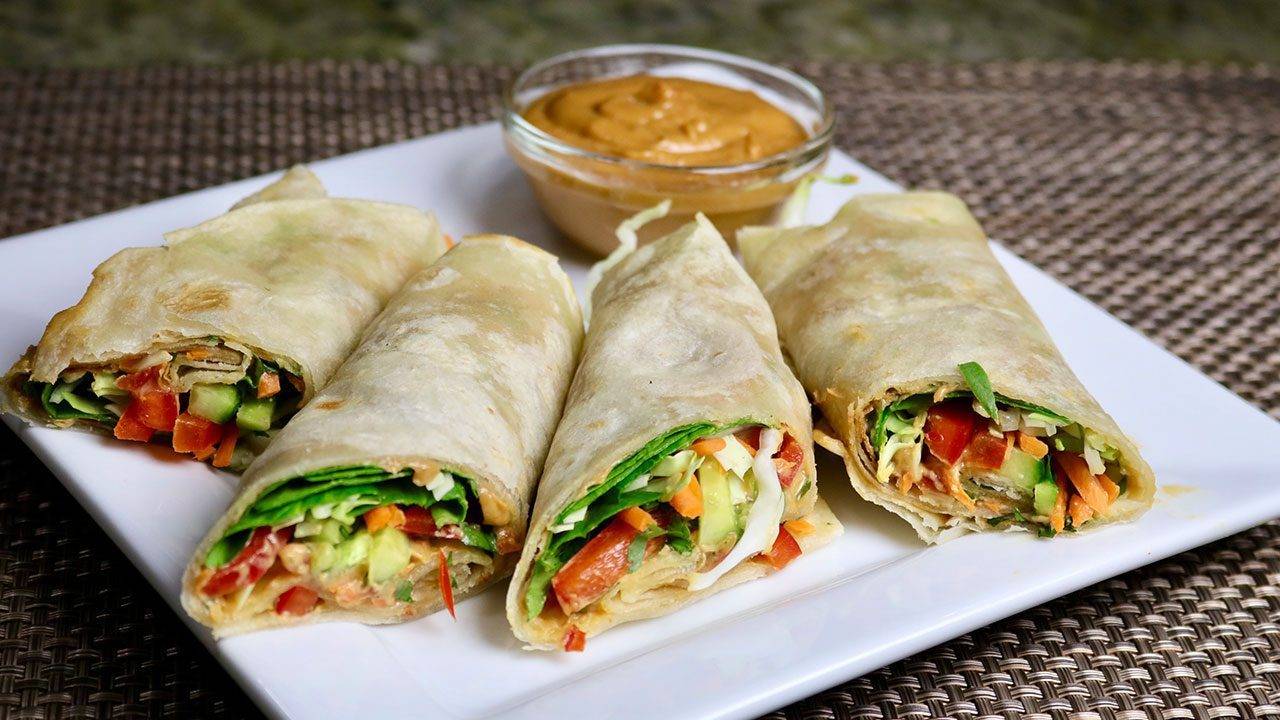
Welcome to our comprehensive recipe for vegetable kathi roll. Whether you’re a seasoned cook or a beginner in the kitchen, this recipe promises to deliver a delicious and satisfying appetizer. Kathi Rolls, a popular street food in India, are versatile and customizable, making them perfect for any occasion.
Paired with our homemade peanut sauce, they are sure to impress your family and friends. In this guide, we’ll walk you through each step of the process, providing clear instructions, helpful tips, and suggestions for variations. Let’s get started!
Step-by-Step Instructions: Preparing the Sauce
To start, let’s prepare the flavorful peanut sauce that will elevate your Kathi Rolls to the next level.
Begin by removing the seeds from the red chili and soaking them in two tablespoons of hot water for a few minutes. This step helps to soften the chili and enhance its flavor.
Once the chili is soaked, blend all the ingredients together in a blender, excluding the peanut butter, soy sauce, ginger juice, sugar, lime juice, and sesame oil. This will create a fragrant and spicy paste.
After blending the spices into a paste, add the peanut butter to the mixture. Be careful not to overblend, as this can cause the peanut butter to release its oil.
Taste the sauce and adjust the salt if necessary. Remember that soy sauce is quite salty, so proceed with caution.
Cooking the Kathi Rolls
Now that the sauce is ready, let’s move on to assembling the Kathi Rolls.
Heat a skillet over medium-high heat and lightly oil the surface. This will prevent the tortillas from sticking.
Once the skillet is hot, place a tortilla on it for about half a minute. You’ll notice the tortilla changing color slightly and puffing up in different places.
Flip the tortilla over and lightly brush it with oil. Repeat this process, flipping the tortilla again and brushing it with oil until it achieves a light golden color on both sides.
Remove the tortilla from the skillet and repeat the process with the remaining tortillas. You can cook the tortillas in advance and set them aside for later use.
Assembling the Kathi Rolls
Now it’s time to assemble the Kathi Rolls with our delicious peanut sauce.
Take one tortilla and lay it flat on a clean surface. Spread approximately two tablespoons of peanut sauce evenly over the tortilla, leaving about half an inch of space around the edges.
In the center of the tortilla, layer the vegetables generously. You can use a combination of spinach, carrots, bell peppers, cucumbers, cabbage, and cilantro for a colorful and nutritious filling.
Once the vegetables are in place, carefully roll the tortilla tightly like a burrito, ensuring that the filling is secure inside.
Repeat this process with the remaining tortillas until all the Kathi Rolls are assembled and ready to serve.
Serving Suggestions
Here are some suggestions for serving your Kathi Rolls with Peanut Sauce:
Serve the rolls with extra peanut sauce on the side for dipping.
Instead of tortillas, you can use leftover Roti or Paratha for a more traditional twist.
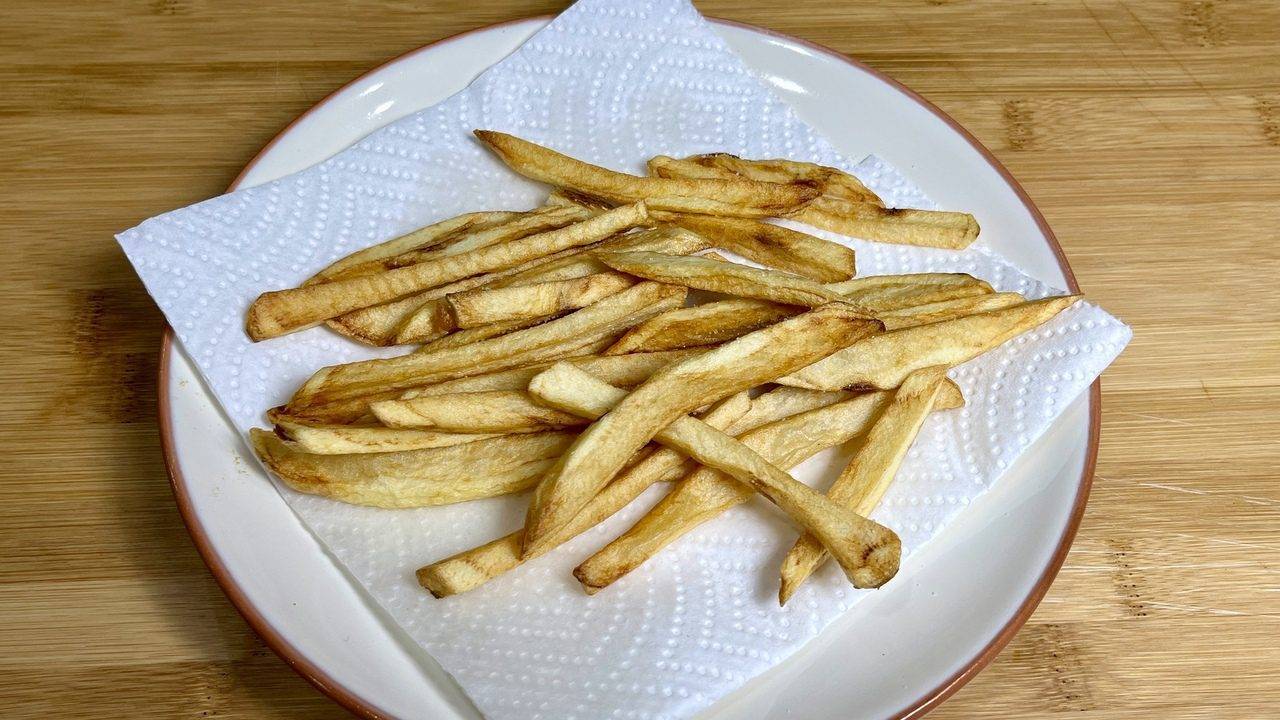
Pair the rolls with a side of vegetable salad, French fries, or a variety of bread for a complete meal.
Notes and Tips
Be mindful not to overblend the peanut butter when preparing the sauce, as it can release its oil and affect the texture.
Adjust the salt level in the sauce according to your preference, keeping in mind the saltiness of the soy sauce.
You can customize the filling of the Kathi Rolls according to your taste preferences. Try addingpaneer, or tofu for added protein.
If you’re preparing the rolls in advance, store them in an airtight container in the refrigerator and reheat them in the oven or microwave before serving for best results.
Frequently Asked Questions (FAQ)
Q: Can I make the peanut sauce ahead of time?
A: Yes, you can prepare the peanut sauce in advance and store it in the refrigerator for up to a week. Just make sure to stir it well before using.
Q: Can I make the Kathi Rolls with gluten-free tortillas?
A: Absolutely! You can use gluten-free tortillas or even lettuce wraps as a substitute for traditional tortillas.
Q: Can I freeze the assembled Kathi Rolls?
A: While it’s possible to freeze the assembled rolls, the texture of the vegetables may change upon thawing. It’s best to assemble the rolls just before serving for the freshest taste.
Benefits of Kathi Rolls with Peanut Sauce
Kathi Rolls are a convenient and portable meal option, perfect for on-the-go lunches or picnics.
The peanut sauce adds a rich and creamy texture to the rolls while providing a good source of protein and healthy fats.
With a variety of vegetables in the filling, Kathi Rolls are a nutritious option that can help you meet your daily intake of vitamins and minerals.
By making your own Kathi Rolls at home, you can control the ingredients and customize them to suit your dietary preferences and restrictions.
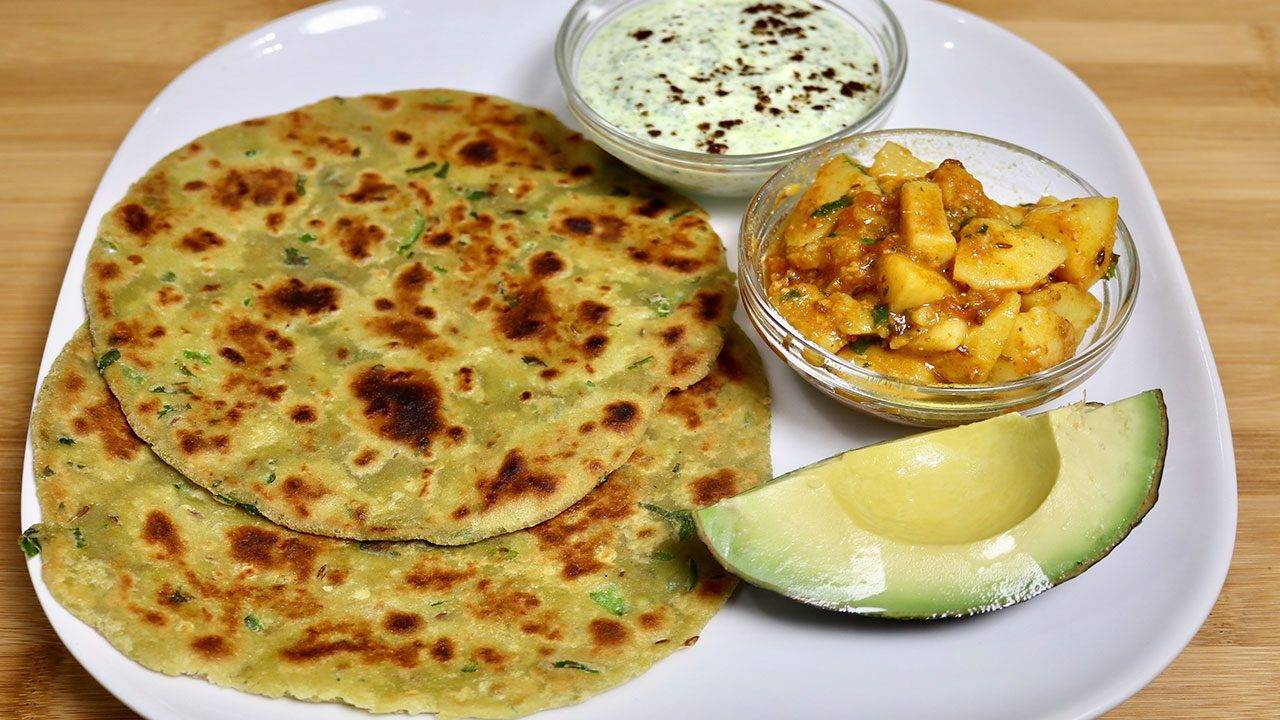
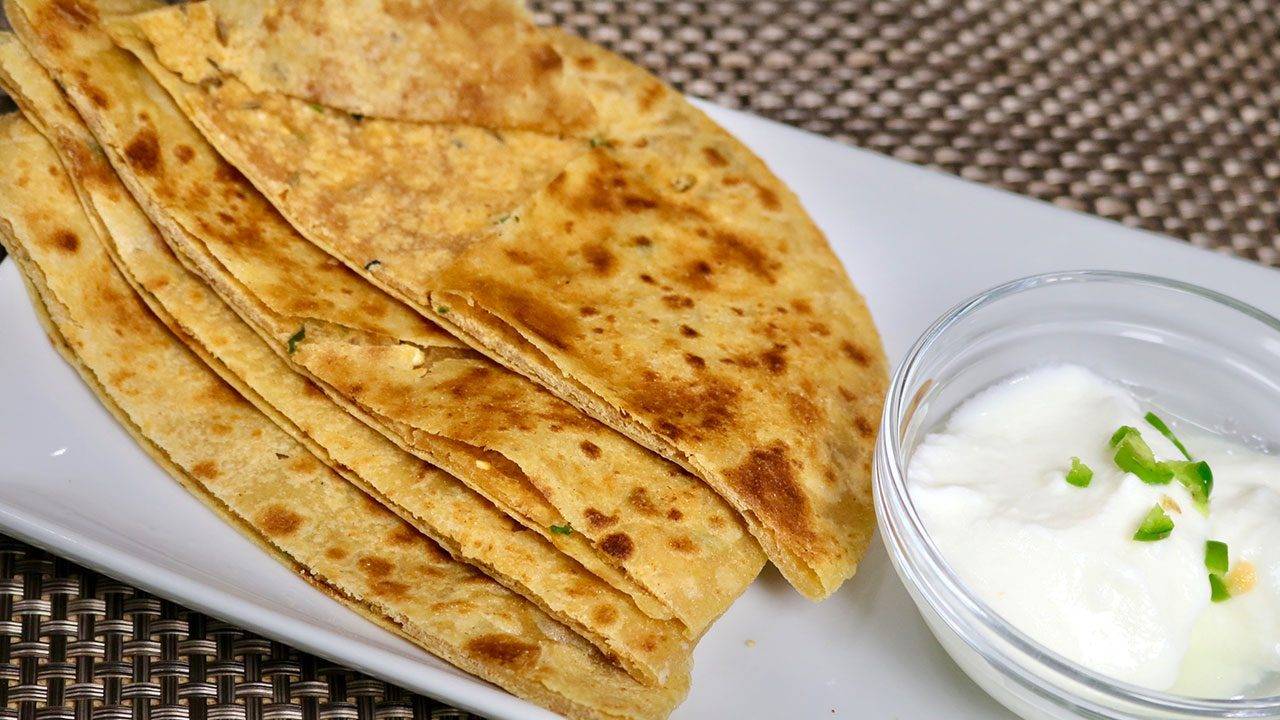
Sattu Paratha, Sattu Ka Paratha is made with spicy sattu filling, sattu is roasted chana flour. This is a popular paratha in state of Bihar. Sattu Paratha is a great breakfast treat and a good lunch box option.
For Dough
1 cup whole wheat flour (roti ka atta)
1 tbsp oil
½ tsp salt
⅓ cup water to make dough (use as needed)
Filling
1 ½ cup sattu, dailya, roasted chana flour
2 tbsp oil
1 ¼ tsp salt
½ tsp cumin seeds (jeera)
1/8 tsp asafetida (hing)
1/8 tsp nigella seeds (kalonji)
½ tsp mango powder (amchoor)
¼ tsp red chili powder
1 tbsp green chili finely chopped
⅓ cup water to make crumbly dough (use as needed)
Also Need
2 tbsp whole wheat flour (to roll the paratha)
2 tbsp oil (to cook the paratha)
Making Dough
Mix flour, salt, and oil add water as needed to make a soft dough. Knead dough for about two minutes on a lightly greased surface to make the dough soft, smooth and pliable. Cover the dough and let the dough rest for at least ten minutes.
Filling
Mix all the filling ingredients together, sattu, salt, asafetida, cumin seeds, kalonji, mango powder and green chili, well. Add water as needed to bind all the ingredients together. Use just enough water, it should hold everything together.
Making Paratha
Divide the dough and filling into six equal parts and form into balls. Filling balls will be little bigger than dough.
Roll dough into a 3” circle. Place a filling in the center. Pull the edges of the dough to wrap it around the sattu filling. Repeat to make all six balls. Let the filled balls settle three to four minutes.
Meanwhile heat a heavy skillet on medium high heat until moderately hot. To test, sprinkle water on the skillet. If the water sizzles right away, the skillet is ready.
Press the filled ball lightly on dry whole wheat flour from both sides. Using a rolling pin, roll the balls lightly to make six-inch circles, keeping the sealed side up. If the dough sticks to the rolling pin or rolling surface, lightly dust the parathas with dry flour.
Place the paratha on the skillet. When the paratha starts to change color and begins to puff up, flip it over. You will notice some golden-brown spots.
After a few seconds, drizzle one teaspoon of oil over the paratha. Flip the paratha again and lightly press the puffed areas with a spatula.
Flip again and press with a spatula making sure the paratha is golden-brown from both sides. Repeat for the remaining parathas. Paratha are best served hot and crispy.
Parathas can be kept at room temperature for up to two days wrapped in aluminum foil or in a covered container. For later use, parathas can be refrigerated three to four days or frozen for up to a month. Re-heat using a skillet or oven.
The difference between besan and sattu because they both look about the same. The difference being that whereas besan is the flour of raw gram, and sattu is the flour of the roasted gram. Roasting the besan it is not same as the flour of roasted chana. Sattu is also high in protein.
Breakfast, Main Course
Indian
Sattu Paratha: A Nutritious and Flavorful Stuffed Flatbread
Sattu Paratha is a traditional Indian flatbread stuffed with a filling made from sattu, which is roasted gram flour. This nutritious and flavorful dish is popular in the states of Bihar, Jharkhand, and Uttar Pradesh, where it is enjoyed as a wholesome breakfast, lunch, or dinner option.
Sattu, the main ingredient in Sattu Paratha, is known for its high protein and fiber content, making it a healthy and satisfying choice.
Benefits of Sattu Paratha:
High in Protein: Sattu, the roasted gram flour filling used in Sattu Paratha, is rich in protein, making it an excellent source of plant-based protein for vegetarians and vegans. Protein is essential for muscle repair and growth, as well as for supporting overall bodily functions.
Rich in Fibre: Sattu is also high in dietary fiber, which aids in digestion, promotes satiety, and helps regulate blood sugar levels. Fiber-rich foods like Sattu Paratha can help prevent constipation, reduce the risk of chronic diseases, and support weight management.
Vitamins and Minerals: Sattu contains essential vitamins and minerals such as iron, calcium, magnesium, and B vitamins, which are important for maintaining overall health and well-being.
Variations of Sattu Paratha:
Spicy Sattu Paratha: Add chopped green chilies, ginger, and spices such as cumin powder, coriander powder, and garam masala to the Sattu filling to create a spicy version of Sattu Paratha. Spicy Sattu Paratha is flavorful and aromatic, with a kick of heat that’s perfect for spice lovers.
Vegetable Sattu Paratha: Mix grated vegetables such as tomatoes, carrots, and spinach into the Sattu filling to create a nutritious and colorful Vegetable Sattu Paratha. The addition of vegetables adds texture, flavor, and extra nutrients to the paratha, making it a wholesome meal option.
Paneer Sattu Paratha: Combine crumbled paneer (Indian cottage cheese) with Sattu to create a rich and creamy Paneer Sattu Paratha. Paneer adds a soft and creamy texture to the filling, while Sattu provides protein and fiber, making it a filling and satisfying option for vegetarians.
Sweet Sattu Paratha: For a sweet twist on Sattu Paratha, mix Sattu with jaggery (unrefined cane sugar), chopped nuts, and spices such as cardamom and nutmeg to create a sweet filling. Sweet Sattu Paratha is a delicious dessert or snack option that’s sure to satisfy your sweet tooth.
Tips for Making Perfect Sattu Paratha:
Use Fresh Sattu: Use freshly roasted and ground Sattu for the best flavor and texture in Sattu Paratha. You can either roast the gram flour at home or purchase ready-made Sattu from the store. Fresh Sattu has a nutty aroma and a rich flavor that enhances the taste of the paratha.
Roll the Parathas Thin: Roll out the dough for Sattu Paratha into thin discs to ensure even cooking and a flaky texture. Use a rolling pin and a dusting of flour to roll the dough evenly without sticking. Aim for a thickness similar to that of a tortilla or chapati.
Cook on Medium Heat: Cook the Sattu Parathas on a hot griddle or tawa over medium heat to ensure they cook through evenly without burning. Brush the parathas with ghee or oil on both sides while cooking to enhance the flavor and achieve a golden-brown color.
FAQs about Sattu Paratha:
Can I make Sattu Paratha gluten-free?
Yes, you can make gluten-free Sattu Paratha by using gluten-free flours such as chickpea flour (besan) or sorghum flour (jowar) for the dough. Ensure that the Sattu filling and any additional ingredients are also gluten-free.
Is Sattu Paratha suitable for weight loss?
Yes, Sattu Paratha can be a suitable option for weight loss when included as part of a balanced diet. Sattu is low in calories and high in protein and fiber, which can help keep you feeling full and satisfied for longer, reducing the likelihood of overeating.
Can I freeze Sattu Paratha dough?
Yes, you can freeze Sattu Paratha dough for future use. Divide the dough into portions, wrap them tightly in plastic wrap or aluminum foil, and store them in an airtight container or freezer bag. Thaw the dough in the refrigerator overnight before rolling and cooking.
What can I serve with Sattu Paratha?
Sattu Paratha pairs well with a variety of accompaniments such as yogurt, pickle, chutney, or raita (yogurt dip). You can also serve Sattu Paratha with dal (lentil curry), vegetable curry, or salad for a complete and satisfying meal.
In conclusion, Sattu Paratha is a nutritious and flavorful Indian flatbread that’s perfect for any meal of the day. Whether enjoyed for breakfast, lunch, or dinner, Sattu Paratha offers a delicious combination of protein, fibre, and essential nutrients that’s sure to keep you feeling satisfied and energized. With its versatile filling options, simple preparation, and wholesome ingredients, Sattu Paratha is a must-try dish for anyone looking to explore the diverse flavors of Indian cuisine.
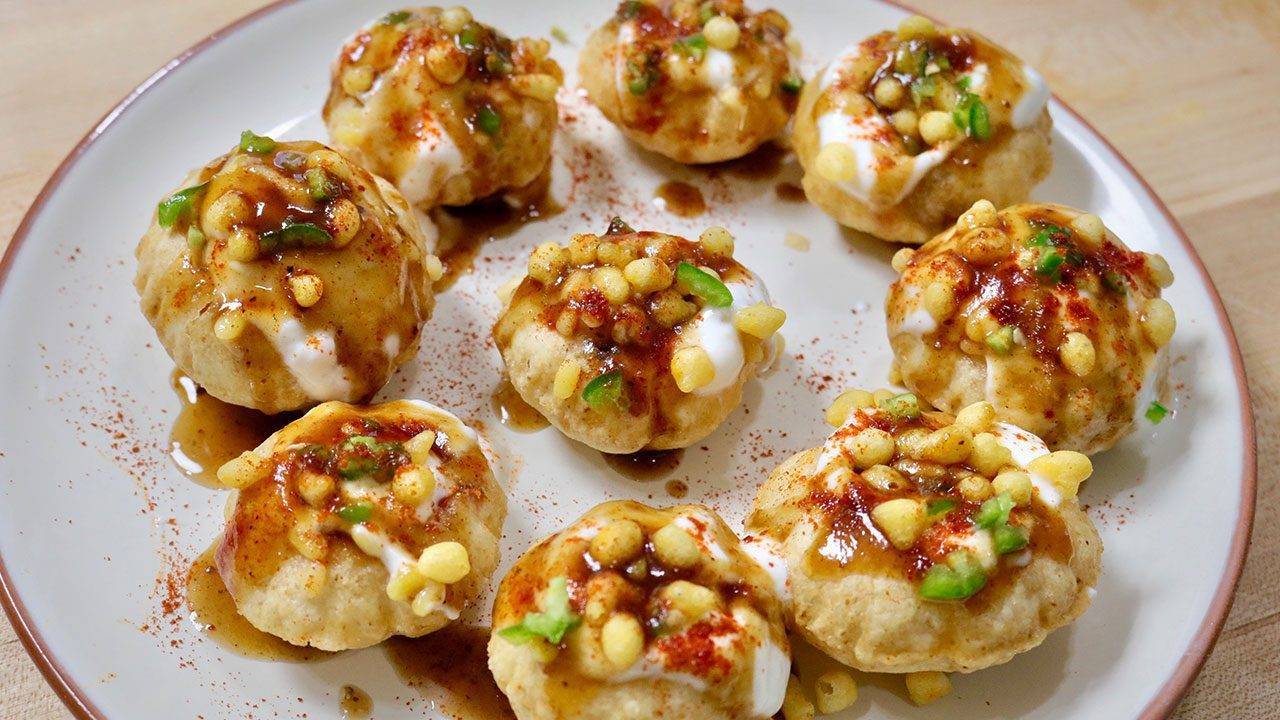
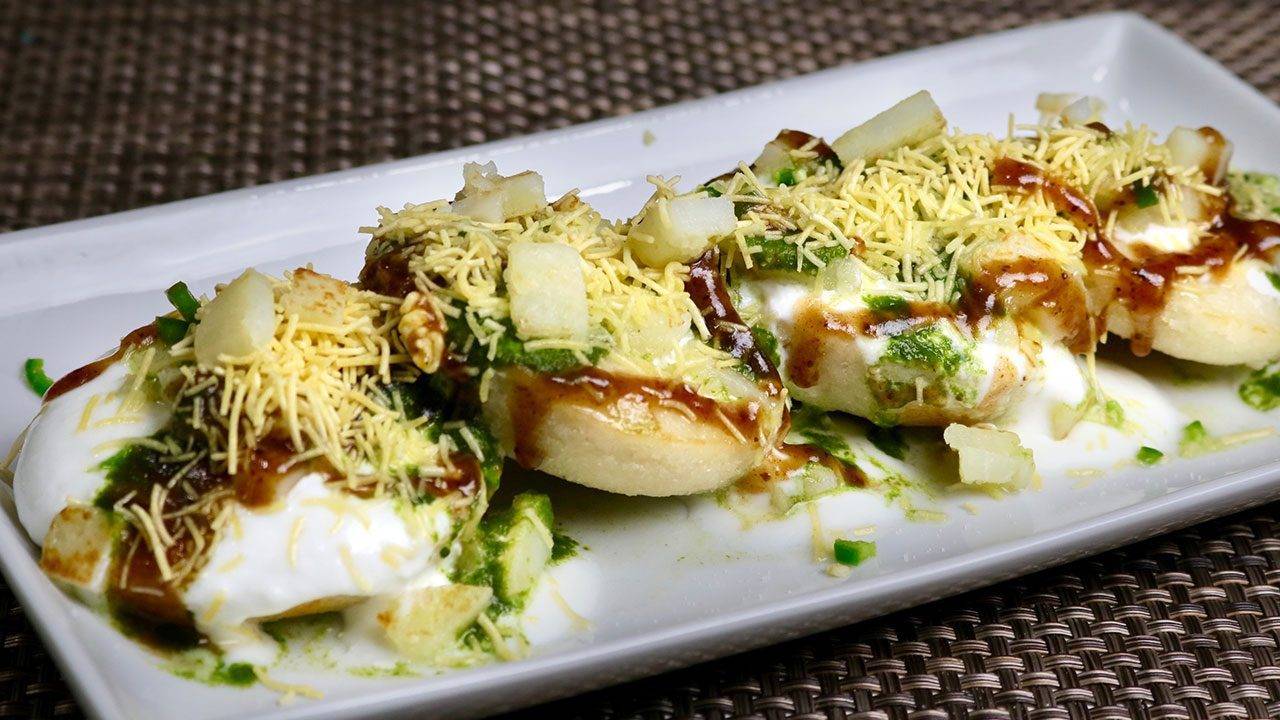
Dahi Puri is a very commonly found Indian street food! I have been wanting to do this recipe for my channel for quite some time, but I wanted to put my own twist on it. After experimenting with different fillings, I was finally able to come up with a combination that my family approved of – ahealthy and delicious salad style filling.
16 crispy puffed puries golgpa (available in India grocery store)
Filling
½ cup yellow moong dal
½ cup potatoes (boiled peeled and cut into small pieces)
½ cup tomatoes (chopped in small pieces)
½ cup cucumber (chopped in small pieces)
1 tbsp green chili (finely chopped)
1 tsp ginger (finely chopped)
½ tsp salt
½ tsp roasted cumin seed powder
1 tsp lemon juice
For Garnishing
1 cup yogurt (whipped)
¼ cup tamarind chutney (find the recipe on web site)
1 tbsp soy sauce
¼ cup boondi
1 tbsp green chili (finely chopped)
¼ tsp red chili powder
Spread the puries on microwave safe plate and microwave for about 20 seconds, this will make the puries crispier and give the freshness. Set aside.
Wash moong dal changing water 3-4 times and boil it in 2 cups of water over low medium heat until dal is very soft and tender but not mushy.
After dal is at room temperature mix all the filling ingredients together, dal, potatoes, tomatoes, cucumber, green chili, ginger, salt, cumin powder, lemon juice
Assemble Dahi Puri
Whip the yogurt and add the water as needed to make it consistency of thick batter.
Mix tamarind sauce and soy sauce together.
First make a hole with you thumb center of the golgapa, fill with 1 tablespoon of filling. drizzle with yogurt tamarind chutney, few pieces of green chili, and few boondi, red chili powder and drizzle some more tamarind chutney.
Assemble Dahi Puries just before serving. You can have every thing ready day before.
Filling also can be served as salad.
Dahi Puri with salad like filling is very light and refreshing.
I have done the recipe for Tamarind Chutney Before. you will also like to see some other easy chaat recipes, like Bread Dahi Vada, Aloo Chana Chaat, Sabudana Bhel.
Appetizer, Snack
Indian
Appetizer, Party Food, Street Food, Tea Time Snack
Introduction to Dahi Puri Chaat
Dahi puri chaat is a beloved Indian street food that tantalizes taste buds with its burst of flavors and textures. Dahi puri chaat combines crispy puris (hollow fried bread), tangy yogurt, spicy chutneys, and various toppings to create a harmonious symphony of sweet, sour, and savory flavors. Dahi Puri Chaat, a delightful combination of crispy puris filled with tangy yogurt, savory chutneys, and fresh toppings, embodies the essence of appetizers, chaat, quick & easysnacks, street food recipes, and summer delights.
This delightful snack is perfect for any occasion, whether it’s a casual evening at home or a festive gathering with friends and family. In this article, we will explore the recipe for dahi puri chaat, offering step-by-step guidance on how to recreate this iconic dish in your own kitchen.
Step 1: Prepare the Ingredients
Before diving into the preparation process, it’s essential to gather all the necessary ingredients. The key components include puris (hollow fried bread), yogurt, tamarind chutney, green chutney, boiled potatoes, sprouted mung beans, and sev (crunchy chickpea flour noodles). You can easily find these ingredients at your local Indian grocery store or prepare them at home using basic pantry staples. For those who prefer a spicy kick, finely chopped green chilies can be added to the mix. Once you have all the ingredients assembled, you’re ready to embark on your dahi puri chaat recipe journey.
Step 2: Prepare the Yogurt Mixture
The recipe for dahi puri chaat hinges on the creamy and tangy yogurt mixture that serves as the base for this delectable snack. To prepare the yogurt mixture, whisk together fresh yogurt, sugar, and a pinch of salt until smooth and creamy. Adjust the sweetness and tanginess according to your preference by adding more sugar or lemon juice as needed. The yogurt mixture should have a velvety texture that coats the back of a spoon. Once prepared, set aside the yogurt mixture while you assemble the remaining components of the chaat.
Step 3: Assemble the Dahi Puri Chaat
Now comes the fun part – assembling the dahi puri chaat! Start by gently tapping a hole in the center of each puri to create a cavity for the fillings. Place a spoonful of boiled potatoes and sprouted mung beans inside each puri, followed by a generous dollop of the prepared yogurt mixture. Drizzle tamarind chutney and green chutney over the yogurt, ensuring a balanced distribution of sweet and spicy flavors. Top off the chaat with a generous sprinkle of sev and finely chopped cilantro for added crunch and freshness. Repeat this process for each puri until all are assembled and ready to be devoured.
Step 4: Serve and Enjoy
Once assembled, dahi puri chaat should be served immediately to preserve its crispiness and freshness. Arrange the chaat on a serving platter and garnish with additional sev and cilantro for visual appeal. Encourage your guests to dig in and savor the explosion of flavors with each bite. Whether enjoyed as a standalone snack or as part of a larger meal, dahi puri chaat is sure to be a crowd-pleaser that leaves everyone craving for more.
Tips for Perfect Dahi Puri Chaat
To enhance the flavor profile of the dahi puri chaat recipe, consider adding finely tomatoes, and grated carrots as additional toppings.
For a healthier twist, opt for baked puris instead of fried ones. You can find baked puris at specialty grocery stores or make them at home using whole wheat flour.
Experiment with different chutney variations to customize the flavor profile of the chaat. Mango chutney, mint chutney are excellent options to explore.
For a refreshing twist, add a handful of pomegranate arils to the chaat for bursts of juicy sweetness.
If you’re short on time, you can prepare the components of the chaat in advance and assemble them just before serving to ensure maximum freshness and crunchiness.
Variations of Dahi Puri Chaat
Ragda Puri Chaat: Replace the boiled potatoes and sprouted mung beans with ragda (spiced yellow peas) for a heartier version of dahi puri chaat.
Bhel Puri Chaat: Substitute puris with crispy puffed rice (bhel) and toss them with chopped vegetables, chutneys, and spices for a crunchy and flavorful snack.
Papdi Chaat: Swap puris with bite-sized pieces of papdi (crispy fried dough) and layer them with yogurt, chutneys, and toppings for a delicious twist on the classic chaat.
Benefits of Dahi Puri Chaat
Rich in Flavor: Dahi puri chaat is bursting with a myriad of flavors, ranging from tangy and spicy to sweet and savory, making it a delight for the taste buds.
Nutrient-Rich: This iconic street food is packed with essential nutrients from various ingredients such as yogurt, sprouted mung beans, and vegetables, offering a wholesome snacking option.
Easy to Customize: With endless possibilities for customization, dahi puri chaat can be tailored to suit individual preferences and dietary restrictions, making it suitable for all palates.
FAQs (Frequently Asked Questions)
Can I make dahi puri chaat in advance?
While it’s best to assemble dahi puri chaat just before serving to maintain its crispiness, you can prepare the individual components such as yogurt mixture, chutneys, and toppings in advance and store them separately in the refrigerator.
Can I use store-bought puris for this recipe?
Yes, you can use store-bought puris for convenience. However, if you prefer homemade puris, you can find recipes online or explore Manjula’s Kitchen for a step-by-step guide.
How long does dahi puri chaat stay fresh?
Dahi puri chaat is best enjoyed immediately after assembly to prevent the puris from becoming soggy. If you have leftovers, store them in an airtight container in the refrigerator and consume them within a day for the best taste and texture.
Can I make this recipe vegan-friendly?
Yes, you can make dahi puri chaat vegan-friendly by using dairy-free yogurt and omitting any dairy-based toppings such as sev. You can also explore Manjula’s Kitchen for vegan alternatives and recipes.
By following this comprehensive guide, you can master the art of making dahi puri chaat at home and impress your friends and family with this flavorful and indulgent street food favorite. Don’t forget to explore more tantalizing recipes on Manjula’s Kitchen, ranging from appetizers and beverages to desserts, to elevate your culinary repertoire and embark on a gastronomic adventure.
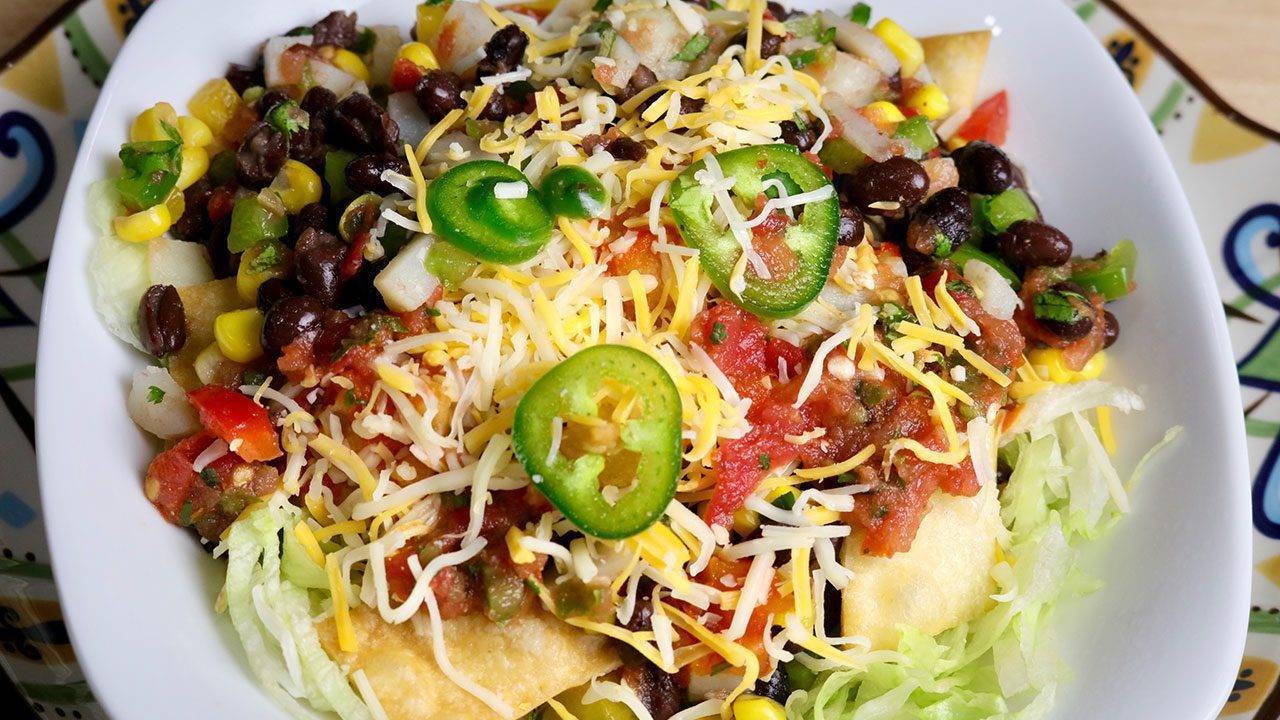
Mexican Bhel! Today I will be making a twist on classic street food Bhel Puri. Bhel Puri is a popular Mumbai roadside snack. To make this dish unique and interesting I am using all classic Mexican ingredients – such as tortilla chips, salsa, Mexican cheese and more! Mexican Bhel Puri can be served as a snack or light lunch for your next get together.
For Chips
2 flour tortillas (8 inch, uncooked)
For The Bean Mix
15 oz can black beans (drained and rinsed)
1 cup potato (boiled peeled and finely diced)
1 cup bell pepper (finely diced, I am using mix of different colors)
½ cup frozen corn (thaw and pat dry)
1 tbsp jalapeño (finely diced)
2 tbsp cilantro (finely chopped)
2 tsp lime juice
½ tsp salt
For Salsa
2 cup tomatoes (chopped)
¼ cup cilantro (chopped)
1 jalapeño (chopped)
½ tsp salt
½ tsp cumin seed powder
For Hot Sauce
10 dry whole red chilies
½ cup tomatoes (roughly chopped)
½ tsp salt
½ tsp cumin seed powder
For Serving
1 ½ cup lettuce (thinly sliced)
1 jalapeño (thinly sliced)
¼ cup shredded Mexican blended cheeses (cheddar/Monterey)
For Bean Mixture
Toss all the ingredients together, beans, potatoes, bell peppers, corn, cilantro, jalapeno, salt, cilantro, and lemon juice , and set aside.
For Tortilla Chips
Cut the tortillas into 1/2-inch square to use as the "papdi". Heat the oil in frying pan oil should be about 1/2-inch-deep, on medium high heat. Fry the tortillas until they are light golden brown.
For Hot Sauce
Boil the chilies in about 1 cup of water, till they are soft and tender. If needed add more water. Blend all the ingredients together, tomatoes, chilies, salt and cumin seed powder. make it into paste.
For Salsa
Blend all the ingredients tomatoes, cilantro, jalapeno, salt and cumin seeds powder, making into chunky.
Assembling
Spread lettuce in the bowl, put the bean mix over, spread some chips, cheese some taco sauce. I will leave on individual how much they want to add the hot sauce.
The bean mixture can be made two days ahead (just don’t add the taco sauce)
The taco sauce and hot sauce also can be made two days ahead and refrigerate until needed.
The fried tortillas can be prepared few days before and kept in an airtight container.
also try Mexican Rice and Vegetarian Enchilada
Snack
Fusion
Mexican Bhel Recipe: Introduction to Mexican Bhel Recipe
Mexican bhel is a delightful fusion dish that combines the flavors of Mexican cuisine with the crunch and zest of Indian street food. This Mexican bhel recipe offers a unique twist on the traditional Indian bhel puri by incorporating ingredients like beans, potatoes, bell peppers, corn, and jalapenos, along with classic Mexican spices and flavors. It’s a perfect appetizer or snack for gatherings or parties, offering a burst of flavors and textures in every bite.
Preparing the Bean Mixture
Start by preparing the bean mixture. In a large mixing bowl, toss together the black beans, diced potatoes, bell peppers, corn kernels, chopped cilantro, finely chopped jalapeno, salt, cilantro, and lemon juice. Ensure all the ingredients are evenly coated with the lemon juice and salt mixture, as it helps to enhance the flavors.
Preparing the Tortilla Chips
Next, let’s make tortilla chips. Cut the flour tortillas into 1/2-inch squares to use as the base for our Mexican bhel. Heat oil in a frying pan until it’s about 1/2-inch-deep, over medium-high heat. Fry the tortilla squares until they turn light golden brown and crisp. Remove them from the oil and drain them on paper towels to remove excess oil.
Preparing the Hot Sauce
For those who like an extra kick of heat, let’s make the hot sauce. Boil the chilies in about 1 cup of water until they are soft and tender. If needed, you can add more water to ensure the chilies are fully cooked. Once they are soft, blend all the ingredients together, including tomatoes, chilies, salt, and cumin seed powder, to make it into a smooth paste. This hot sauce will add a fiery flavor to your Mexican bhel.
Preparing the Salsa
No Mexican-inspired dish is complete without salsa. Let’s prepare a chunky salsa to add freshness and tanginess to our Mexican bhel. Blend together tomatoes, cilantro, jalapeno, salt, and cumin seeds powder, ensuring it remains chunky in texture. This salsa will complement the other flavors in the bhel and add a refreshing contrast.
Assembling the Mexican Bhel
Now, let’s assemble our Mexican bhel. Start by spreading lettuce leaves in a serving bowl. This creates a crisp and fresh base for our bhel. Then, layer the bean mixture over the lettuce, ensuring an even distribution of all the colorful ingredients. Sprinkle some fried tortilla chips over the bean mixture to add crunch and texture. Top it off with grated cheese for a creamy and indulgent touch. Drizzle some taco sauce over the bhel to add a burst of flavor.
For those who enjoy an extra kick of spice, serve the hot sauce on the side, allowing individuals to add it according to their preference. This customizable aspect adds an element of fun to the dish, as everyone can adjust the spice level to suit their taste buds.
Tips for Making Mexican Bhel
To save time, you can use canned beans instead of cooking them from scratch. Just make sure to rinse them thoroughly before using to remove excess salt.
Feel free to customize the bean mixture by adding other ingredients like diced avocado, black olives for added flavor and texture.
For a healthier alternative, you can bake the tortilla chips instead of frying them. Simply brush the tortilla squares with a little oil and bake them in a preheated oven until crispy.
Adjust the spice level of the hot sauce according to your preference by adding more or fewer chilies.
You can make a large batch of the bean mixture and store it in the refrigerator for up to two days, making it a convenient option for meal prep or quick snacks.
Variations of Mexican Bhel
Vegetarian Variation: Omit the cheese and use vegan-friendly ingredients to make this dish suitable for vegetarians.
Grilled Variation: Instead of frying the tortilla chips, you can grill them for a smoky flavor. Simply brush the tortilla squares with oil and grill them until crispy.
Benefits of Mexican Bhel
Packed with nutrients from the variety of vegetables and beans, this Mexican bhel is a wholesome and nutritious snack option.
It offers a burst of flavors and textures, making it a satisfying dish to all.
The customizable nature of this recipe allows individuals to tailor it according to their taste preferences, making it suitable for gatherings and parties with diverse palates.
By incorporating ingredients like beans and vegetables, this Mexican bhel is a great way to add more plant-based protein and fiber to your diet.
FAQs about Mexican Bhel
Q: Can I make this dish ahead of time?
A: Yes, you can prepare the bean mixture, tortilla chips, hot sauce, and salsa ahead of time and assemble the Mexican bhel just before serving to maintain the crunchiness of the chips.
Q: Can I adjust the spiciness of the dish?
A: Absolutely! You can control the heat level by adjusting the amount of jalapeno peppers used in the bean mixture and hot sauce. You can also remove the seeds from the jalapenos for a milder flavor.
Q: Is there a gluten-free option for this recipe?
A: Yes, you can use gluten-free corn tortillas instead of flour tortillas to make the chips, ensuring the entire dish is gluten-free.
Q: Can I make a larger batch of hot sauce and salsa for future use?
A: Definitely! You can prepare a larger batch of hot sauce and salsa and store them in airtight containers in the refrigerator for up to a week. Just give them a good stir before using.
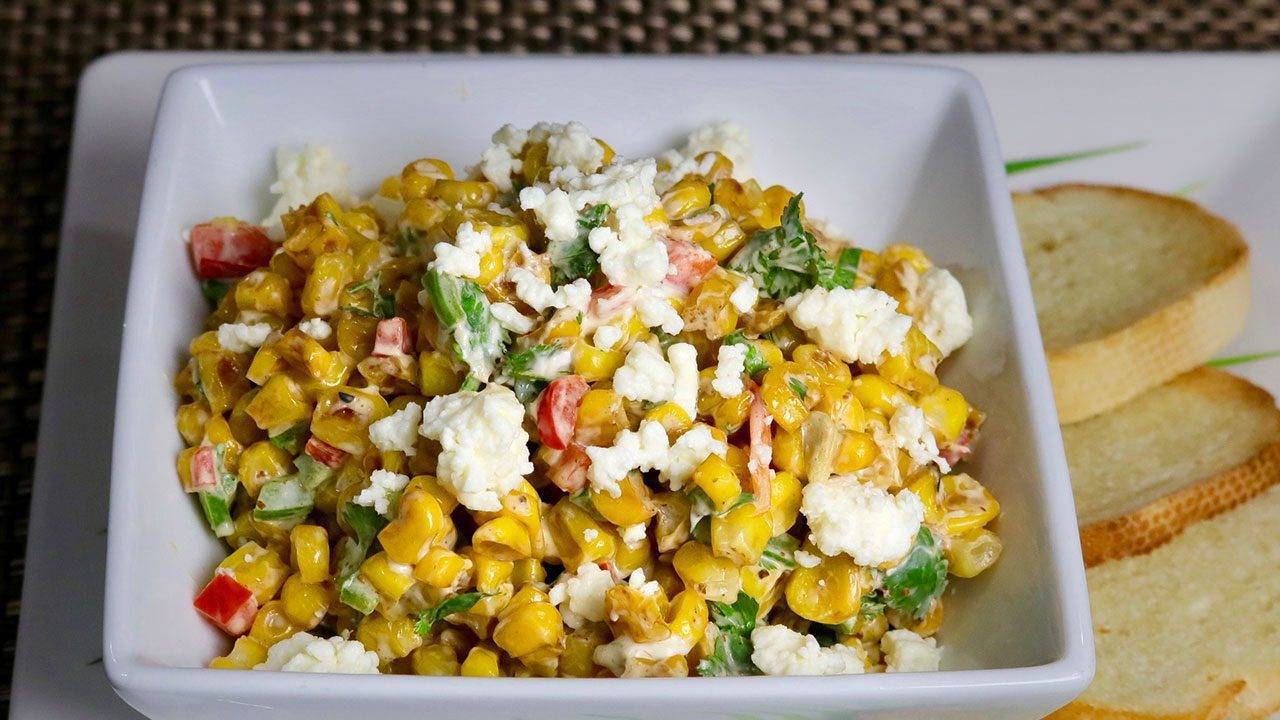
Spicy Corn is a very enjoyable snack and not only that, but this is a quick and easy recipe to make. Make it as spicy or as mild as your heart desires. Best of all, you can also serve this as a side dish. Enjoy the spicy corn for a beautiful picnic or outdoor get together. You can also serve this over crisp slices of bread.
2 cup corn kernels (I am using frozen corn, you can use fresh)
1 tsp oil
½ tsp salt
½ tsp cumin seeds (roasted, bhuna jeera)
2 tbsp cilantro (finely chopped)
1 tbsp green chili (finely chopped, adjust to taste)
2 tbsp red bell pepper (finely chopped)
1 tsp lemon juice
¼ cup cream cheese (soft)
For Garnishing
¼ cup feta cheese
Use the flat bottom-heavy frying pan, lightly oil it and heat over medium high heat, put the corn kernels and stir fry for 4-5 minutes stirring continuously. While stir frying kernels will be getting some light and some dark brown color, some of the kernels will pop like you are grilling.
Turn off the heat, and add salt, cumin seed powder, cilantro, green chili, red bell pepper, lemon juice, and cream cheese mix it well. Sprinkle feta cheese.
Spicy corn taste best when it is served warm but can be served at room temperature.
Spicy Corn works great for picnic or outdoor get together. Also try Aloo Poori, Lemonade, or Watermelon Cooler
IdliChaat is a tasty twist to traditional South Indian Idli. This can be served as an appetizer or an afternoon snack. It's quick and easy to make, with the perfect savory flavors! Try this recipe today and you will be satisfied with a great dish!
6 Idlies
1/2 cup potatoes (boiled peeled and cut into small pieces)
2 Tbsp oil
1/2 tsp salt
1 Tbsp green chili (finely chopped)
2/3 cup yogurt whipped (dahi,curd)
3 Tbsp hari cilantro chutney
3 Tbsp tamarind chutney
1/4 cup fine sev
I am using store bought frozen idlies or you can also use left over idlies. Make sure though frozen idlies to bring to room temperature.
Whip the yogurt until smooth. Add a little milk as needed to make the pourable consistency.
Heat 2 tablespoons of oil in a pan and arrange the idle do not overlap them. Cooked the idlis over medium heat, turn them about 3-4 time, till they are light golden brown both sides. This should take about 4 minutes.
Transfer them on a plate and stir-fry the potatoes in the same pan sprinkling the 1/4 teaspoon of salt. Stir-fry the potatoes till they start getting light golden color this should take about 2 minutes.
Serving the Idli Chaat
Arrange the idlies in a serving plate, sprinkle remaining salt ¼ teaspoon. Put ½ the potatoes drizzle the yogurt, cilantro chutney and tamarind chutney. Garnish with green chilies and fine sev.
Notes
You can slice the idli in about 6 pieces and stir fry. This is another delicious way to serve to serve left over idlies.
You will also enjoy Dahi Vada, and Bhel Puri. Links for Cilantro Chutney and tamarind Chutney
Snack
Indian
Idli Chaat Recipe: A Delicious Twist to a Classic Dish
Idli Chaat is a delightful fusion of traditional South Indian idlis with a twist of chaat-inspired flavors, creating a quick and easysnack that tantalizes the taste buds with its irresistible appetizers. Idli chaat is a delightful fusion dish that combines the traditional South Indian snack of idli with the flavors of chaat, a popular street food in India. This unique blend of textures and flavors creates a mouthwatering experience that is sure to please your taste buds. In this article, we’ll explore how to make idli chaat at home, step by step.
Step 1: Preparing the Idlis
To begin making idli chaat, you’ll need freshly steamed idlis. If you don’t have idlis ready, you can prepare them using your favorite idli batter recipe. Once the idlis are steamed to perfection, allow them to cool slightly before proceeding to the next step.
Step 2: Cutting the Idlis
Once the idlis have cooled down, cut them into bite-sized pieces. This step helps to create a perfect base for the chaat toppings and ensures that each bite is filled with flavor.
Step 3: Assembling the Dahi Idli Chaat
Now comes the fun part – assembling the dahi idli chaat! Take the cut idli pieces and arrange them on a serving plate. Next, generously drizzle them with creamy yogurt, ensuring that each piece is well-coated. This adds a refreshing tanginess to the dish.
Step 4: Adding Toppings
Now, it’s time to add the toppings that will take your idli chaat to the next level. You can get creative with your toppings, but some classic choices include tomatoes, and cilantro. For an extra kick of flavor, sprinkle some chaat masala and roasted cumin powder on top.
Step 5: Garnishing
To finish off your dahi idli chaat, garnish it with a handful of nylon sev and a drizzle of tangy tamarind chutney. These final touches not only add visual appeal but also enhance the overall taste of the dish.
Tips for Making the Perfect Idli Chaat
Use freshly steamed idlis for the best texture and flavor.
Be generous with the yogurt and toppings to ensure every bite is bursting with taste.
Experiment with different toppings and garnishes to customize the chaat according to your references.
Variations of Idli Chaat
For a spicy twist, add some finely chopped green chilies or a dash of red chili powder.
Instead of yogurt, you can use whipped cream or sour cream for a different flavor profile.
Try adding some boiled chickpeas or sprouts for added protein and texture.
Benefits of Idli Chaat
Idli chaat is a nutritious dish that provides a good balance of carbohydrates, protein, and vitamins.
It’s a great way to use leftover idlis and turn them into a delicious snack or appetizer.
The probiotics in yogurt make this dish beneficial for gut health.
FAQs (Frequently Asked Questions)
Q: Can I use store-bought idlis for this recipe?
A: Yes, you can certainly use store-bought idlis if you’re short on time. However, freshly steamed idlis will yield the best results in terms of flavor and texture.
Q: Can I make idli chaat in advance?
A: While it’s best enjoyed fresh, you can prepare the components of idli chaat in advance and assemble them just before serving to prevent the idlis from becoming soggy.
Q: Is idli chaat spicy?
A: The level of spiciness can be adjusted according to your preference. You can make it as spicy or as mild as you like by controlling the amount of green chilies or chili powder you use.
Idli Chaat is a delightful dish that brings together the best of both worlds – the comforting flavors of idli and the exciting taste of chaat. With just a few simple ingredients, you can create a dish that is sure to impress your family and friends. So why not give this recipe a try and experience the deliciousness of idli chaat for yourself?