Indian Snacks: Flavorful and Irresistible Bites
Indian snacks are known for their diverse flavors, textures, and ingredients. These Indian snacks are perfect for any occasion, whether you’re hosting a party, looking for a healthy option, or simply craving something delicious. Let’s explore some popular Indian snacks recipes that you can easily prepare at home. Popular Indian Snacks Samosas Samosas are classic Indian snacks made with a crispy pastry filled with a spiced potato and pea mixture. These snacks are perfect for parties and gatherings, offering a flavorful bite that everyone loves. Samosas are a staple in Indian snacks for party menus and are known for their satisfying crunch. It’s a famous north indian food recipes Pakoras Pakoras are delicious fritters made by dipping vegetables like potatoes, or spinach in a seasoned gram flour batter and deep-frying them until golden brown. These snacks Indian style are perfect for rainy days or festive occasions. Pakoras are a favorite in easy indian recipes and are loved for their crispy texture. Bhel Puri Bhel Puri is a popular street food recipes made with puffed rice, sev, vegetables, and tangy tamarind chutney. This healthy Indian snack is light and refreshing, making it a great option for a quick and tasty bite. Bhel Puri is one of the best indian dishes which is a staple in Indian vegetarian snacks for party menus and is known for its delightful mix of flavors and textures. Aloo Tikki Aloo Tikki is a savory potato patty made with mashed potatoes, spices, and herbs, shallow-fried to perfection. This Indian snack is often served with chutneys and yogurt, making it a hit at any gathering. Aloo Tikki is an excellent addition to your collection of Indian snacks recipes. It’s one of the most popular Indian street food recipes. Dhokla Dhokla is a steamed cake made from fermented rice and chickpea batter, known for its light and fluffy texture. This healthy Indian snack is typically garnished with mustard seeds, curry leaves, and grated coconut. Dhokla is perfect for breakfast or as a snack and is a popular choice in easy recipes for snacks. Enhancing Your Snack Experience
To enhance your snack experience, consider exploring related categories that complement these Indian snacks. Adding Indian desserts like gulab jamun and jalebi can provide a sweet ending to your snack time. Incorporating healthy Indian recipes like roasted nuts and fruit chaat can offer lighter options for your guests. Hosting a large gathering?
The popular party recipe category is filled with dishes that are sure to impress your guests and make your celebration memorable. Including easy Indian recipes like dal makhani or biryani can add a touch of authenticity to your meal. Frequently Asked Questions (FAQs) Q: What are some popular Indian snacks recipes?
A: Some popular Indian snacks recipes include Samosas, Pakoras, Bhel Puri, Aloo Tikki, and Dhokla. Q: How can I make easy recipes for snacks at home?
A: To make easy recipes for snacks at home, try dishes like Pakoras and Dhokla. These recipes are simple to prepare and require minimal ingredients. Q: What are some healthy Indian snacks?
A: Some healthy Indian snacks include Dhokla and Bhel Puri. These dishes are nutritious and offer a great way to enjoy snacks without excess calories. Q: Can I prepare Indian snacks for the party in advance?
A: Yes, many Indian snacks for a party can be prepared in advance. Prepare the components ahead of time and assemble the snacks just before serving to ensure freshness. Q: What are some traditional Indian recipes to serve with snacks?
A: Some traditional Indian recipes to serve with snacks include Samosas, Pakoras, and Chutneys. These dishes pair perfectly with snacks, adding balance and flavor to the meal. Conclusion Indian snacks are a delightful way to enjoy flavorful and versatile bites. Whether you’re looking for easy recipes for snacks or healthy options, these dishes will bring joy and satisfaction to your table. So, gather your ingredients, try out these Indian snacks recipes, and create unforgettable snacks with your loved ones. Don’t forget to find vegetarian recipes related categories for more delightful recipes from Manjula’s Kitchen!
By incorporating these snack dishes into your culinary repertoire, you’ll be able to enjoy a wide variety of delicious and nutritious foods. Whether you’re looking for a quick snack, a party favorite, or a healthy option, there’s an Indian snack recipe to suit every taste. Happy cooking!
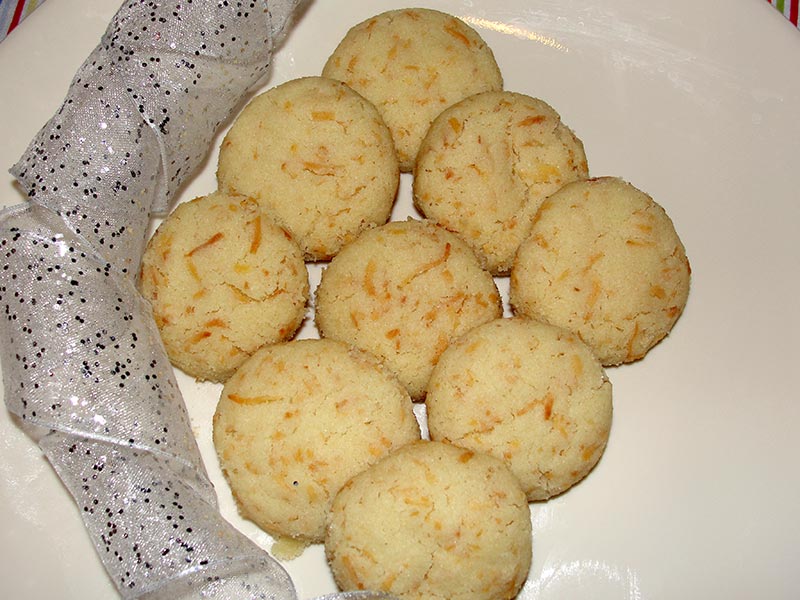
This is one of my mom's cherished recipes, known for being quick and easy to make. My brothers and I used to whip these up when we were in elementary school. If I had to rename them, I'd call them "Quick Cookies" because they truly live up to the name. They take about 3 minutes to prepare and 15 minutes to bake. Another great aspect of this recipe is that it's vegan-friendly, as it's entirely egg-less. These cookies are perfect for anyone looking for a speedy, egg-less treat.
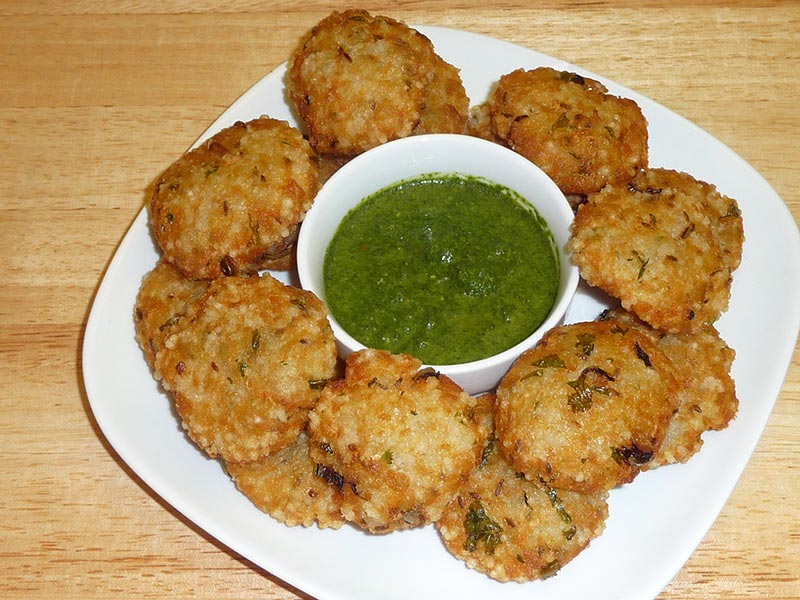
Sabudana Vada (Fried Dumplings of Potatoes and Tapioca)
Sabudana Vada is a delicious snack with a great texture. It is crunchy on the outside and soft inside. This can satisfy just about anybody, even those on a gluten-free diet. This recipe is completely gluten free.
Approximately 2 tablespoons finely chopped cilantro (hara dhania)
1 teaspoon lemon juice
Oil to fry
Instructions
Method
Wash the tapioca and soak it in 3 cups of water for 3 to 4 hours.
Drain the water. After soaking, the tapioca will have increased in volume, by about 2 times. Set aside.
Par-boil the potatoes, so they are only half-cooked. Insert a knife into the potato to ensure that it is still somewhat firm.
Cool the potatoes, then peel and grate them using a vegetable grater.
Mix all the ingredients together. The dough will be a little sticky and soft in consistency.
Divide the potato dough into 16 parts.
Roll each one into a smooth patty. You will need to lightly oil your palms to prevent the dough from sticking.
Heat the oil in a frying pan on medium high heat. There should be at least 1½ inches of oil in the frying pan. To check if the oil is ready, drop a small piece of dough into the oil. The dough should rise to the surface, and not change its color immediately.
Slowly drop the patties into the frying pan.
Fry the vada until both sides are golden brown. Turn them occasionally. It will take approx. 4 to 5 minutes to cook.
Remove the vada and place over a paper towel so the excess oil is absorbed.
Sabudana vada should be crunchy on the outside and soft inside.
Serve them as is or with cilantro or tamarind chutney.
Notes
TipThe frying oil needs to be sufficiently hot, or else the Vadas will turn out greasy and may break into pieces while cooking.Serving suggestions
Sabudana Vadas are best served with cilantro chutney or tamarind chutney as a dip.
Vadas taste best when they are served hot.
Sabudana Vadas can be made one day in advance and stored at room temperature. Do not refrigerate. When ready to serve, place on a cookie sheet and heat in the oven at 300 degrees till warm.
Sabudana Vada, a popular snack especially during Navaratri and Ganesh Chaturthi celebrations, is a gluten-free and veganappetizer commonly enjoyed as a delightful treat during festivals like Krishna Janmashtami, offering a crunchy texture and savory flavor to those seeking gluten-free and vegan snack options. Sabudana Vada is a beloved snack in Indian cuisine, especially popular during festivals and fasting periods.
Sabudana vada is essentially fried dumplings made from potatoes and tapioca pearls. It’s a delightful blend of flavors and textures, crispy on the outside and soft on the inside. This sabudana vada recipe is not only delicious but also relatively simple to make, requiring just a few basic ingredients commonly found in Indian households.
Let’s delve into the process of how to make sabudana vada and explore some tips, variations, benefits, and frequently asked questions regarding this classic snack.
Tips for Perfect Sabudana Vada
Soak Sabudana Properly: The key to making good sabudana vada lies in soaking the tapioca pearls properly. Rinse the sabudana under running water until the water runs clear, then soak them in water for at least 4-5 hours or overnight. They should be soaked enough to be easily mashed between your fingers.
Use Boiled Potatoes: Ensure that the potatoes are boiled properly and mashed well. This helps bind the vada mixture together and prevents them from breaking apart during frying.
Adjust Seasonings: Feel free to adjust the seasonings according to your taste preferences. You can add more green chilies for extra heat or increase the amount of lemon juice for a tangier flavor.
Fry on Medium Heat: Fry the vadas on medium heat to ensure they cook evenly from inside out and develop a golden-brown crust on the outside.
Serve Hot: Sabudana vadas are best enjoyed hot and fresh. Serve them with mint chutney, tamarind chutney, or yogurt for a delightful snack experience.
Variations of Sabudana Vada
Sabudana Aloo Tikki: Instead of shaping the vada into traditional round patties, you can make them into tikki shapes for a twist. Flatten the mixture into small discs and fry until golden brown on both sides.
Sabudana Vada with Peanuts: Add roasted and crushed peanuts to the vada mixture for an extra crunch and nutty flavor.
Sweet Sabudana Vada: For a unique variation, add some sugar and grated coconut to the vada mixture to make sweet sabudana vadas. Serve them as a dessert or a sweet snack.
Baked Sabudana Vada: If you’re looking for a healthier alternative, you can bake the vadas instead of frying them. Simply brush them with oil and bake in a preheated oven until golden brown and crispy.
Benefits of Sabudana Vada
Rich in Carbohydrates: Sabudana, being made from tapioca pearls, is rich in carbohydrates, providing a quick source of energy.
Gluten-Free: Since sabudana is derived from tapioca, it is naturally gluten-free, making it suitable for those with gluten intolerance or celiac disease.
Good Source of Protein: Potatoes used in the vada mixture add a decent amount of protein to the snack, making it more satiating.
Easy to Digest: Sabudana is easy to digest, which makes it a popular choice during fasting periods when heavier foods are avoided.
FAQs about Sabudana Vada
Can I make sabudana vada ahead of time?
While sabudana vada is best enjoyed fresh, you can prepare the mixture ahead of time and refrigerate it. Fry the vadas just before serving for the best taste and texture.
Can I freeze sabudana vada?
Yes, you can freeze uncooked sabudana vada. Place them on a tray lined with parchment paper and freeze until firm, then transfer them to a freezer-safe bag or container. Fry them directly from frozen, adding a few extra minutes to the frying time.
What can I serve with sabudana vada?
Sabudana vada pairs well with various chutneys such as mint chutney, tamarind chutney, or yogurt. You can also enjoy them with a hot cup of masala chai for a perfect snack time treat.
For more mouthwatering recipes and culinary inspiration, explore the following links from Manjula’s Kitchen:
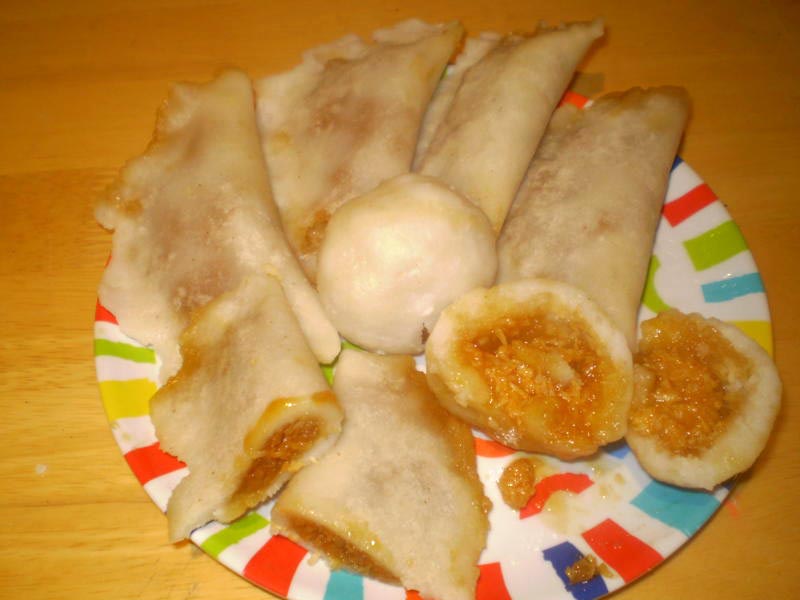
When I saw that the ingredient was rice for the contest, I remembered one of my childhood favorites (Ila Ada and Kozhukatta). Both have the same dough and the same filling, but that they are in different shapes. Ila ada is made by spreading the dough thinly onto banana leaves and has a sweet filling in the center, while kozhukkatta is just the rice dough shaped like a ball with the same sweet filling stuffed in the center. Both are steamed, hence making both very healthy and light.
1 cup Grated jaggery (can also use sugar instead of jaggery)
8 5"x5" Banana leaves (can also substitute with aluminium foil if you don't have banana leaves)
Pressure cooker or steamer
Instructions
Method
Mix together the grated coconut, grated jaggery, cardamom powder, and jeera. Keep aside.
Boil the water and add salt and ghee(optional).
Add the rice flour and mix well without forming lumps. The mixture should not be too loose…It shoud be able to hold shape in the form of a ball.
Divide the mixture into 8 balls and keep aside.
For Ila Ada:
Place each ball in the center of each banana leaf and flatten it out with your fingers to spread as thin as possible. You can wet your finger tips with water to help in spreading. Place the sweet filling in the center and fold the banana leaf over and press the ends along the edges.
Now steam them in pressure cooker or steamer – might take 10 to 12 minutess to cook.
Enjoy warm.
For Kozhakatta:
Place each ball in the center of your palm and press with the other hand to flatten it. Now fill the flattened dough with the sweet filling of jaggery and mould the dough back into shape by bringing the ends together.
Now steam them in pressure cooker or steamer – will take around 15 minutes to cook.
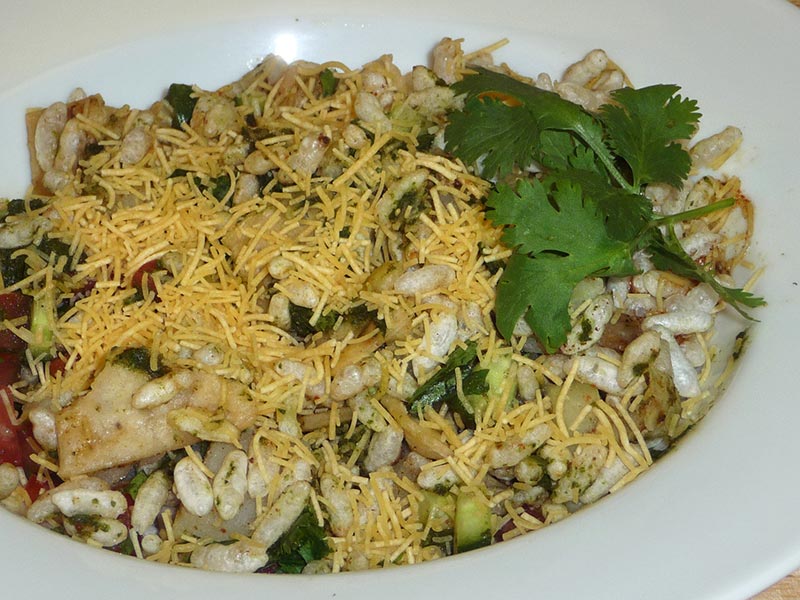
Bhel Puri is a simple spicy snack with a light crunch! This is a popular snack with street vendors in Mumbai. Every vendor has his own twist to bhel puri but two main ingredients remain the same . . . puffed rice (murmura) and fine sev. Bhel Puri is low-fat, nutritious, delicious snack!
3 cups puffed rice (murmura, kurmura) available in Indian grocery stores.
1 cup fine sav (vermicelli-like snack made from gram flour) available in Indian grocery stores.
1 cup papdi broken in small pieces (recipe you can find on my web site) or available in Indian grocery stores.
1/2 cup of chopped boiled potatoes
1/2 cup of chopped cucumber
1/2 cup of chopped tomatoes remove the seeds
2 tablespoons chopped cilantro
1/2 teaspoon salt (adjust to taste)
4 tablespoon of hari cilantro chutney
4 tablespoon of tamarind chutney
1 tablespoon minced green pepper optional
For Garnish
1/4 cup fine sav
2 tablespoons lemon juice
Instructions
Method
In frying pan over medium heat dry roast the puffed rice for 3 to 4 minutes. Let it cool.
Combine the dry ingredients (puffed rice, sev, papdi,and salt) together and mix well. Set aside until ready to serve
Mix chopped potatoes, cucumber, tomatoes, cilantro,and minced green pepper if you like it hot, and set aside.
When ready to serve, combine the dry ingredients and potato mixture.
Add hari cilantro and tamarind chutneys to your taste, making sure the chutneys coat the bhel puri. Garnish with sev and drizzle with lemon juice to taste.
Notes: Assemble bhel puri just before serving to prevent the puffed rice and sev from getting soggy
Notes
Tips
Puffed rice (murmura) loses some of its crispness with time. Roasting restores the crispness and freshness.
Bhel Puri Chaat is a delightful combination of appetizers and snacks, popular as street food, particularly cherished during summer. This vegan dish, rooted in chaat culture, embodies the essence of Indian street food recipes with its refreshing blend of flavors and textures. In this bhel puri chaat recipe, we’ll explore the delightful world of Indian street food with a crunchy, spicy snack that’s bursting with flavor.
Bhel puri chaat is a popular dish enjoyed across India, known for its unique blend of textures and tangy taste. Whether you’re craving a savory snack or hosting a gathering, this recipe is sure to impress your taste buds and guests alike.
Step 1: Gathering Ingredients
To begin making bhel puri chaat, assemble the following ingredients: puffed rice, sev (thin strands of fried gram flour), tomatoes, boiled potatoes, cilantro, green chilies, tamarind chutney, mint chutney, chaat masala, and salt. These ingredients can be found in most Indian grocery stores or online.
Step 2: Preparing the Base
Start by preparing the base of the bhel puri chaat. In a large mixing bowl, combine the puffed rice, tomatoes, boiled potatoes, cilantro, and green chilies. Mix well to ensure all the ingredients are evenly distributed. This step is crucial as it sets the foundation for the flavor profile of the dish.
Step 3: Adding Crunch with Sev
Next, add a generous amount of sev to the mixture. Sev not only adds a crunchy texture to the bhel puri chaat but also enhances its visual appeal. Feel free to adjust the amount of sev according to your preference for texture and crunchiness.
Step 4: Drizzling Chutneys
Now, it’s time to add the tangy and flavorful chutneys to the bhel puri chaat. Drizzle tamarind chutney and mint chutney over the mixture, ensuring that each bite is infused with the deliciousness of these sauces. The combination of sweet and tangy chutneys elevates the taste of the dish to a whole new level.
Step 5: Seasoning with Chaat Masala
Sprinkle chaat masala and salt over the bhel puri chaat to enhance its savory flavor profile. Chaat masala is a blend of spices commonly used in Indian cuisine, adding a unique and aromatic touch to the dish. Be sure to taste the mixture and adjust the seasoning according to your taste preferences.
Step 6: Mixing Thoroughly
Using a gentle hand, mix all the ingredients thoroughly, ensuring that the flavors are well incorporated. This step is crucial for achieving a harmonious balance of flavors in the bhel puri chaat. Take your time to mix the ingredients evenly, ensuring that each bite is bursting with flavor.
Step 7: Serving the Bhel Puri Chaat
Once the bhel puri chaat is well mixed, transfer it to serving bowls or plates. Garnish with additional cilantro and sev for an extra pop of color and crunch. Serve immediately and enjoy this delightful snack with family and friends.
Tips for Making the Best Bhel Puri Chaat
To add an extra kick of heat to the bhel puri chaat, finely chop some green chilies and mix them into the dish.
For a refreshing twist, squeeze some lemon juice over the bhel puri chaat just before serving to enhance its tanginess.
Customize the bhel puri chaat according to your taste preferences by adding your favorite toppings such as chopped raw mango, peanuts, or grated carrots.
Variations of Bhel Puri Chaat
Aloo Bhel Puri Chaat: Add diced boiled potatoes to the bhel puri chaat mixture for a heartier version of the dish.
Fruit Bhel Puri Chaat: Incorporate diced fruits such as mangoes, apples, and pomegranate seeds for a sweet and tangy twist on the classic recipe.
Healthy Bhel Puri Chaat: Substitute puffed rice with roasted murmura (puffed rice) for a healthier alternative without compromising on taste.
Benefits of Bhel Puri Chaat
Nutrient-Rich: Bhel puri chaat is packed with essential nutrients from the vegetables and puffed rice, making it a wholesome snack option.
Quick and Easy: This recipe is quick and easy to prepare, making it perfect for busy weeknights or last-minute gatherings.
Versatile: Bhel puri chaat can be customized with various toppings and chutneys to suit individual taste preferences, making it a versatile dish for any occasion.
FAQs about Bhel Puri Chaat
Q: Can I make bhel puri chaat ahead of time?
A: While it’s best enjoyed fresh, you can prepare the components of the bhel puri chaat ahead of time and assemble them just before serving to maintain the crunchiness of the dish.
Q: Can I adjust the spiciness of the bhel puri chaat?
A: Yes, feel free to adjust the amount of green chilies or skip them altogether if you prefer a milder version of the dish.
Q: Can I store leftover bhel puri chaat?
A: Due to the nature of the ingredients, leftover bhel puri chaat may lose its crunchiness over time. It’s best to consume it immediately after preparation for the best taste and texture.
For more delicious recipes, check out Manjula’s Kitchen. Explore a wide range of authentic Indian dishes to tantalize your taste buds!
By following these simple steps and tips, you can easily recreate the magic of bhel puri chaat in your own kitchen. Whether you’re craving a flavorful snack or looking to impress your guests, this recipe is sure to be a hit!
More Recipes to Explore
If you enjoyed making these masala peanuts, why not try your hand at some other mouthwatering recipes from Manjula’s Kitchen?
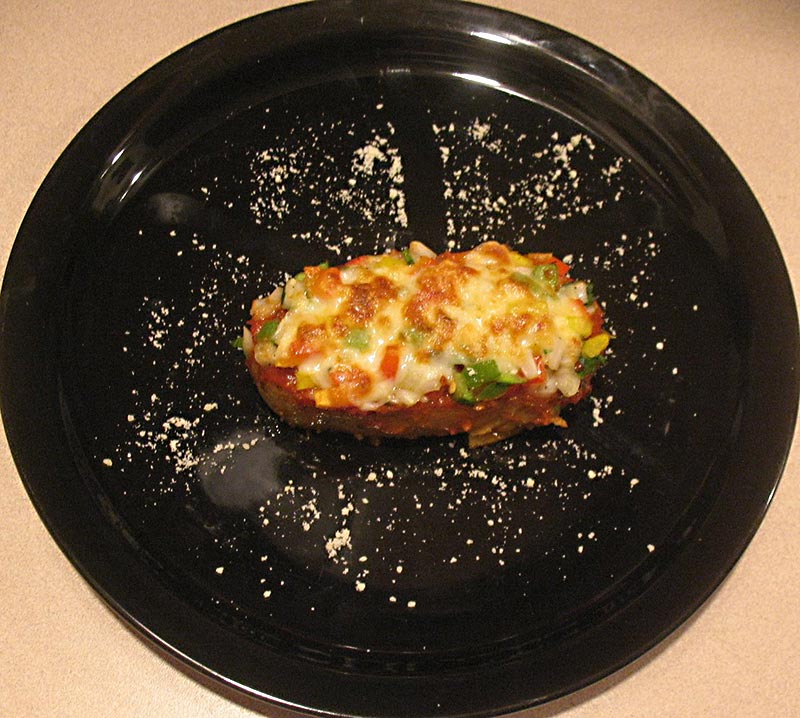
The inspiration for this recipe came from visiting Manjula’s website, where she was hosting a recipe contest for September 2010. The challenge was to create a recipe using potatoes. Intrigued, I decided to participate if I could come up with a unique idea. I pondered all week, brainstorming beyond the usual curry or sabji. I scoured Google for new potato recipes and stumbled upon an interesting blog post: "pizza with potato?" I thought, "Why not?" This led me to try the recipe with my twist. Here is my innovative take on it, which I’m excited to share with you. A low-fatsnack recipe that is surely going to be loved by all.
3 large and even sized Baking Potatoes/Russet potatoes
3 multi colored Bell Peppers (I used Red, yellow and green), chopped finely
1 small Onion chopped
2 tbsp Capers
1/4 cup parsley chopped
3/4 cup Pasta sauce (used sweet basil pasta sauce)
Salt to taste
1/2 tsp Black pepper powder
1/4 tsp Red pepper flakes
1/4 cup Parmesan cheese
1/2 cup Fresh mozzarella cheese grated/ Fontana cheese (I used Fontana cheese)
1 tbsp Olive oil
Instructions
Method
Boil the potatoes in pressure cooker for 2 whistles or until they are cooked almost 3/4th. Cool the potatoes and peel off the skin and cut into 3, one (1) inch slices on the lengthier side. Cut thin slice on the edge slices so that they have a flat bottom.
Preheat the oven for about 400F.
In a bowl mix 3/4 tbsp olive oil, salt and pepper. Whisk it well. Spread this mixture on the potatoes so that they coat well and arrange them on a baking sheet and bake them for about 10 mins.
Meanwhile, in a bowl add the chopped onions, chopped bell peppers, capers, salt, pepper and parsley, crushed red pepper flakes and remaining olive oil and mix them well. (you can add any toppings of your choice….like creating your own pizza)
Take the potatoes out of the oven, spread the pasta sauce evenly on top of the potatoes, place the mixed veggies on top so that it covers all the pasta sauce,
Add some Fontana/mozzarella cheese on top and sprinkle with Parmesan cheese and pop this into oven for more 5-7 mins or until the cheese it melted.
Enjoy the yummy pizza without all the fat and meat!
Notes
Additional Notes
You can also broil it for about 2 mins to get a light brown crust on top of the cheese and veggies.
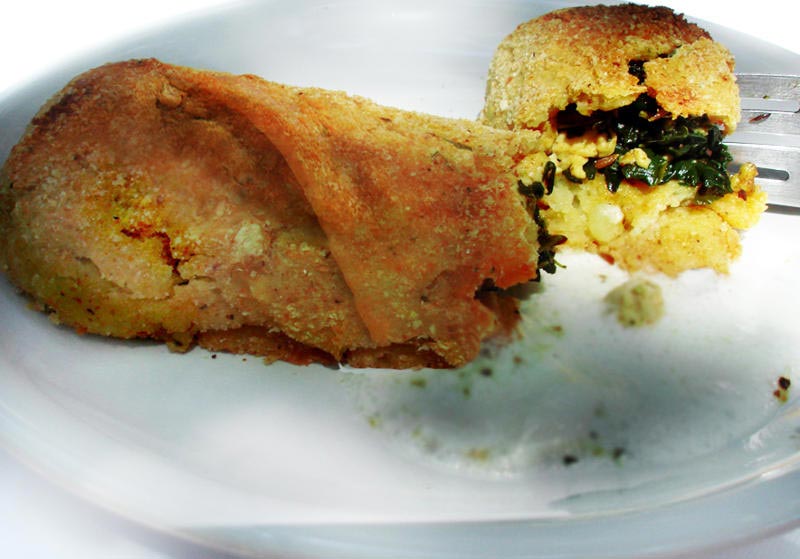
These Spinach and Tofu Stuffed potato rolls have been our lunch today and we still have leftover! I hope you find it interesting, healthy and creative. I used Indian spices to appeal to my hubby's palate as well.
Separately cook the spinach with little water and squeeze all the excess moisture.
Heat the oil in a pan and slightly fry the cumin, coriander, black pepper and paprica.
Add the cubed tofu and stir fry for a couple of minutes till all flavours are incorporated.
Add the cooked spinach and stir fry for an extra one minute. Set aside to cool.
Cook the potatoes. Let cool. Peel and mash using a potato masher
Add the starch, spices, salt and knead to form a uniform mass.
Divide the dough into 8 parts.
Sprinkle the working surface with bread crumbs and flatten the dough to form a rectangular shape about 1/4" thickness.
Place some stuffing along the center of the rectangle.
Fold the lateral sides and roll the dough to form a roulade. Repeat the same with the rest of the dough.
Preheat the oven to 350 F.
Grease a baking pan/ dish with oil and carefully place all the rolls on the bottom. Bake for about 20-25 min, till the crust is crisp and golden in color.
Enjoy them with yogurt or your choice of gravy.
Notes
Important: Do not let the dough sit for too long before making the rolls or it will get soft and unmanageable.
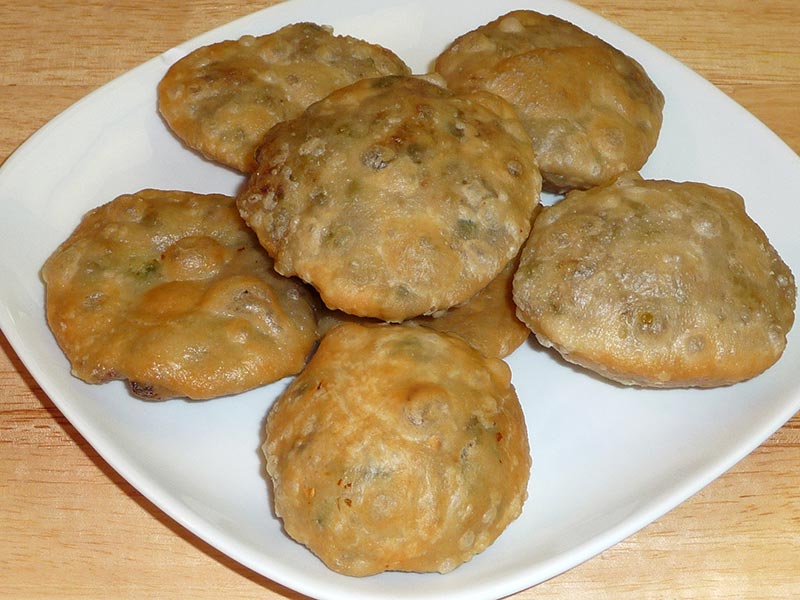
Mattar Kachori is a delicious, fried puff pastry filled with spicy green peas. This mouthwatering snack also can be served as part of any main course meal.
Add the flour, salt, and oil to a bowl and mix it well.
Add the chilled water slowly, mixing with your fingers as you pour the water. Do not knead the dough. The dough should be very soft but not sticking to fingers. Cover the dough and let it sit for at least fifteen minutes.
To Make Filling
Heat the oil in a frying pan, add green peas, stir-fry until peas are tender.
Add ginger, coriander powder, fennel seed powder, chili powder, mango powder and salt, stir fry for another few minutes.
While stir frying the peas mash them with spatula.
Let the filling cool to room temperature.
To Make Kachoris
Take the dough and lightly knead it. Divide the dough in twelve equal parts.
Take one part of the dough and with your fingers flatten the edges and make it into about a 2-inch circle. Leaving the center, a little thicker than the edges around. Mold the dough into a cup and place about 1 teaspoon of filling in the center. Pull the edges of the dough to wrap the filling. Proceed to make all 12 balls.
Let the filled balls sit for 3 to 4 minutes before pressing.
Set the filled balls on a clean and dry surface with the seam facing up. Using the base of your palm, slowly flatten them into about 3 inches circle.
Heat about 1-1/2 inches of oil in a frying pan on medium heat. To check if the oil is ready put a little piece of dough in the oil. It should sizzle, and come up very slowly.
Do not overcrowd the kachoris in a frying pan, fry them on medium heat. After they are puffed, slowly turn them over.
It will take about 3 minutes to fry from each side. Fry until golden-brown on both sides.
If the kachoris are fried on high heat, they will get soft and will not be crispy.
Notes
Serving suggestionsKachoris can be served plain, with Boondi Ka Raita, or with Aloo Dum.
Keyword Appetizer, Breakfast, Lunch Box, Main Dish, Mattar Kachori, Party Food, Stuffed Puri
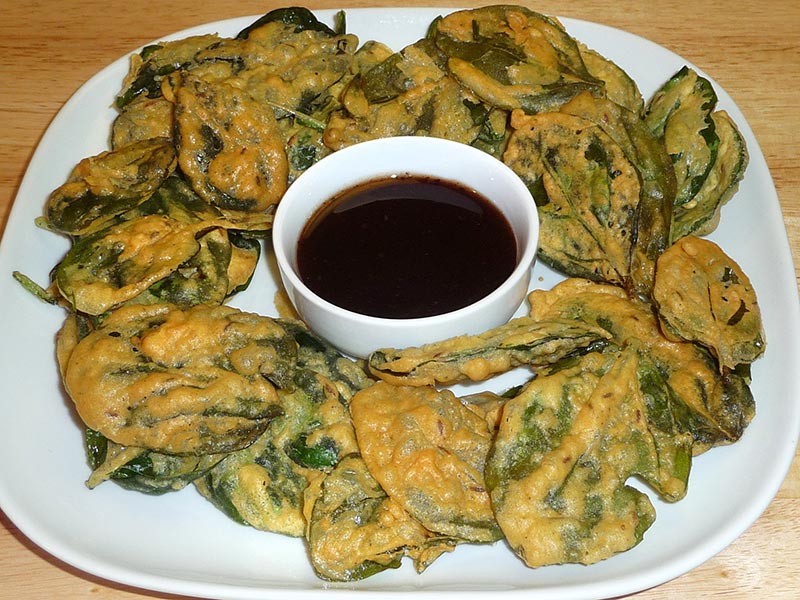
Spinach pakoras are delicious as a snack. Spinach pakoras can be served many different ways and they always taste great as an appetizer. One of my favorite ways to serve these pakoras is papdi chaat.
Mix all the dry ingredients together: besan, corn starch, black pepper, cumin seeds, asafetida, and salt. Corn starch adds to the crispness.
Add the water slowly to make a smooth batter (batter should be thin consistency).
Heat the oil in a frying pan on medium high heat.
The frying pan should have at least 1 ½ inch of oil. To check if the oil is ready, put one drop of batter in oil. The batter should come up but not change color right away.
Dip the spinach leaf into the batter one at a time, making sure it is covered by the batter completely; wipe it from side of the batter bowl making sure batter is evenly spread over spinach. Then, slowly drop in the slices into the frying pan.
Fry the pakoras in small batches. The pakoras will take about 2 to 3 minutes to cook.
Turn them occasionally. Fry the pakoras until both sides are golden-brown.
The crispy, delicious pakoras are now ready to serve.
They can be stored for several days in air tight container.
Notes
TipsIf oil is too hot pakoras will not be crispy; if oil is not hot enough, pakoras will be greasy.Serving Suggestions
Spinach pakoras can be served as chips with your choice of dipping sauce.
Crispy spinach pakoras are a quintessential Indian snack that tantalize taste buds with their crunchy texture and flavorful profile. Spinach Pakora, a delightful blend of appetizers and snacks, is a gluten-free and vegan treat perfect for winter recipes, offering a crunchy and flavorful indulgence. These bite-sized delights, also known as crispy spinach pakoras, are a favorite among food enthusiasts for their simplicity and robust taste. In this comprehensive guide, we delve into the art of crafting these irresistible treats, exploring the crispy spinach pakoras recipe, step by step.
Step 1: Gathering Ingredients
To embark on this culinary adventure, gather the necessary ingredients. Fresh spinach leaves, besan (gram flour), rice flour, ajwain (carom seeds), turmeric powder, chili powder, cumin seeds, asafetida (hing), and salt are the key players in this recipe. These ingredients blend harmoniously to create the signature flavor and texture of crispy spinach pakoras.
Step 2: Preparing the Batter
Begin by washing the spinach leaves thoroughly and patting them dry. Chop the spinach finely, ensuring uniformity in size. In a mixing bowl, combine besan, rice flour, ajwain, turmeric powder, chili powder, cumin seeds, asafoetida, and salt. Gradually add water to the dry mixture, whisking continuously until a smooth batter forms. The consistency should be thick enough to coat the spinach leaves evenly.
Step 3: Coating the Spinach
Dip each spinach leaf into the prepared batter, ensuring it is well-coated on both sides. Gently shake off any excess batter to achieve a light coating. Repeat this process for the remaining spinach leaves, arranging them on a plate for frying.
Step 4: Frying to Perfection
Heat oil in a deep-frying pan over medium-high heat. Once the oil reaches the desired temperature, carefully slide the coated spinach leaves into the hot oil, ensuring they are not overcrowded. Fry the spinach pakoras until they turn golden brown and crisp, flipping them occasionally for even cooking. Once done, transfer them to a plate lined with paper towels to absorb any excess oil.
Step 5: Serving and Enjoying
Serve the hot and crispy spinach pakoras with a side of mint chutney or tamarind sauce for an added burst of flavor. These delectable treats are perfect for snacking on rainy days or as appetizers for gatherings. Enjoy the crunchy exterior giving way to the tender spinach inside with every bite.
Variations:
Paneer Spinach Pakoras: Add crumbled paneer (Indian cottage cheese) to the batter for a creamy twist.
Cheese Spinach Pakoras: Stuff the spinach leaves with cheese before coating them with batter for a gooey surprise.
Benefits:
Spinach is a nutritional powerhouse, packed with vitamins, minerals, and antioxidants that promote overall health. Incorporating spinach into pakoras not only enhances the flavor but also adds a dose of goodness to this indulgent snack. Additionally, the use of besan (gram flour) provides a gluten-free alternative, making it suitable for individuals with dietary restrictions.
FAQs:
Q: Can I make crispy spinach pakoras ahead of time?
A: While pakoras are best enjoyed fresh and hot, you can prepare the batter in advance and fry them just before serving to retain their crispiness.
Q: Can I bake spinach pakoras instead of frying them?
A: Although frying yields the crispiest results, you can try baking spinach pakoras in a preheated oven at 375°F (190°C) for approximately 15-20 minutes or until golden brown.
Q: Can I freeze leftover pakoras?
A: While pakoras are best consumed fresh, you can freeze any leftovers in an airtight container. Reheat them in the oven or air fryer for a few minutes until warmed through.
Explore More Delectable Recipes
For more mouthwatering recipes and culinary inspiration, explore the following links from Manjula’s Kitchen:
These Whole Wheat Almond Eggless Cookies are perfect gluten free, desserts, kid-friendlysnacks, or a delicious treat anytime. Made with wholesome ingredients, they offer a healthier twist on traditional cookies without compromising on taste.
1/2 teaspoon green cardamom seed coarsely powder (ilaichi)
1/2 cup unsalted butter (8 tablespoons or 4oz)
About 2 tablespoons of milk or as needed
Instructions
Method
Pre heat the oven to 360 degree F.
In a bowl, mix the flour, sugar, salt, sliced almonds and cardamom powder well.
Next add soft butter and milk to the flour mixture to make dough. Dough should be very soft.
Divide the dough into about 24 equal parts and make them into balls.
Press each ball between your palms lightly; every piece should be about 1/2” in thickness.
Place the dough balls on an ungreased cookie sheet about inch a part.
Bake the cookies for about 18 minutes or until cookies are lightly gold brown.
After they become lightly golden brown remove the cookie sheet from the oven. Let the cookies cool down for two to three minutes before taking them off the cookie sheet.
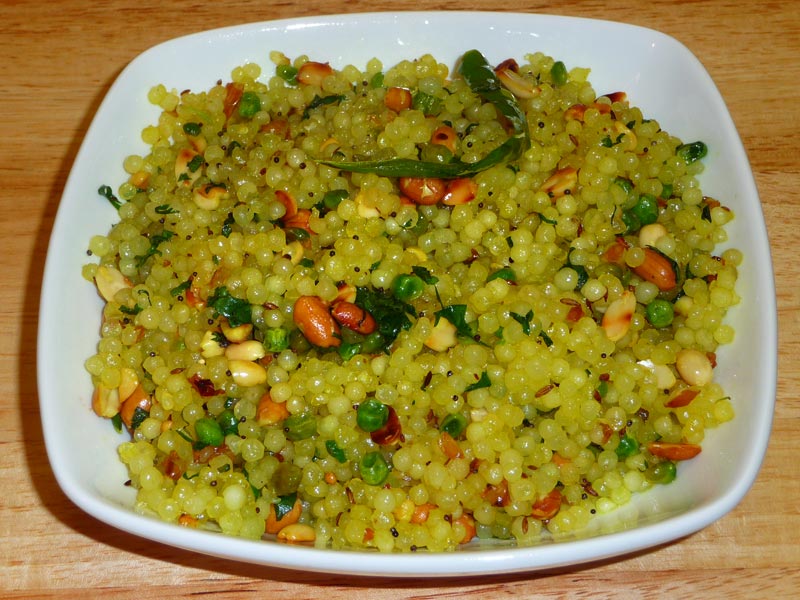
Sabudana also known as Tapioca makes a great Khichdi. This recipe is mildly spiced and peanuts give it a light crunch. Tapioca khichdi is great for breakfast or as a snack and it tastes delicious.
Gently wash then soak tapioca (sabudana) in about 1/2 cup of water for 6 to 8 hours.
Roast the peanuts on medium heat, until they are lightly brown. Keep aside.
Heat the oil in a frying pan on medium heat. Test the heat by adding one cumin seed to the oil; if seed cracks right away then oil is ready. Add cumin seeds and mustard seeds after seeds crack add green chilies and stir for a few seconds.
Next add the green peas and stir fry until peas are tender.
Add the soaked tapioca (sabudana) and stir fry for 3 to 4 minutes ,
Add turmeric, and salt and stir fry on medium heat continuously until tapioca (sabudana) becomes translucence, looks like pearls. Stir gently and making sure tapioca doesn’t get sticky and stuck to each other. This should take about 6 to 7 minutes.
Add peanuts, lemon juice and cilantro (hara dhania), stir gently. Serve hot.
Notes
To save time soak the tapioca in warm water for about 2 to 3 hours water should not be hot.If you don’t stir continuously tapioca will stick to each other.
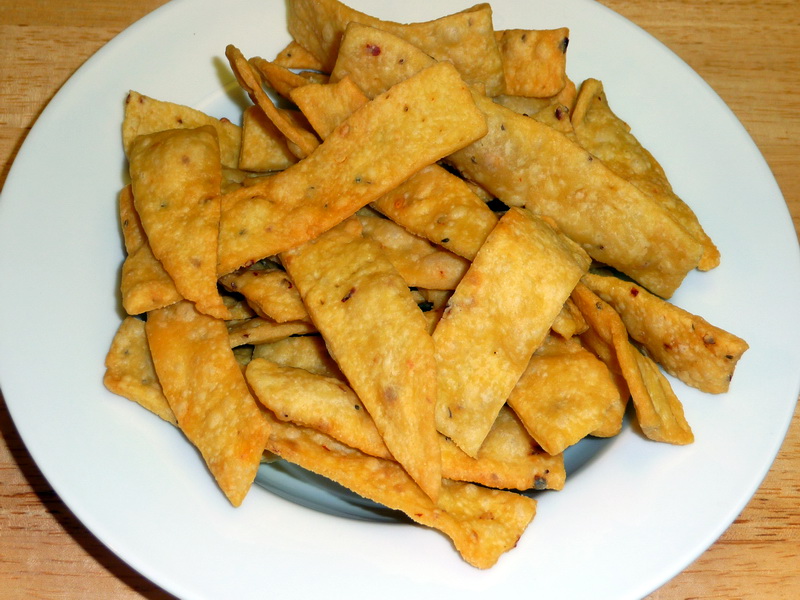
Mix flour, semolina (sooji), gram flour (besan), salt, carom seeds, asafetida, chili flakes, and oil, together.
Add water as needed to make firm but smooth dough. Cover with damp cloth and set aside at least for ten minutes.
Knead the dough for another minute and divide into four equal parts.Take each part of the dough and make a flat ball shape.
Roll them thin into about 9-inch circles. Prick them with a fork all over the rolled dough, the Paree do not puff when frying.
Cut each of the rolled dough into about half inch wide and 3 inch long pieces. Note: you can cut them in your desire shape.
Heat the oil in a frying pan on medium heat. The frying pan should have at least 1 inch of oil. To check if the oil is ready, put a small piece of dough in the oil. The dough should make the oil sizzle and come up slowly.
Make sure to place just enough Paara so you can turn them over easily when frying. Fry the Paara until both sides are light golden-brown.
After Besan Paara come to room temperature they should become crisp.
Notes
Suggestions:Try replacing carom (ajwain) seed with dry fenugreek leaves.you will also like Besan Sev, Atta Ka Ladoo
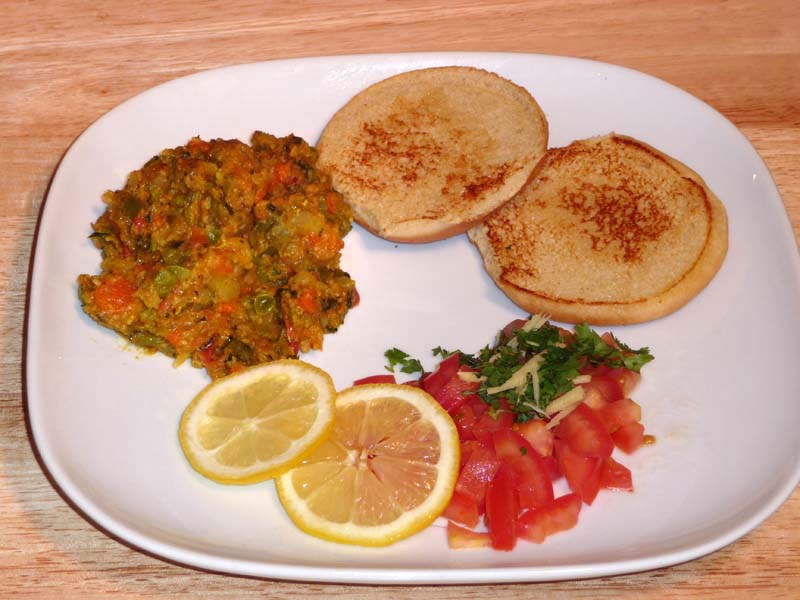
Pav Bhaji is a favorite fast food dish in India. Pav is buns and bhaji is the mixed spicyvegetables. This is a very popular street food with roadside vendors.
Boil all the vegetables potatoes, cauliflower, beans, peas, and beans in about 1 ½ cup of water. Don't add too much water, just enough to cook.
After the vegetables are soft and tender, drain the excess water and mash them coarsely with a fork or potato masher.
Heat the oil in a frying pan over medium heat.
Add tomatoes, green chilies, cilantro, and ginger and sauté for 2-3 minutes until pasty.
Next add the red chili powder, fennel seed and turmeric, mix it well.
Add mashed vegetables.
Using a spatula, simultaneously mash and stir all the vegetables for 5 minutes.Using a spatula, simultaneously mash and stir all the vegetables for 5 minutes.
Add salt and two tablespoons of ghee, stir-fry for another minute.
Add about ¼ cup of water or as needed, and let it cook for a minute.
Turn off the heat.
Add garam masala, and lemon juice, mix it well
Toast the halves bun over a skillet using butter over medium heat until buns are golden brown from both sides.
Serve toasted buns with bhaji (mixed vegetables), garnish with chopped tomatoes and sliced lemon.
Notes
Variations:
You can use almost any vegetables to make the bhaji, but keep the potato base. You can also try vegetables such as cabbage, bell pepper, and eggplant.
If you don’t eat potatoes, use green bananas for the base.
Hot and spicy peanuts fried with delicious mix of spices. This makes a great snacks for sitting around watching TV or playing games with family and friends. Recipe serves 6.
In a frying pan roast the dry peanuts on medium heat for 3-4 minutes and let it cool for few minutes.
Mix all the ingredients together in a large bowl.
Add water as needed making sure the spices and flour stick to the peanuts uniformly.
Heat the oil in a frying pan on medium heat.
The frying pan should have at least 1 inch of oil. To check if the oil is ready, put one drop of batter in the oil. The batter should raise to the top but not change color right away.
put few drops of oil in your hand it helps droping the penuts before putting peanuts on the oil.
While putting the peanuts into oil, loosen them with your fingers to make sure the peanuts are separated and do not form lumps. Peanuts should be separated while frying.
Fry the peanuts until they turn light brown, turning them occasionally.
When they are done cooking, take them out of the oil with a slotted spoon. Place them on a paper towel to absorb the extra oil.
After cooling to room temperature, the peanuts should be crispy.
Notes
Masala Peanuts can be stored for a month in an airtight container.
Also see my recipe for Spicy Cashew, Almond brittle.
These make a delicious homemade gift – pack it in a jar or candy bag.
Masala Peanuts are delightful appetizers perfect for holidays and festivals, offering a crunchy, gluten-free snack option that satisfies both vegan and non-vegan palates alike. Peanut masala recipe is a beloved snack across India, offering a delightful combination of crunchy peanuts and aromatic spices. This masala peanuts recipe is a favorite among snack enthusiasts for its bold flavors and addictive crunch. Whether you’re hosting a gathering or simply craving a savory treat, learning how to make masala peanuts recipe at home is both rewarding and satisfying.
How to Make Masala Peanuts Recipe: Step-by-Step Guide
Step 1: Prepare the Peanuts
Start by selecting fresh, raw peanuts for the best results. Rinse them thoroughly under cold water to remove any dirt or debris. Then, pat them dry using a clean kitchen towel or paper towels.
Step 2: Dry Roast the Peanuts
Heat a non-stick pan over medium heat. Once the pan is hot, add the peanuts in a single layer. Dry roast them, stirring occasionally, until they turn golden brown and emit a nutty aroma. This process typically takes about 8 to 10 minutes. Keep a close eye on them to prevent burning.
Step 3: Prepare the Spice Mixture
While the peanuts are roasting, prepare the spice mixture. In a small bowl, combine masala peanuts recipe spices such as red chili powder, turmeric powder, cumin powder, chaat masala, and salt according to your taste preferences. Adjust the spice levels to suit your palate.
Step 4: Coat the Peanuts with Spices
Once the peanuts are roasted to perfection, transfer them to a large mixing bowl. While they are still warm, sprinkle the prepared spice mixture over the peanuts. Toss them gently to ensure that each peanut is evenly coated with the spices. Allow the peanuts to cool completely before serving.
Step 5: Serve and Enjoy
Your homemade masala peanuts are now ready to be enjoyed! Serve them as a standalone snack or pair them with your favorite beverages. Store any leftovers in an airtight container to maintain their freshness and crunchiness.
Tips for Making Perfect Masala Peanuts
Experiment with different spice blends to customize the flavor according to your preferences.
You can add ingredients like amchur powder for tanginess or garam masala for extra warmth.
For an extra layer of flavor, consider adding roasted garlic or curry leaves to the spice mixture.
Make sure to roast the peanuts evenly to achieve a uniform golden brown color and prevent any burnt spots.
Allow the peanuts to cool completely before storing them to maintain their crispiness.
Variations of Masala Peanuts
Sweet and Spicy: Add a touch of sweetness to your masala peanuts by incorporating a bit of powdered sugar or jaggery along with the spices.
Herb Infused: Experiment with fresh herbs like cilantro, mint, or curry leaves to add a refreshing twist to your masala peanuts.
Nutty Crunch: Enhance the texture of your masala peanuts by tossing them with a handful of toasted cashews, almonds, or pistachios.
Benefits of Masala Peanuts
Rich in Protein: Peanuts are an excellent source of plant-based protein, making masala peanuts a nutritious snack option.
Good Source of Healthy Fats: Peanuts are high in monounsaturated fats, which are beneficial for heart health when consumed in moderation.
Packed with Essential Nutrients: Peanuts are rich in essential nutrients like vitamins, minerals, and antioxidants, contributing to overall well-being.
FAQs about Masala Peanuts
Can I use pre-roasted peanuts for this recipe?
While you can use pre-roasted peanuts, roasting them yourself allows you to control the level of crunchiness and ensures that they are freshly toasted.
How long do homemade masala peanuts stay fresh?
When stored in an airtight container at room temperature, homemade masala peanuts can stay fresh for up to two weeks. However, they are best enjoyed within the first few days to maintain their crispiness.
Can I make masala peanuts without oil?
Yes, you can skip the oil and dry roast the peanuts directly in a pan for a healthier alternative. However, using a small amount of oil helps the spices adhere to the peanuts more effectively.
For more delightful Indian recipes, explore Manjula’s Kitchen, where you’ll find a treasure trove of culinary inspiration ranging from traditional dishes to modern twists on classic favorites. Be sure to check out recipes like Aloo Gobi, Palak Paneer, and Chana Masala for a taste of authentic Indian cuisine.
Gujia is a fried pastry filled with an aromatic nuts mixture. In India, Gujia is traditionally made for the holidays like Diwali and Holi and is a must have treat.
Mix flour, sooji, and oil in a bowl, make a soft dough adding water slowley as needed. Knead the dough until the dough becomes soft and pliable.
Set the dough aside and cover it with a damp cloth. Let the dough sit for at least ten minutes.
Filling:
Mix the cream and milk powder in a frying pan. Cook on medium heat until mixture starts leaving the sides of the frying pan and becomes soft runny dough. Stir continuously so the mixture does not burn on the bottom of the pan.
Turn off the heat and add coconut, almonds, melon seeds, sugar, and cardamom powder. Mix together well. After cooling, the mixture will be lightly moist. Keep aside.
Making the Gujias:
Mix 2 tablespoons of water with 1 tablespoon of flour to make a paste. Set aside.
Knead the dough again for a minute. Divide the dough into about 20 equal parts and roll into balls with the palms of your hands.
Roll each ball into about 4-inch diameter (like a roti or chappati).
Dip your finger in the flour paste and spread it around the rim of the rolled dough, but just on the half the circle.
Take the rolled dough in your palm and put about 1-1/2 tablespoons of the filling mixture in the center and fold it into a semi-circle. Now press the edges together with your fingers. Make sure the edges are completely sealed otherwise they will open while frying and oil will get in and filling will come out. Continue filling the rest of the gujia in the same manner.
Heat about 1 inches of oil in a frying pan on medium heat. To test if the oil is hot enough, drop a small piece of dough into the oil. It should sizzle right away but come to the surface slowly.
Place the gujia in the frying pan few at a time.
After gujhias are floating on top of the oil, turn them slowly. Fry the gujias until they turn light golden-brown color on all sides. Don’t fry on high heat; the gujia crust will be too soft and not crispy.
When they are done cooking, lift them out of the oil with a slotted spoon.
Garnishing:
Boil the sugar and water on medium heat until syrup is about one thread or 230 degrees (Fahrenheit) on a candy thermometer.
Dip the gujias into the syrup making sure they are coated with syrup all around. Place the gujias on a wire rack to allow the extra syrup drain.
Garnish the gujias with sliced almonds and pistachios while the gujhias are still moist with syrup.
Gujias will be dry in an hour.
Notes
Gujia can be stored in airtight container up to a month.Gujia makes great gift idea for Holidays you may also like Besan Ladoo, Spicy Cashew, Baklava, Besan Mathri
Keyword Ghugra, Holiday Dessert, Holiday Gift, Karangi, Special Occasion
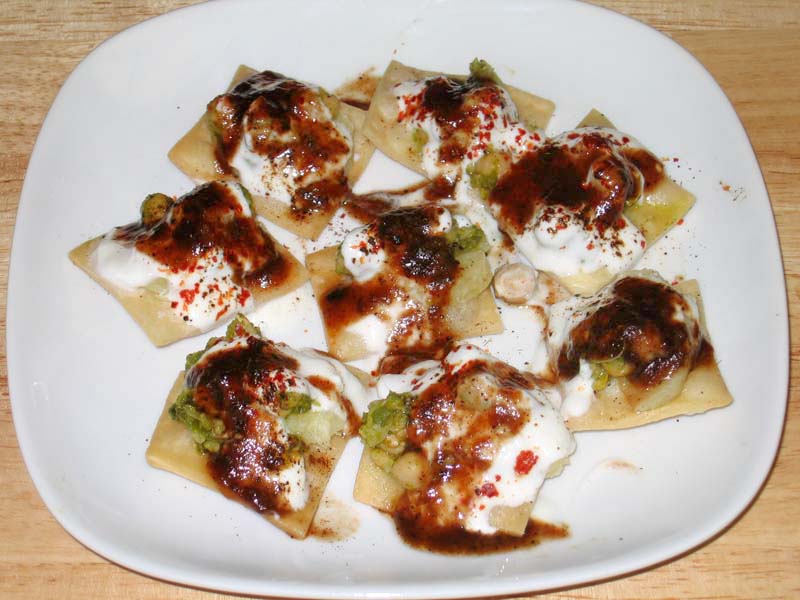
Papdi (papri) Chaat is my kind of food and there are so many kinds of chaat. Chaat is a popular street food all over India. Chaat is basically different varieties of snacks served with tamarind or hari (cilantro) chutney or with hot spice mix. The definition of chaat literally is "to taste".Recipe serves 4 to 6
Mix the flour, sooji, salt, and oil in a bowl. Add water to the mixture a little at a time, kneading to form firm dough.
Cover the dough and set aside for 15 minutes or more.
Divide the dough into about 3 equal parts.
Roll one section of the dough to eight inches in diameter, fairly thin – about thickness of dime. Do the same with the remaining two parts.
Prick the rolled dough firmly every quarter-inch or so with a fork to keep the papdi from puffing while frying. Using a sharp knife, cut the rolls into 1½-inch squares.
Heat the oil in about one inch of oil in a frying pan over medium heat. To test, drop a small piece of dough in the oil. The dough should sizzle but come up to the surface slowly. If the dough rises
immediately, let the oil cool slightly and try again.
Place just enough papdi to cover the oil in the frying pan in a single layer. Don’t crowd them.
Fry the papdi until both sides are a light golden brown.
Remove cooked papdi with a slotted or mesh spoon and transfer to a plate. Continue cooking the remaining papdi in batches.
After the papdi cool to room temperature they should be crisp.
Papdi can be stored in airtight container for 1 month.
Making the Garnish
Mash the chickpeas lightly and mix with hari (cilantro) chutney to your taste. Keep aside.
Put the yogurt into a bowl and whisk until smooth. Add a little milk as needed to consistency of pancake batter. Add salt to taste. Set aside
Arrange the papdi on a large plate.
Place a slice of potato on top of each papdi (does not need to be the exact size). Place ½ teaspoon of the chickpea mixture over each potatoa slice.
Drizzle yogurt over each papdi.
Sprinkle roasted cumin powder, and red chili to your taste.
Finish the papdi chat by drizzling with tamarind chutney.
Notes
To make round papdi, divide the dough in about 30 equal parts and roll them individually into 2½-inch rounds. Prick with a fork in four to five places.
Papdi Chaat, a popular street food delicacy, combines crispy papdi with a tantalizing mix of appetizers and chaat elements, creating a flavorful explosion that delights the taste buds. Papdi chat is a delightful Indian street foodsnack that tantalizes the taste buds with its crispy papdis, tangy chutneys, yogurt, and assorted toppings. This papdi chat recipe promises to deliver an explosion of flavors in every bite, making it a perfect choice for parties, gatherings, or simply as a savory indulgence.
How to Make Papdi Chat
To create this mouthwatering delicacy, start by preparing the papdis, the essential base of the dish. Combine all-purpose flour, semolina, carom seeds, and salt in a mixing bowl. Knead the ingredients into a firm dough, adding water gradually. Roll out the dough thinly and cut it into small rounds. Prick the rounds with a fork and deep fry until golden brown and crispy. Drain excess oil and set aside.
Next, prepare the tangy tamarind chutney by simmering tamarind pulp, dates, jaggery, and spices until thickened. Strain the mixture to remove any solids, resulting in a smooth, flavorful chutney. Similarly, whip up a refreshing mint chutney by blending mint leaves, coriander, green chilies, and yogurt into a smooth paste.
Now, assemble the papdi chat by arranging the crispy papdis on a serving plate. Drizzle generous amounts of both chutneys over the papdis, followed by spoonfuls of beaten yogurt. Sprinkle chaat masala, roasted cumin powder, and red chili powder for an extra kick of flavor. Top it off with tomatoes, and fresh coriander leaves.
Serve the papdi chat immediately, allowing everyone to enjoy the perfect blend of textures and tastes.
Tips for Making Papdi Chat
Crispy Papdis: Ensure the papdis are rolled out thinly and fried until crisp to achieve the perfect texture.
Chutney Consistency: Adjust the consistency of the chutneys by adding water gradually while cooking to achieve the desired thickness.
Topping Variation: Experiment with different toppings such as boiled potatoes, chickpeas, or sev to add more depth to the flavor profile.
Spice Level: Adjust the amount of green chilies and red chili powder according to your preference for spice.
Variations of Papdi Chat
Dahi Papdi Chat: For a creamier variation, substitute beaten yogurt with thick, creamy yogurt or hung curd.
Healthy Twist: Replace fried papdis with baked or air-fried versions for a healthier alternative.
Fusion Flavors: Experiment with fusion flavors by incorporating ingredients like avocado, salsa, or shredded cheese for a unique twist on the traditional recipe.
Benefits of Papdi Chat
Rich in Flavors: Papdi chat combines a variety of flavors, textures, and spices, making it a truly indulgent treat for the taste buds.
Nutrient-Rich Ingredients: Ingredients like yogurt, chickpeas, and fresh vegetables provide essential nutrients like protein, fiber, vitamins, and minerals.
Cultural Experience: Enjoying papdi chat offers a cultural experience, allowing you to savor the vibrant street food culture of India.
FAQs (Frequently Asked Questions)
Q: Can I prepare the papdis ahead of time?
A: Yes, you can prepare the papdis in advance and store them in an airtight container once cooled to maintain their crispiness.
Q: Can I make the chutneys ahead of time?
A: Absolutely, both tamarind and mint chutneys can be prepared in advance and stored in the refrigerator for several days.
Q: Can I make papdi chat without yogurt?
A: Yes, you can omit yogurt or use a dairy-free alternative like coconut yogurt for a vegan version of the dish.
Papdi chat is a versatile and beloved snack that never fails to impress with its burst of flavors and textures. Whether enjoyed as an appetizer, a snack, or a light meal, this recipe promises to be a crowd-pleaser at any gathering or occasion. So, gather your ingredients and embark on a culinary journey to recreate this iconic Indian street food delight in your own kitchen!